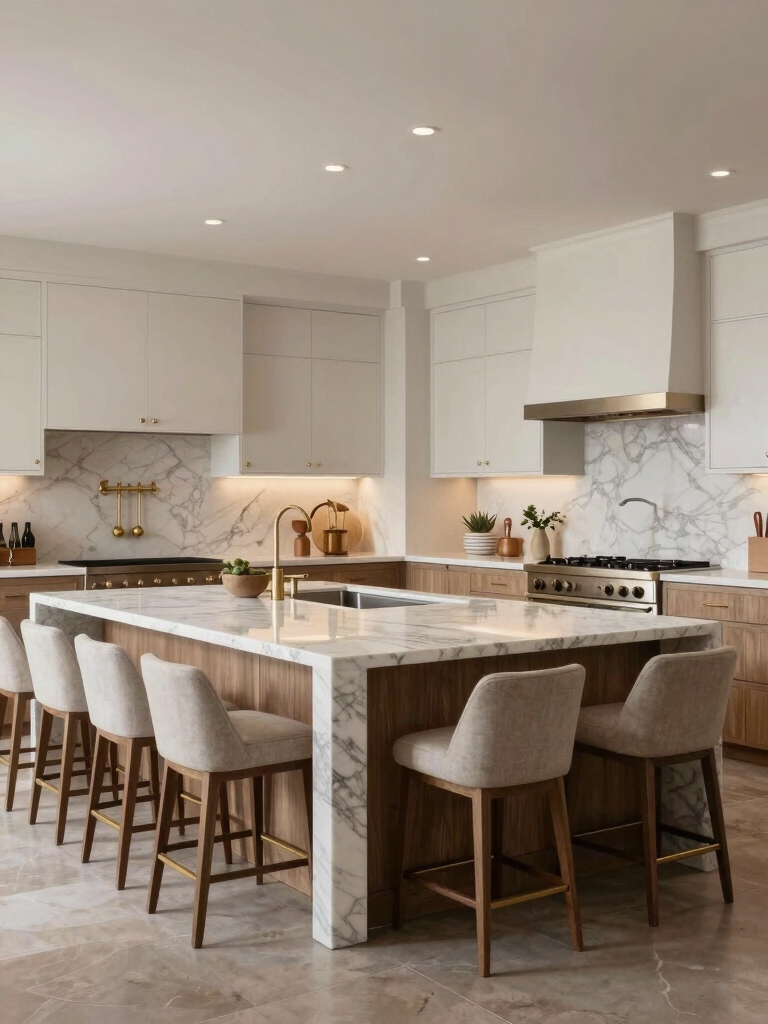
I size islands by measuring floor space, planning circulation, and aiming for an island about one-third to one-half of the main run so it feels balanced. I leave 36–48 in. clearances—wider for primary aisles and seating—so appliance doors and stools don’t clash.
I group prep, cleanup, and seating, pick durable surfaces, and anchor the island with focused lighting and storage. Follow these rules and you’ll get a functional, comfortable island; keep going and I’ll show practical layouts and details.
Determining the Right Island Size for Your Space

When I’m planning an island, I start by measuring the available floor space and picturing how people will move around it—this single step saves most sizing mistakes.
I consider seating needs, appliance placement, and prep zones, then balance proportions so the island feels intentional, not overwhelming.
I aim for clear sightlines, comfortable overhangs, and enough storage while respecting the room’s scale and function.
Good island design also prioritizes circulation, ensuring the kitchen flows naturally around the island with seamless kitchen islands that enhance movement.
Maintaining Proper Traffic Flow Around the Island

Once I’ve sized the island to fit the room, I make circulation my next priority: people should move freely around all sides without bumping into cabinets, appliances, or one another.
I allow clear walkways—typically 36–48 inches—consider traffic patterns between fridge, sink, and stove, and keep seating, appliance doors, and serving zones from obstructing flow so movement feels effortless and intentional.
I also check overall island proportions against common kitchen island dimensions to ensure the layout suits the standard room size.
Choosing an Optimal Island Proportion and Scale

When I plan an island, I aim for a proportion that feels balanced with the overall kitchen footprint—typically about one-third to one-half of the main counter run so it doesn’t overpower the space.
I also check work triangle clearance carefully, keeping at least 42–48 inches between the island and cooking/prep zones so movement stays smooth.
Together, those two rules help the island feel both intentional and highly functional.
Unexpected small kitchen islands can become focal points when they include surprising features like integrated seating or concealed storage, a trend that inspires many unexpected small kitchen island inspirations in compact spaces.
Island-To-Kitchen Ratio
Although a beautiful island can anchor a kitchen, I recommend you think of scale first: the island should feel like a natural extension of the room, not a separate piece of furniture.
I prefer proportions around one-third of open floor length or width, adjusted for traffic and seating. Keep balance with cabinetry lines and sightlines so the island complements rather than dominates the space.
Consider how the island size relates to the overall layout and traffic patterns to maintain proper flow and avoid creating crowded walkways.
Work Triangle Clearance
Because the work triangle governs how you move between sink, stove, and refrigerator, I pay close attention to clearance when sizing an island so it helps — not hinders — flow.
I aim for 36–48 inches around prep zones, wider for multiple cooks, and keep pathways direct. Proportion matters: a scaled island preserves circulation, workspace, and the kitchen’s practical rhythm.
I often refer to practical island templates that make choosing proportions and layout easier.
Planning Clearances for Safe and Comfortable Use

When I plan an island, I make sure the work triangle clearances are efficient so cooking flows without bumping into people or cabinets.
I also check walkway and aisle widths for comfortable movement and to accommodate multiple cooks.
Finally, I factor in appliance door swing so ovens, dishwashers, and refrigerators won’t block traffic or counters.
I always try to avoid common mistakes by following the practical rules top architects recommend.
Work Triangle Clearances
If I want an island kitchen that’s comfortable and safe, I plan the work triangle clearances carefully so people can move, cook, and open appliances without bumping into each other.
I balance distances between sink, stove, and fridge for efficient flow, allow clear landing spaces, and adjust for multiple cooks.
Thoughtful clearances make the island functional, inviting, and calm.
I also consider small kitchen island designs that maximize space by choosing compact layouts and storage-forward islands with space-saving storage to keep traffic areas clear.
Walkway and Aisle Widths
Having set work triangle clearances, I now focus on walkway and aisle widths so people can move comfortably and safely around the island.
I recommend 42–48 inches for primary aisles where two people pass, 36–42 inches for single‑person zones, and at least 48 inches near seating or multiple prep areas.
Clear, consistent widths prevent congestion and make the kitchen feel balanced.
Appliance Door Swing
I’ll walk you through planning appliance door swing so openings don’t collide with people, islands, or adjacent cabinets.
I check clearances: leave 30–48 inches for oven, 24–36 for dishwasher, and full swing room for fridge doors.
I position appliances to avoid crossing paths, use swing diagrams, and prefer pocket or sliding doors when space’s tight to keep traffic smooth and safe.
Integrating Work Zones and Task Areas on the Island

Let’s map the island around how you actually work: I prioritize arranging distinct work zones—prep, cooking, cleanup, and casual seating—so each task flows smoothly without crossing paths.
I place sinks near waste and dishwasher access, allocate clear prep surfaces by the stove, and reserve a welcoming edge for casual seating. Thoughtful lighting and storage keep each area functional and uncluttered.
Selecting Durable, Functional Surface Materials
When I’m choosing island surfaces, I focus first on how each material performs under real use—resistance to scratches, water, heat, and everyday wear matters more than trendiness.
I favor quartz for low maintenance, honed stone for soft patina, and butcher block where warmth is wanted.
Pick finishes and edge details that hide wear, and prioritize longevity and easy upkeep over flashy looks.
Incorporating Efficient Under-Island Storage Solutions
I start by treating the island as prime real estate—what sits underneath should work as hard as the top does.
I prioritize deep drawers for pots, pull-out shelves for small appliances, and dedicated bins for recyclables.
Slim trays hold baking sheets; adjustable dividers corral linens.
Thoughtful lighting and soft-close hardware make daily use effortless, keeping the island organized and genuinely useful.
Designing Comfortable and Functional Seating
I’ll start by thinking about ideal seat height so everyone can sit and stand comfortably without knocking knees on the island or the counters.
I’ll also consider clear circulation space behind chairs — you need enough room to pass or pull out stools without feeling cramped.
Together those two choices make the island both inviting and truly usable.
Optimal Seat Height
Usually I start by asking how you plan to use your island — will you eat there every day, work from it, or entertain friends — because that determines the ideal seat height.
I recommend counter stools for 36″ counters (24–26″ seat), bar stools for 42″ islands (30″ seat), and adjustable options if users vary.
Keep legroom and a modest overhang.
Clear Circulation Space
When you’re planning island seating, I focus first on clear circulation space so people can move, pull stools, and chat without bumping into each other.
I allow at least 42–48 inches behind seating for busy kitchens, 36 inches for quieter zones, and leave visual sightlines for hosts.
That spacing keeps traffic flowing, maintains comfort, and encourages lingering without congestion.
Adding Appliances and Sinks to the Island Strategically
Think about what you use most and place appliances and sinks on the island to support that workflow—I often recommend prioritizing prep and cleanup so the sink, dishwasher, and trash are grouped but not cramped.
I balance ergonomics and sightlines, keep plumbing runs efficient, and leave clear prep space.
- Sink near dishwasher
- Trash pull-out adjacent
- Prep zone between appliances
- Maintain seating clearance
Coordinating Lighting for Task and Ambient Needs
After placing sinks and appliances where they support your prep and cleanup, lighting becomes the next thing I plan around—good light makes those zones work better and feel welcoming.
I balance focused task lights—pendants or adjustable recessed—over work surfaces with softer ambient fixtures to set mood.
Dimmers are essential; layered light keeps cooking efficient and the island inviting for meals or conversation.
Using Electrical and Plumbing Planning Early
With the layout locked in, I start plumbing and electrical planning early so the island performs exactly how we want it—supporting prep, cleanup, seating, and any appliances without costly mid-project changes.
I coordinate trades, circuits, and drain routing to keep options open and budgets steady.
- Map outlets and appliance power
- Plan sink and dishwasher drainage
- Reserve circuits for future needs
- Verify code and clearances
Defining Visual Style and Material Transitions
I’ll start by choosing a cohesive material palette so the island reads as part of the whole kitchen rather than an afterthought.
I’ll plan seamless shifts lines—matching edges, consistent grout lines, and careful joint detailing—to keep sightlines calm and uninterrupted.
Then I’ll anchor the space with a focal element, like a contrasting countertop or pendant trio, to give the island purpose and visual balance.
Cohesive Material Palette
A cohesive material palette makes an island feel intentional instead of patched together, and I’ll show you how to define a clear visual style while smoothing shifts between surfaces.
I pick three dominant materials, limit finishes, and use a unifying accent. Here’s my checklist:
- Primary surface: countertop or wood
- Secondary: cabinet or tile
- Accent: metal or stone
- Repeat proportions
Seamless Transition Lines
Now that we’ve settled on a cohesive material palette, let’s make the joins sing. I focus on clean junction lines—continuous grain, aligned edges, and subtle reveals—to guide the eye across island surfaces.
I choose matching seams, concealed fasteners, and gentle miters so materials flow without interruption. The result feels intentional, calm, and effortlessly refined, giving the island a polished, unified presence.
Anchoring Focal Elements
Let’s set a clear visual anchor so the island reads like a deliberate centerpiece rather than a collection of parts.
I choose a dominant material or color, then translate it through accents and joints to guide the eye. Balance contrast and continuity, and let shifts feel intentional.
- Anchor material choice
- Accent repetition
- Shift details
- Scale coordination
Accommodating Accessibility and Universal Design
Because everyone deserves a kitchen that feels effortless to use, I focus on island layouts that blend accessibility and universal design without sacrificing style.
I prioritize reachable counters, knee-clearance seating, adjustable-height surfaces, and slip-resistant flooring. Thoughtful storage, clear circulation paths, and lever handles make daily tasks simpler.
My goal is an inviting island that adapts to varied abilities while remaining elegant and uncluttered.
Balancing Open Sightlines and Zoned Privacy
Having made the island accessible for everyone, I also think about how it sits in the room visually and functionally — you want open sightlines that keep the space feeling airy, but you also need pockets of privacy for cooking, entertaining, or a quick phone call.
I balance flow and retreat with simple strategies:
- Low-profile island with raised partial screen
- Strategic pendant placement
- Built-in storage as visual buffer
- Flexible seating to define zones
Future-Proofing the Island for Evolving Needs
As families change and tech keeps advancing, I design islands so they’ll adapt without a full remodel:
I choose modular components, accessible power and data routing, and finishes that stand up to different uses so the island can shift from homework hub to meal prep station to impromptu workstation as your needs evolve.
I prioritize flexible storage, plug-and-play appliances, and durable surfaces that age gracefully.
You’ve got the basics to design an island that’s both beautiful and practical — size, flow, clearances, work zones, materials, accessibility, sightlines and future needs.
I’ll bet you’re already picturing how one change could transform your kitchen; what will yours do? Trust your needs first, then let proportion and purpose guide details.
Keep it flexible, comfortable and visually connected to the room, and you’ll end up with an island that truly serves your life.