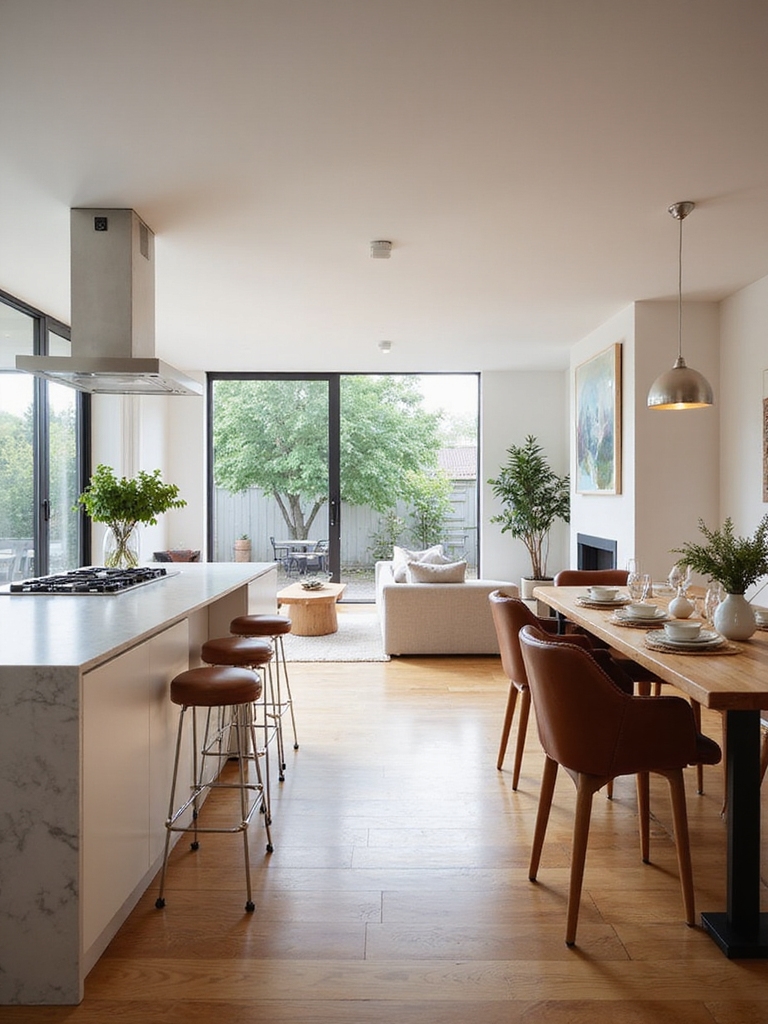
I’ve designed open kitchen bars to keep conversation flowing and drinks within reach, so you can host without fuss. I prefer an island for shared prep, a peninsula for cozy separation, or a wall bar for compact homes.
I match counter heights to stools, choose durable quartz or butcher block, and plan clear traffic paths so guests mingle safely. I use warm woods, matte metals, and layered lighting to set the mood — keep going and I’ll share layouts, measurements, and tricks.
How to Use This Guide: A 5-Step Planning Checklist

Before we plunge into layouts and materials, I want to give you a clear, five-step checklist that’ll keep the whole project honest and simple.
I’ll walk you through measuring your space, setting a realistic budget, listing must-haves, choosing durable finishes, and scheduling trades.
I’ll keep it practical and cozy so your open kitchen bar becomes welcoming without surprises.
For the best results, aim for a seamless flow between your kitchen and dining spaces so conversation and movement stay effortless.
Decide Your Goal: Hangout, Dining Bar, or Drink Station

Before you sketch anything, I ask myself what I want the bar to do—be a cozy hangout, a proper dining spot, or a slick drink station—and that choice shapes every decision.
Your layout should honor that purpose, from how much counter space you need to where stools or chairs fit comfortably. Think about seating and function first, and the rest will fall into place.
Open island kitchens also show how an island can turn cooking into social time, so plan flow and sightlines for easy interaction with guests and family island kitchen configurations.
Purpose Driven Layouts
If you’re planning an open kitchen, start by choosing what you want it to do for you: a casual hangout where friends linger, a dining bar for quick meals, or a focused drink station for cocktails.
I map traffic flow, prep zones, and sightlines to that purpose, placing storage and surfaces where they’ll actually be used, keeping the space honest, warm, and effortless.
Open kitchen islands often become central gathering points, so I design them to support multiple functions and enhance social interaction.
Seating And Function
Now that the layout serves your chosen purpose, I pick the seating style to match: I’ll treat a hangout like a living room extension with low stools and plenty of elbow room; a dining bar gets comfortable, back‑support chairs set for meals; a drink station uses taller, narrower seating and room to mingle.
I often choose warm wood, durable cushions, and flexible arrangements so guests relax and flow easily.
Casual bar seating often blends comfort and style to create a social kitchen vibe that invites lingering.
Choose the Right Open Kitchen Bar Layout: Peninsula, Island, or Wall

I like to think of an open kitchen bar as the heart of a home, and choosing between a peninsula, an island, or a wall layout means deciding how people will move, gather, and cook in that space.
I favor islands for flow and shared prep, peninsulas for cozy separation without isolation, and wall bars for compact homes that still invite conversation and rustic charm.
Islands often become focal points that encourage interaction and can be arranged to improve sightlines in an open plan kitchen living room.
Set Counter Heights and Seating Depth for Comfort

When planning an open kitchen bar, I think about how counter height and seating depth shape comfort as much as style; they determine whether guests perch awkwardly or settle in for hours.
I aim for 36” for standard counters, 42″ for bar height, and 12–15″ knee clearance. Match stool seat height to counter, allow elbow room, and favor cozy, slightly deeper seats for lingering conversations.
Boost Workflow in a Peninsula Kitchen Layout improves traffic flow and workstation efficiency by optimizing placement and reach for cooks and guests, emphasizing work triangle considerations.
Pick Durable Countertop Materials for Spills and Wear

Since we’ve settled on comfortable heights and seating, I’ll turn my attention to what actually takes the wear and tear: the countertop—where spills, cutting, and casual elbows meet the surface every day.
I prefer practical, warm choices that age well and hide life’s little marks.
- Soapstone: patinas beautifully
- Quartz: low-maintenance
- Butcher block: easy to sand
- Concrete: rugged, sealed finish
Durable backsplashes can further protect these surfaces and add long-term value to your home.
Choose Bar Seating Styles for Function and Flow
When I’m picking stools or chairs for an open kitchen bar, I first make sure the seat height matches the counter so elbows sit comfortably.
I favor cushioned, supportive seats that invite lingering without crowding the space.
And I leave clear walkways so people can move around the bar without bumping knees or backs.
Smart island layouts can include multifunctional storage to maximize utility in compact cooking spaces.
Match Height To Counter
Because a bar that’s the wrong height turns quick meals into awkward perchings, I always start by measuring the counter before choosing stools—matching seat height to counter keeps traffic flowing and guests comfortable.
- Measure counter height, subtract 10–12″ for stool seat.
- Note overhang for knees and ankles.
- Allow 24–30″ per person for spacing.
- Test with a temporary stool to confirm sightlines and ease.
Prioritize Comfortable Seating
A good bar seat invites you to linger, so I pick styles that balance comfort with the room’s flow—think supportive backs for long chats, swivel seats for easy turns, and slim profiles when traffic’s tight.
I choose warm woods, cushioned seats, and textured leather that age beautifully.
That rustic, cozy feel makes guests stay, converse, and return without fuss.
Maintain Clear Traffic Paths
Comfortable seating draws people in, but I also think about how folks move around the bar — nobody wants to squeeze past stools or awkwardly pivot in a narrow aisle.
I pick seating that keeps paths clear, balances cozy with circulation, and respects work zones. Simple rules guide me:
- Leave 36–42 inches behind stools
- Use swivel or armless stools
- Stagger seating for flow
- Keep walkways unobstructed
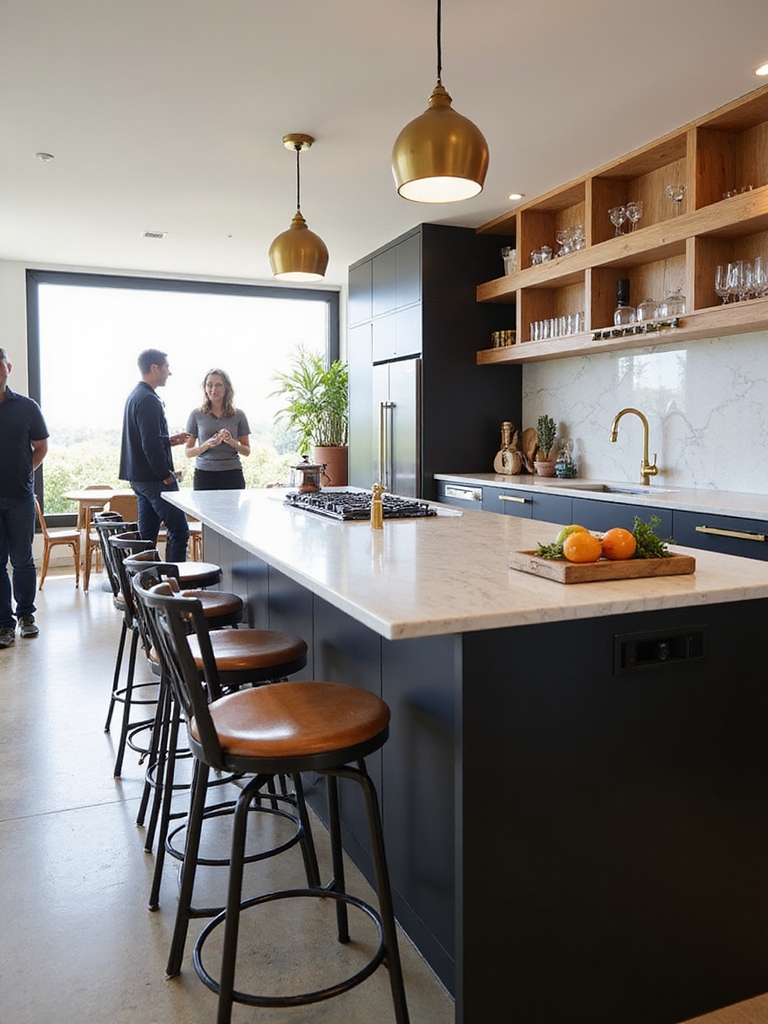
Plan Storage, Service Zones, and Glassware Access
When I plan storage, service zones, and glassware access, I picture how I move during a busy night and design the layout to match my flow; drawers for linens sit near the dishpit, stemware hangs above the polish station, and bottled inventory lines the back wall so I can grab what I need without crossing paths.
I keep open shelving for everyday tumblers, labeled bins for garnishes, and a dedicated tray staging area.
Add Appliances and a Mini Bar Without Crowding Prep Areas
Now that the flow for storage and service is set, I plan appliances and a mini bar so they boost efficiency without crowding prep zones.
I tuck a compact fridge and undercounter wine cooler into a corner, keep countertop appliances grouped, and reserve clear prep space.
Small touches make it cozy and usable:
- Slim fridge near service area
- Drawer microwave hidden
- Built-in ice bin
- Pull-out tray for bottles
Plan Lighting for Mood and Task Work
Because lighting sets both the mood and the workability of a kitchen, I plan layers that do double duty: soft, dimmable fixtures to warm the room and focused task lights where I prep and cook.
I mix pendant warmth over the bar with under-cabinet strips for chopping, and add a few spot fixtures to highlight a rustic shelf—practical, cozy, and ready for guests.
Finishes and Color Palettes for a Cohesive Look
Lighting sets the mood, but finishes and color will pull the whole room together, so I choose materials that work with the light I’ve planned.
I favor warm woods, matte metals, and muted paints so the bar feels lived-in and welcoming. I balance contrast with cohesion and add texture for depth.
- Reclaimed wood countertops
- Soft matte cabinet tones
- Aged brass accents
- Natural stone backsplashes
Design Traffic Flow and Sightlines for Gatherings
When I’m planning an open kitchen bar, I think about how people move and what they’ll see before I choose finishes or furniture; clear sightlines and smooth traffic flow keep conversations alive and prevent accidental collisions.
I arrange seating to face the action, leave generous walkways, and anchor zones with rugs or lighting. Guests can mingle naturally, bartend easily, and enjoy cozy, unblocked views.
Make Your Open Kitchen Bar Kid- and Pet-Friendly
I’ve learned that a welcoming open kitchen bar should feel safe as well as cozy, so I favor sturdy rounded corners that keep rambunctious toddlers and curious pups from getting hurt.
I also make sure cabinets and drawers have secure childproof latches to keep little hands and noses away from sharp tools and tasty temptations.
Tell me which areas of your bar worry you most and I’ll suggest simple, practical fixes.
Sturdy Rounded Corners
I always pick rounded corners for my open kitchen bar because they soften the space and cut down on bumps for kids and pets.
They feel gentler, age well, and suit a rustic, lived-in vibe. Here’s what I focus on:
- Thick, rounded bullnose edges
- Durable hardwood or stone finishes
- Smooth, sealed surfaces
- Gentle overhangs for stools
Secure Childproof Latches
Because kids and curious pets are always testing boundaries, I make secure childproof latches a non-negotiable part of my open kitchen bar—keeping breakables and cleaners out of reach while preserving the room’s warm, rustic feel.
I choose discreet, sturdy latches that blend with wood, install them on lower cabinets and drawers, and test them regularly so curious hands meet gentle, reliable resistance.
Budgeting: Where to Splurge and Where to Save
If you’re planning an open kitchen bar, I want you to think of the budget like a recipe—some ingredients deserve a little splurge, others you can swap without losing flavor.
I focus spending on durable countertop and good lighting; I save on paint, open shelving, and inexpensive hardware.
- Countertop quality
- Ambient and task lighting
- Paint and finishes
- Open shelving and hardware
Small-Space Solutions: Multifunctional and Foldaway Bars
Don’t let a tight footprint keep you from enjoying a proper bar—I’ve learned to think vertically and flexibly, squeezing big utility into small spaces with foldaway surfaces and multiuse pieces.
I love a reclaimed wood wall-mounted shelf that doubles as prep space, a slim cabinet hiding glassware, and stools that tuck completely away. These tricks keep gatherings cozy without clutter.
Styling and Staging Tips to Keep Your Bar Party-Ready
I keep a simple routine of wiping surfaces, stashing empty glasses, and returning tools to their spots so the bar’s always ready when guests arrive.
I swap a few seasonal accents—fresh herbs in spring, warm-toned linens in autumn—to keep the look fresh without clutter.
Those two small habits let me host on short notice and still feel proud of my space.
Quick Cleanup Habits
I usually keep a small kit under the counter so I can blitz the bar between pours and keep things looking welcome; grab a microfiber cloth, a spray bottle of diluted vinegar, a small tray for used garnishes, and a bin for recyclables and the mess disappears in minutes.
- Wipe spills immediately
- Empty tray frequently
- Rinse glassware fast
- Tidy tools after each round
Rotating Seasonal Decor
Keeping the cleanup kit handy makes it easy to swap looks as the seasons change, so I like to plan small, rotating decor updates that feel fresh without overhauling the whole bar.
I swap linens, seasonal glassware, a simple greenery bundle or dried stems, and a signature seasonal cocktail sign.
Guests notice the subtle shifts; it keeps the space cozy, welcoming, and always ready.
I hope this guide sparks ideas and makes planning your open kitchen bar feel easy and fun.
Think of your bar as the heart of casual gatherings—where drinks flow, laughter bubbles, and memories are made.
Tending to layout, materials, comfort, and safety will keep things cozy and practical.
So grab a sketchpad, measure once, and trust your instincts; with a little care, your bar will welcome friends like an old friend greeting you at the door.