I redesigned tight parallel kitchens to nearly double usable counters by adding a slim pull-out island, fold-down leaves and slide-out work surfaces that tuck away when not in use. I pair vertical storage, magnetic rails and appliance garages to clear clutter and keep essentials at arm’s reach.
I also recommend compact built-ins, bright finishes and layered task lighting so the space feels larger and works harder. Keep going and I’ll show layouts, sizes and installation tips.
Assessing Your Parallel Kitchen Layout and Work Triangle

When I assess a small parallel kitchen, I start by mapping the work triangle—sink, stove, fridge—and measuring the clearances between the two runs; this quick check tells me whether traffic will flow or bottleneck.
I note appliance reach, prep zones, and walkways, then suggest shifting tasks or storage to balance sides.
Simple repositioning often frees counter space and smooths daily routines. I also consider proven narrow galley layout strategies to maximize function and storage.
Installing a Slim Pull-Out Island for Extra Prep Space

I like to recommend a slim pull-out island when you need extra prep space without crowding a parallel kitchen.
Measure carefully so the dimensions stay functional for two work aisles, and pick hardware that locks solidly in place for stability.
I’ll walk you through sizing options and installation tips to keep the island secure and easy to use.
Peninsulas can offer many of the benefits of islands in tight layouts, including added counter space and seating, making them a great choice for small kitchens with limited floor area and efficient use of space.
Space-Saving Dimensions
Because every inch counts in a parallel kitchen, I often suggest a slim pull-out island to add prep space without crowding the flow.
I pick proportions that clear minimum walkways and match cabinetry lines.
Consider these dimensions:
- Width: 8–12 inches for cutting board pull-outs.
- Depth: 18–24 inches to hold prep tasks.
- Height: match counter (36 inches).
- Clearance: 36 inches each side for comfortable movement.
Slim islands are one of several smart kitchen island options that can fit compact spaces and boost functionality with minimal footprint, especially when designed to align with existing cabinetry lines and traffic flow; see space-saving dimensions for planning guidance.
Installation and Stability
Having settled on the slim pull-out’s dimensions, I’ll walk you through installing it so it feels rock-solid and effortless to use.
I level the base, anchor rails into studs, shim where needed, and test slide motion repeatedly. Add soft-close hardware and a locking catch for safety. Finish with a sealed top to resist spills.
The result: compact, sturdy extra prep that disappears when not in use. Small counter solutions often rely on space-saving counters to make the most of tight layouts.
Folding and Drop-Leaf Countertops That Save Space

You’ll see how a simple hinge can transform a tight kitchen: I often recommend folding or drop-leaf countertops to clients who need surface area only sometimes.
They tuck away cleanly, feel sturdy when supported, and match existing finishes.
Consider practical choices:
- Solid wood leaf with folding bracket
- Stainless hinge for wet zones
- Under-support leg that folds
- Edge profile that resists wear
Small islands can be designed to fit narrow layouts by using slim profiles and multifunctional storage with a compact footprint.
Wall-Mounted Folding Tables for Flexible Dining and Prep

If a folding countertop can reclaim workspace, a wall-mounted folding table can reclaim whole meals and gatherings in a tiny footprint.
I love how one simple hinge transforms a blank wall into breakfast seating or extra prep room. Choose sturdy brackets, a finish that matches your palette, and clever storage underneath.
It’s elegant, practical, and keeps traffic flowing in compact parallel kitchens.
Add a slim bench or stools to create space-smart seating and make the most of every inch.
Extending Counters With Slide-Out Work Surfaces

I like adding slide-out work surfaces to small parallel kitchens because they give you countertop space only when you need it.
A pull-out cutting board at counter height makes prep effortless, while an under-counter slide shelf tucks away appliances or extra workspace without crowding the room.
Let me show you how these simple mechanisms boost function and keep the layout feeling open.
Small kitchen islands can also serve as unexpected multipurpose pieces when designed to double counter space and incorporate clever storage.
Pull-Out Cutting Board
Slide a slim panel out from beneath the countertop and suddenly I’ve got extra workspace where I need it most.
I love how a pull-out cutting board feels intentional — close, stable, and tucked away when not in use. It keeps prep tidy and protects counters.
- Maximizes limited space
- Preserves countertop material
- Easy, ergonomic access
- Blends with cabinetry design
Under-Counter Slide Shelf
Pulling out a slim under-counter slide shelf instantly extends my prep area without claiming extra floor space, and it’s one of my favorite tricks for small parallel kitchens.
I tuck away seldom-used appliances, chop close to the stove, or stage ingredients on it.
It’s sleek, sturdy, and quick to install.
The result: functional surface that disappears when I need room.
Using Over-the-Sink Cutting Boards and Accessories
Perched over the sink, I’ve found that a slim over-the-sink cutting board instantly expands workspace and keeps prep mess contained.
I use collapsible colanders, fitted chopping boards, and accessory trays to turn the sink into a tidy prep zone that flows with design.
- Maximizes countertop continuity
- Controls scraps and washing
- Integrates with existing faucet height
- Feels intentional and elegant
Adding Narrow Rolling Carts to Create Temporary Countertops
I roll a narrow cart into place whenever I need a quick, sturdy stretch of countertop, and it instantly changes how the kitchen functions.
I pick a slim, mobile cart with a solid top, drawer for utensils, and open lower shelf for trays. It tucks away when not needed, gives me prep surface and landing zone, and complements parallel layouts without permanent changes.
Building Integrated Appliance Garages to Clear Counters
I love tucking everyday gadgets into a sleek appliance garage so countertops stay calm and uncluttered.
I’ll show how concealed storage pairs with pull-out power stations for easy use and charging, plus ventilated door designs that keep coffee makers and toasters safe and odor-free.
With a few thoughtful details you’ll get the convenience of quick access without sacrificing a streamlined look.
Concealed Appliance Storage
Think of appliance garages as the small, smart secret I use to keep counters looking calm without hiding functionality.
I tuck toasters, mixers, and coffee makers behind lift-up doors or roll-up tambour panels, keeping them accessible yet out of sight.
It’s about rhythm, material continuity, and effortless access.
- Concealment
- Accessibility
- Ventilation
- Cohesive design
Pull-Out Power Stations
After hiding bulky appliances in garages, I like to bring power right where you need it with pull-out power stations that tuck neatly into cabinetry.
I slide them out to plug a mixer or phone, then glide them back to clear counters. They keep cords contained, include USB and outlet options, and maintain a calm, uncluttered cooking surface without sacrificing convenience or style.
Ventilated Door Design
Often I tuck countertop appliances behind ventilated doors built into the cabinetry, and it’s surprising how much cleaner a small parallel kitchen feels when those gadgets have a dedicated, breathable home.
I love appliance garages that hide clutter, allow airflow, reduce noise, and keep surfaces clear.
- Ventilation prevents moisture.
- Pull-back doors save reach.
- Outlets inside eliminate cords.
- Matching finish reads calm.
Vertical Storage Solutions to Free Up Work Areas
Maximizing vertical storage transforms a cramped parallel kitchen into a room that breathes — I’ve found that stacking smartly and going up instead of out frees countertops and keeps essentials within reach.
I prioritize tall, slim cabinets, open shelving above prep zones, and pull-out pantry towers for spices and oils.
Elevated baskets and clear labeled containers keep clutter off counters and functionality high.
Magnetic and Rail Systems for Frequently Used Tools
I love using magnetic strips and rails to keep the tools I reach for every day right where I need them.
A magnetic knife bar, rail-mounted hooks for spatulas and ladles, and even magnetic spice jars on the backsplash save drawer space and make cooking more efficient.
Let me show you how to pick placements and styles that stay safe, tidy, and surprisingly stylish.
Magnetic Knife Storage
Think of a magnetic strip or rail as an extra pair of hands along your backsplash that keeps knives and tools visible, accessible, and off crowded countertops.
I use one to free counter space and stylize the wall. It’s safe, hygienic, and easy to rearrange.
- Cuts clutter
- Speeds prep
- Shows tools as decor
- Keeps blades aired and dry
Rail-Mounted Utensils
I often mount a slim rail along the backsplash to hang ladles, tongs, measuring cups and other tools I reach for every day, because it keeps them within arm’s reach without cluttering drawers or counters.
I mix stainless hooks with minimalist baskets for spoons and peelers, keeping sightlines clean while making prep faster—an elegant, practical tweak for tight parallel kitchens.
Magnetic Spice Jars
Often I stick magnetic spice jars to the side of my fridge or a slim steel strip above the prep zone so the herbs and blends I actually use are always in sight and effortless to grab.
They free counter space, add tidy visual interest, and make seasoning intuitive.
- Visibility
- Accessibility
- Modularity
- Aesthetic cohesion
Open Shelving and Floating Cabinets to Maximize Reach
When you’re working with a narrow galley, open shelving and floating cabinets let me stretch storage vertically without crowding the walkway.
I mix closed floating cabinets for dishes with open shelves for everyday items and decorative touches, keeping essentials easy to reach.
I choose slim, sturdy brackets and consistent materials so the arrangement feels intentional, airy, and efficient rather than cluttered.
Optimizing Drawer Organization to Reduce Surface Clutter
Taming drawers starts with a plan: I group items by use—cutlery, prep tools, spices, linens—and fit each category with the right divider or tray so everything has a home.
I keep surfaces clear by storing wisely and editing often.
- Slim utensil trays
- Adjustable dividers
- Vertical spice racks
- Folded linen bins
Compact, Built-In Appliances to Preserve Counter Real Estate
Because I want every inch of a small parallel kitchen to work for me, I choose compact, built-in appliances that tuck into cabinetry and free up counter real estate without sacrificing function.
I favor slim dishwashers, under-counter microwaves, and drawer-style refrigerators that stay hidden yet accessible.
Thoughtful placement keeps workflow smooth, surfaces clear, and the space feeling modern and uncluttered.
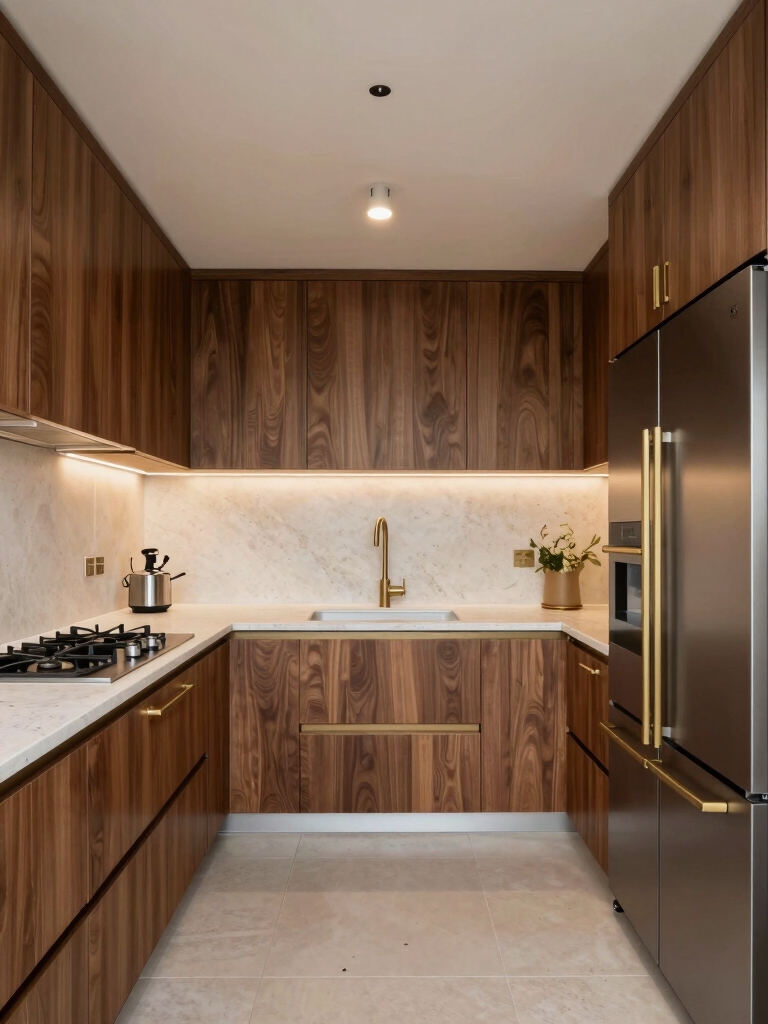
Light, Reflective Finishes and Lighting to Enhance Perception of Space
A palette of light, reflective finishes and carefully planned lighting can make a narrow parallel kitchen feel twice its width, so I lean toward glossy cabinetry, pale countertops, and mirrors or glass backsplashes that bounce light across the room.
I also layer task, ambient, and accent lighting to sculpt depth and highlight surfaces.
- Under-cabinet task lighting
- Recessed ambient lights
- Reflective backsplash
- Accent pendant glow
Multifunctional Seating and Counter Extensions for Dual Use
I often fold extra function into every inch of a narrow parallel kitchen, so I swear by seating and counter extensions that do double duty as prep space, casual dining, and storage.
I choose fold-down leaves, pull-out counters, and bench seating with lift-up storage to keep workflows smooth, entertain comfortably, and hide clutter without losing visual openness or style.