I design open-kitchen island plans that turn cooking into social time, with islands sized for clear 42–48 inch circulation and seating that keeps conversation flowing while you prep. I layer task lighting, durable surfaces, and hidden storage so the island works as prep zone, serving bar, and casual dining spot.
I tuck in a beverage station, appliance garage, and pet-friendly pullouts to keep clutter away. Keep going and I’ll show layouts, dimensions, and seating options tailored to your space.
The Social Benefits of an Open Kitchen Island

I often find that an open kitchen with an island turns cooking from a solitary task into a shared experience; I can chop vegetables while talking to friends at the counter, keep an eye on kids doing homework, or serve drinks without stepping away from the conversation.
It becomes a hub for casual gatherings, spontaneous help, and relaxed hosting—where conversation, prep, and comfort coexist naturally.
Island Kitchen Layouts That Changed How I See Cooking Spaces design principles provide practical ideas for arranging seating and work zones to enhance social flow.
Choosing the Right Island Size for Your Entertaining Needs

While that social hub feels effortless, its success often comes down to size: pick an island that’s too small and guests crowd your prep zone; make it too big and the room feels obstructed.
I balance function and flow by measuring traffic, seating, and work zones. Consider these quick checks:
- Allow 42–48 inches for clearances
- Fit seating without blocking cooks
- Keep workspace for staging and serving
I also tailor island layouts to room size by choosing designs suited to different square footage and circulation patterns.
Island Layouts That Encourage Conversation Flow

Think of the island as your conversation conductor: I arrange seating, appliance placement, and sightlines so people naturally cluster without cutting off the cook.
I orient prep zones toward guests, leave clear walkways, and use varied counter heights to define spaces.
Open sightlines to living areas, subtle angled edges, and intentional clearances invite movement and easy exchanges while keeping cooking efficient and social.
I also design islands so they integrate with overall room flow for seamless circulation, enhancing both function and gathering.
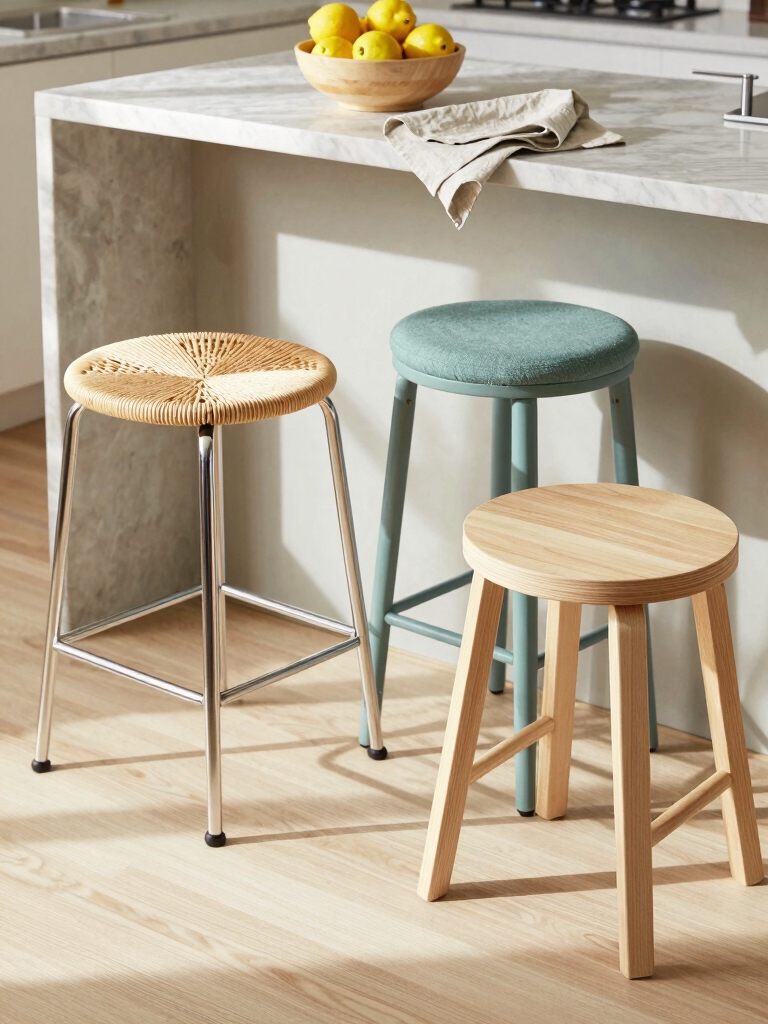
Seating Configurations: Bar Stools, Benches, and Banquettes

I’ll walk you through choosing the right bar stool height so your island feels comfortable rather than awkward, and we’ll compare the practical tradeoffs between a bench and a banquette for everyday use.
Think about clearance, cushion needs, and how each option shapes conversation and traffic flow.
Large Kitchen Island with Seating Built for Big Families can help you plan seating that accommodates everyone, including options that prioritize comfortable family seating for meals and gatherings.
Bar Stool Height Guide
How high should your stools be for the island to feel effortless and comfortable? I measure stool height from floor to seat: counter-height (24–26″), bar-height (29–32″), and extra-tall for raised bars.
Choose based on island overhang and user height. Consider footrests and swivel for comfort.
- Counter-height: casual, close to prep surface
- Bar-height: classic entertaining stance
- Footrest: essential ergonomics
Stylish kitchen islands can be designed to suit any home style, from modern to traditional, by varying materials, seating configurations, and finishes to match your space, including options like benches, banquettes, and individual stools with seating arrangements.
Bench vs. Banquette
While bar stools are the usual island go-to, I’ve found that choosing between a bench and a banquette can totally change how the space feels and functions: benches keep things casual and flexible, fitting varying group sizes and easy storage, while banquettes create a cozy, built-in nook that’s great for lingering breakfasts and maximizing seating in tight layouts.
I prefer benches for versatility, banquettes for intimate style.
Kitchen island table hybrids have become popular because they combine prep, dining, and socializing in one multifunctional piece, often serving as the centerpiece of an open-plan layout where a kitchen island table hybrid encourages gathering and conversation.
Integrating Appliances Into Your Island Design

If you want your island to be more than a prep surface, start by thinking about which appliances you actually use and where they’ll fit best; I’ll often sketch zones for cooking, cleanup, and storage to test flow before committing.
I prioritize sightlines, ventilation, and electrical needs so the island feels seamless and social.
- Place cooktop where guests can watch safely
- Tuck microwave for quick access
- Consider drawer refrigeration
I also plan the layout to maximize every inch with smart island layouts that balance seating, storage, and appliance placement.
Storage Solutions to Keep Entertaining Essentials Handy
I like to tuck entertaining essentials where I can reach them without cluttering the countertop, so I plan built-in beverage stations that keep glasses, ice, and mixers together.
Drawer tray organizers keep utensils and cocktail tools orderly, and hidden appliance garages let me stow blenders or electric kettles out of sight until I need them.
Together these solutions make hosting smoother and the island feel intentionally calm.
Built-in Beverage Stations
One smart built-in beverage station can transform how I entertain, keeping glasses, mixers, and tools within easy reach so the party flows without constant kitchen trips.
I design zones for prep, chilling, and display, blending form with function to stay organized and stylish.
- Integrated wine rack and glass hangers
- Under-counter fridge or ice drawer
- Pull-out prep surface and utensil tray
Drawer Tray Organizers
Drawer tray organizers make it effortless for me to grab the right tools when guests arrive, turning chaotic junk drawers into neat, purpose-built stations for entertaining.
I customize trays for utensils, napkins, cocktail picks, and bottle openers, grouping items by function and frequency.
Clear labels and adjustable compartments keep everything visible and ready, so setup is fast and cleanup even faster.
Hidden Appliance Garages
After organizing trays so every tool has a place, I like to tuck the bulkier gadgets behind a simple lift-up door or roll-up tambour—hidden appliance garages keep mixers, blenders, and toasters within arm’s reach without crowding the countertop.
I design them for easy access, ventilation, and cord management so entertaining stays smooth.
- Quick-access placement
- Ventilated storage
- Integrated outlets
Work Triangle Considerations With a Central Island
Although a central island can anchor the room, I pay close attention to how it affects the work triangle so cooking stays efficient and comfortable.
I position sink, stove, and fridge to maintain clear sightlines and 4–7 feet of walking between points.
Islands should complement, not block, traffic; include prep space and storage while preserving safe, intuitive flow for entertaining and daily use.
Materials and Finishes That Withstand Heavy Use
Choose materials that take a beating and still look good — I pick surfaces and finishes that stand up to daily wear, spills, and frequent use without demanding constant upkeep.
I favor durable choices that age gracefully and simplify maintenance. Here’s what I recommend:
- Quartz countertops for stain resistance and low upkeep
- Matte, wipeable cabinet finishes
- Porcelain tile or engineered wood flooring for heavy traffic
Lighting Strategies to Set the Mood and Enhance Function
I’m thinking about how layered ambient lighting can give the whole kitchen a soft, welcoming base while task lights over the island keep prep and cooking precise.
I’ll show how dimmable accent fixtures add drama for evenings and flexibility for everyday life.
Together, these layers let you set the mood and make the island truly functional.
Layered Ambient Lighting
Balancing light layers makes an open kitchen feel both welcoming and practical, and I’ll walk you through how to mix ambient, task, and accent lighting so each zone works on its own and together.
I favor dimmable, warm ambient sources that wash the room, then add subtle accents for texture and sightlines so entertaining flows without glare.
- Dimmable ceiling washes
- Cove or toe-kick glows
- Accent wall or shelf spots
Task Lighting Over Island
When I plan task lighting over an island, I focus on clarity and mood—making sure the fixtures deliver bright, shadow-free light for food prep while also dialing the warmth and intensity down for casual evenings.
I choose focused pendants or linear LEDs placed to avoid glare and shadow, balance color temperature for true food colors, and layer fixtures so function and atmosphere coexist seamlessly.
Dimmable Accent Fixtures
I often reach for dimmable accent fixtures to shift an open kitchen from bright workspace to inviting hangout without swapping bulbs or rearranging furniture.
I use layered lighting to highlight the island, art, and snack stations, dialing warmth and intensity for each moment.
Dimmers make changeover effortless, save energy, and refine ambiance for cooking, sipping, or lingering.
- Warm undercabinet wash
- Pendant backlight glow
- Toe-kick night mode
Multi-Functional Islands: Prep, Serve, and Gather
Think of the island as the hub where cooking, serving, and socializing meet — I design it to handle chopping, chatting, and quick meals without skipping a beat.
I layer zones: a prep sink and butcher block, a concealed trash and recycling pullout, a raised bar for casual dining, and flexible storage for trays and servingware.
It adapts from meal prep to mingling effortlessly.
Designing for Traffic Flow and Accessibility
Because kitchens are where people move as much as they cook, I plan islands and pathways to keep traffic smooth and accessible for everyone who uses the space.
I balance clear work triangles, generous walkways, and reachable storage so guests and family flow naturally without bottlenecks.
- 42–48 inch main aisles
- 36–42 inch single-sided lanes
- Barrier-free counters and reachable shelves
Incorporating a Beverage Station or Mini Bar
Smooth traffic flow makes it easy to add a compact beverage station or mini bar without creating a new bottleneck, so I place drink prep where people naturally pause—near seating areas, the island overhang, or a sidewall that won’t interrupt main aisles.
I include refrigeration, glassware storage, and a small sink or ice drawer, keeping utilities compact and workflows intuitive for effortless refills and conversation.
Styling Tips for a Welcoming Entertaining Space
When I style an open kitchen for entertaining, I aim for layered warmth that invites people to linger: a mix of textures, purposeful lighting, and curated surfaces that balance function with personality.
I create zones that flow, keep surfaces tidy, and add approachable accents that spark conversation.
- Soft textiles and natural wood
- Adjustable pendant and task lighting
- Artful trays and edible centerpieces
Kid- and Pet-Friendly Island Design Ideas
When I plan an island for a busy household, I choose durable, easy‑clean surfaces that stand up to spills and sticky fingers.
I also favor rounded edges and thoughtful heights so kids can move around safely and adults don’t bump hips.
And I like to tuck in hidden pet zones—built‑in feeding stations or a cozy nook—to keep pets comfortable without sacrificing style.
Durable, Easy-Clean Surfaces
Because kids and pets turn every surface into a stage, I focus on materials that stand up to spills, scratches, and daily chaos without looking industrial.
I choose finishes that clean quickly, hide wear, and feel warm under little hands and paws.
- Matte quartz for stain resistance and low maintenance
- Sealed hardwood for character and easy spot sanding
- Porcelain slabs for toughness and seamless cleaning
Rounded, Safe Edges
If I can change one thing in a family kitchen, it’s the edges: rounding countertops and island corners keeps bumps and bruises to a minimum while still looking intentional and modern.
I choose soft curves, eased bullnose profiles and trimmed overhangs so kids can wander safely.
A layered palette—matte stone, warm wood and subtle trim—keeps the look refined while prioritizing daily comfort and flow.
Hidden Pet Zones
I carve out discreet nooks into the island so pets feel included without taking over the kitchen: pull-out drawers for food and bowls, a low cubby for a dog bed, or a ventilated cabinet for an indoor cat litter tray.
I tuck storage, hide waste, and keep surfaces bite- and spill-resistant to maintain flow and style.
- Pull-out feeding station
- Ventilated litter cabinet
- Low cozy cubby
Budgeting and Phasing Your Island Renovation
Planning is where your island renovation starts to feel real, and I’ll walk you through how to budget and phase it so money and time don’t derail the project.
I break costs into essentials, upgrades, and contingencies, then phase work: structure and utilities first, surfaces next, finishes last.
You’ll get a timeline, cost checkpoints, and simple choices to keep surprises—and stress—down.
I remember hosting a dinner where everyone ended up leaning on the island, swapping stories like old friends around a campfire; that’s exactly what an open kitchen with a well-sized island does.
Studies show kitchens are now the top gathering spot in 70% of homes, so design choices—from seating to a mini bar—actually shape how people connect.
Keep it welcoming, practical, and a little playful, and your island will become the heart of your home.