

Open shelves are easier than you think. I start with a cohesive color palette, then group similar items to create calm, cohesive visuals. I mix glass, ceramic, and metal for texture, and keep a few bold anchors to draw the eye. Height and depth matter, so I place taller pieces together and leave breathing room. I rotate pieces seasonally and swap in budget-friendly upgrades to keep things fresh. Want more tips that keep the vibe intact? Stay with me.
How Open Shelves Tell Your Kitchen Story

Open shelves aren’t just storage—they’re storytelling. I love how they show your daily rituals: mugs, jars, and little treasured mismatches speak louder than labels.
I choose pieces thoughtfully, balance height, and let negative space breathe. You’ll notice texture and color pop as you cook, entertain, and tidy. Incorporating clutter-free kitchen practices can further enhance the aesthetic and functionality of your open shelves.
Your kitchen reveals personality without shouting—functional charm, honest, doable, and warmly you.
Pick a Cohesive Color Palette for Open Shelves
Color harmony starts with what you already love on display.
I pick a cohesive palette by choosing 2–3 core hues and letting neutrals balance them. I test Rust, cream, and sage in small accents, then expand if needed.
I keep textures varied but colors restrained, so shelves feel calm, unified, and easy to refresh with simple swaps. An effective way to achieve this is by crafting your story through the thoughtful arrangement of your open kitchen shelves.
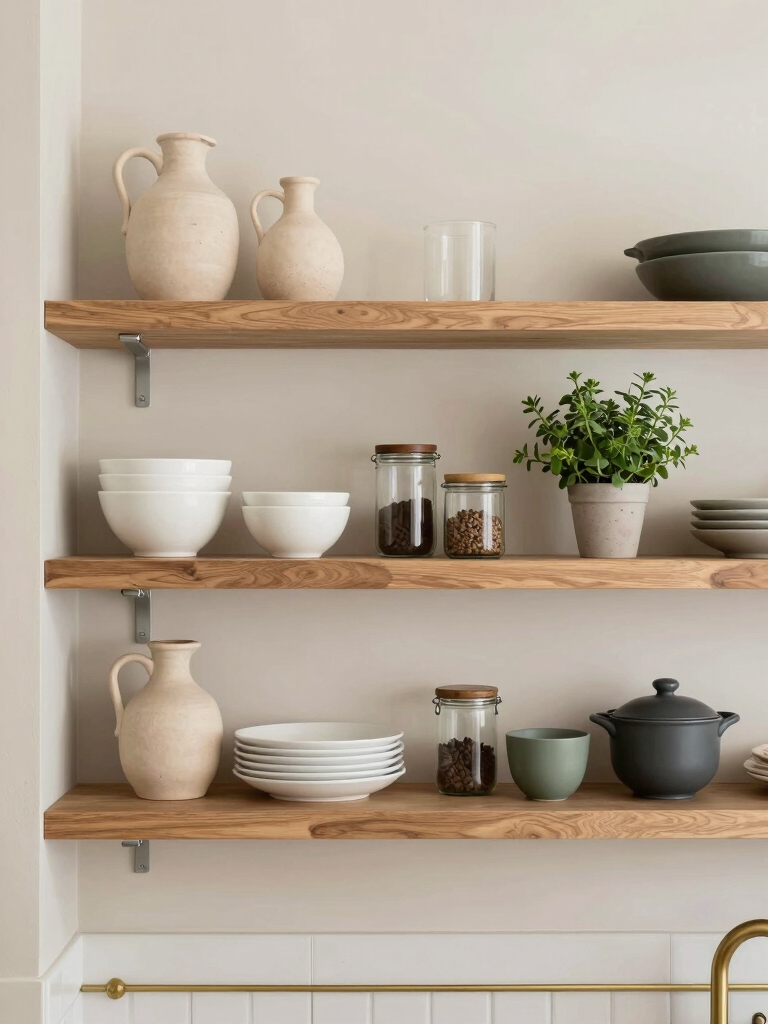
Group Like Items for Visual Calm
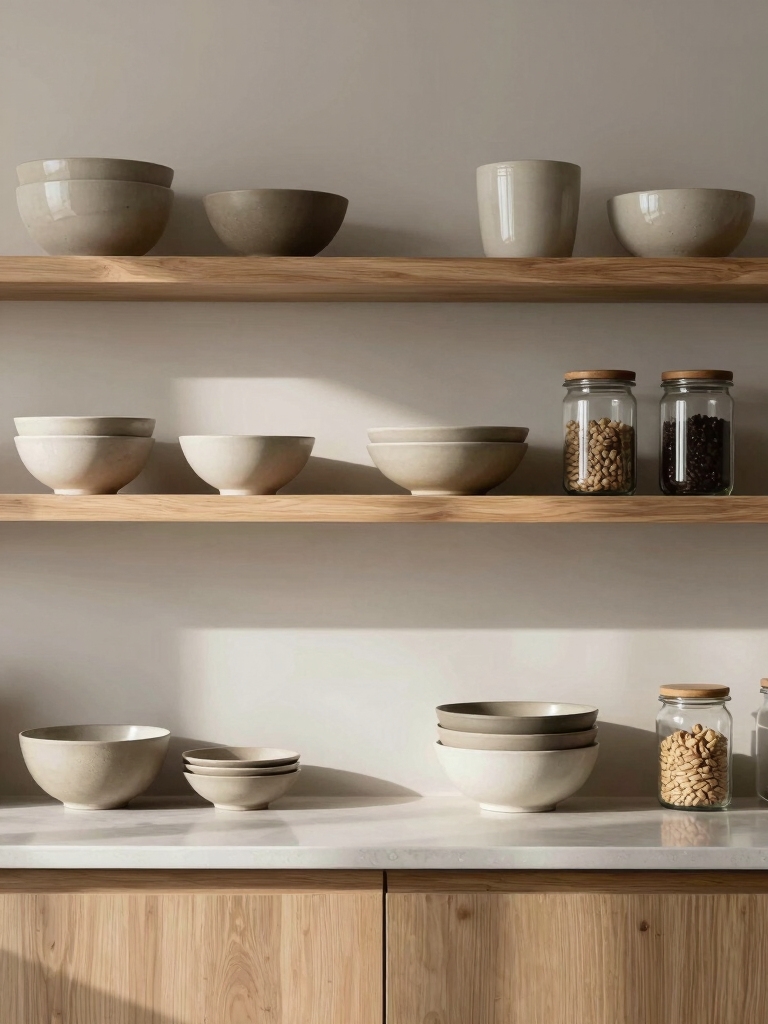
Grouping like items keeps shelves from feeling cluttered, so I start by clustering similar pieces together for a calm, cohesive look. I’ll use visual anchors—a few bold vases, a stack of matching bowls, or a row of labeled jars—to ground the display. Then I balance with thoughtful spacing, letting gaps breathe between groups to maintain clarity. Incorporating stylish open cupboard inspirations can further enhance the aesthetic of your kitchen shelves.
Group by Similar Items
Grouping like items together creates visual calm by clarifying how the space functions.
I group details by similarity, so shelves feel intentional, not cluttered. Consistency helps the eye glide, not search.
Here are examples to try:
- Similar mugs lined up by color
- Glassware grouped by height
- Plates stacked by size
- Cookbooks fanned by topic
Incorporating open shelf kitchen styling techniques can further enhance the overall aesthetic and functionality of your space.
Create Visual Anchors
When you create visual anchors, you group like items so the shelf feels calm and purposeful.
I keep a few familiar pieces together, rotating subtle accents to avoid clutter. Visual anchors guide the eye, so focal items stand out without shouting.
I test balance by stepping back, adjusting heights, and limiting color snippets for a cohesive, inviting display. Incorporating open shelves in your kitchen not only enhances aesthetics but also maximizes functionality, allowing for easy access to frequently used items.
Balance With Spacing
To keep the shelf calm and balanced, I group like items and give them some breathing room.
I mix heights, shapes, and textures, so each piece has space to breathe. This restraint prevents clutter and guides the eye.
- Uniform jars with varied heights
- A single framed photo among books
- Matte ceramics beside glossy metal
- Small plants tucked between bowls
Incorporating open shelving kitchen ideas can further enhance the aesthetic while maintaining functionality.
Mix Glass, Ceramic, and Metal for Texture

Mixing glass, ceramic, and metal adds instant texture to an open shelf setup.
I mix shapes, sizes, and finishes to keep the display dynamic without clutter. Choose clear glass for lightness, porcelain for polish, and brushed metal for contrast. Mastering the Art of Open Kitchen Shelf Styling can elevate your approach to arranging these materials.
Rotate pieces seasonally, group by color, and balance with negative space. Practical tips keep the look cohesive and approachable.
How to Size and Place Shelves: Height and Depth

We’ve set up a textured, inviting shelf display; now it’s time to size and place the shelves themselves.
I keep height practical and depth proportional, so items stay accessible and balanced.
Here’s how:
- Position the top shelf at eye level for easy reach
- Allow 12–15 cm between shelves for varied items
- Use deeper shelves for bowls, mugs, jars
- Align edges for a clean, cohesive line
- Incorporate open kitchen cabinets to create a stylish and functional space.
Give Space: Use White Space to Breathe
I’ve found that white space isn’t wasted space—it’s space that helps your shelves read clearly.
When I balance objects with breathing room, the kitchen feels calmer and easier to navigate.
Let’s chat about how gentle visual breathing can highlight the best pieces on open shelves.
White Space Strategy
White space isn’t wasted space—it’s design fuel. I guide you to breathe with your shelves: balance color, texture, and items, so each piece earns its place. Your eye travels calmly, not overwhelmed.
Here’s how:
- Let empty shelves echo calm, not emptiness
- Group similar tones for cohesion
- Place statement pieces with restraint
- Leave margins around busy mugs and jars
Gentle Visual Breathing
Gentle visual breathing means giving your shelves room to “breathe” so every piece can shine.
I approach each shelf like a tiny room: I mix vertical and horizontal space, leave margins, and resist crowding.
You’ll notice calmer shelves, easier maintenance, and faster restocking.
Keep it practical: rotate highlights, group by function, and let white space carry the eye.
Everyday Essentials as Style Anchors
Even on a tight schedule, everyday essentials can anchor your kitchen style.
I share simple, practical choices that feel intentional, not fussy, and stay on display without shouting.
You’ll feel calmer when items are chosen for function and texture, not clutter.
- matte mug trio for warmth
- wooden spoon set that ages beautifully
- glass canisters with labeled clarity
- stainless steel kettle for shine
Add Greenery and Natural Textures for Warmth
Adding greenery and natural textures is a simple way to warm up the kitchen without clutter.
I mix compact potted herbs with braided jute, hemp towels, and a wooden spoon rack. Real greens breathe life; textures add softness.
I avoid loud accents, preferring calm greens and subtle finishes that feel inviting, not busy, enhancing open shelves with quiet warmth.
Avoid Clutter: Curate, Don’t Crowd
Clutter can creep onto open shelves, but we can keep the look calm by curating what truly earns its spot.
I favor a few meaningful pieces, swapped seasonally, to keep rhythm and breathability. Let’s prune with purpose, then layer textures and color softly.
- One standout piece per shelf to anchor the eye
- Simple, functional vessels for everyday use
- A small plant or two for life
- Edgy, monochrome accents for contrast
Starter Open-Shelf Look: A Simple Swap Blueprint
I’m keeping this starter swap simple with a few key moves: focus on Simple Swap Essentials to clear space and swap in functional pieces, organize with a clean shelf arrangement, and lean on Budget-Friendly Prep to get a fresh look without overspending.
I’ll share practical, bite-sized tips as we go, so you can see how easy it’s to transform your open shelf with a quick, thoughtful lineup.
Let’s start by choosing a couple of core pieces, then build around them for a balanced, accessible display.
Simple Swap Essentials
When you’re aiming for a Starter Open-Shelf Look, simple swaps make a big impact without overhauling your space.
I suggest quick, budget-friendly moves that sharpen focus and feel intentional.
- swap in glass canisters for bulky containers
- rotate weekly with a single standout item
- group similar items for cleaner visual rhythm
- swap hardware on doors and drawers for cohesion
Shelf Arrangement Tips
Here’s a simple, practical approach to shelf arrangement that fits the Starter Open-Shelf Look: choose a clear focal item and build around it, keeping groups of similar items together and using varying heights to create visual rhythm.
I keep clutter low, rotate pieces seasonally, and leave breathing room so each item shines without competing for attention.
Practical, friendly guidance you can follow.
Budget-Friendly Prep
If you’re aiming to keep the Starter Open-Shelf Look affordable, start with a simple swap blueprint: replace pricey, bulky pieces with versatile, budget-friendly alternatives that still echo your style.
I’ll guide you to practical options that save money without sacrificing flair.
- Refinish thrifted wood for warmth
- Use open-wire baskets for storage
- Swap glassware for durable stoneware
- Opt for modular, expandable shelves
Minimalist Open Shelves: Black, White, and Quiet
Minimalist open shelves lean into quiet simplicity: black, white, and the space between.
I keep lines clean, items curated, and textures subtle. You don’t need crowding or clashing color; choose a few essentials, like glass jars and a ceramic mug, and let negative space breathe.
Clean daily, rotate thoughtfully, and enjoy a calm, usable display.
Warm Gathered Look: Earthy Tones and Cozy Objects
I lean into earthy tones and tactile textures to create a warm, welcoming kitchen.
I mix natural woods, unglazed ceramics, and soft linens to invite lingering moments. You’ll feel grounded, not fussy, as practical pieces do the heavy lifting.
- woven basket accents
- clay mugs and bowls
- linen towels in olive and sand
- amber bottles with dried herbs
Eclectic Collection: Show Your Personal Treasures
Your shelf should feel like you: a curated mix of mementos, finds, and favorites that tell your story.
I mix items that spark joy and memory, keeping scale in check so not to overwhelm.
Rotate a few pieces seasonally, or swap in a new keepsake.
Keep cords hidden, boundaries clear, and let each treasure speak with its own simple, honest voice.
Seasonal Refreshes Without Reworking the Core Display
Seasonal refreshes can happen without a full rework of the core display: I add a few seasonal accents, swap in a centerpiece piece, and let a small handful of objects take the spotlight for a month.
- A woven tray with warm tones
- A seasonal vase or botanical sprig
- Small, tactile bowls in coordinating hues
- A single statement utensil or tool for texture
Glassware as the Light-Bouncing Hero
Glassware isn’t just for drinking—it’s the light-bouncing hero of a kitchen shelf.
I pair clear, cut-glass pieces with soft, warm bulbs so reflections brighten counters without shouting. Varying heights and shapes adds rhythm, while keeping surfaces uncluttered.
Pick a few statement glasses and let them glow; the space feels bigger, calmer, and effortlessly organized. You’ll notice the glow, not the glass.
Functional Display: Storage That Looks Good
I’ve got simple tricks for keeping displayable storage both useful and pretty, so you can grab what you need without a mess.
Start with decluttering with style, then mix textures and heights to add interest while staying organized.
I’ll show you how to balance function with good looks using smart storage choices that invite you to cook and entertain.
Displayable Storage Tips
When it comes to displayable storage, the goal is to blend function with vibe, so your shelves feel organized rather than cluttered.
I share practical tips you can use now.
- Keep a few trusted items steady, like a mug group or spice jars
- Layer heights for visual interest with baskets and books
- Use open-clear containers for visibility
- Add a single decorative color pop to unify the look
Declutter With Style
Decluttering with style isn’t about sacrificing charm for function—it’s about making every shelf look intentional.
I switch on the essentials: a few favorite pieces, clean lines, and measured gaps.
I hide daily clutter behind doors or baskets, while keeping the curated items in view.
We keep color simple, and rotate pieces seasonally, so your shelves stay calm, not crowded.
Mix Textures And Heights
Mixing textures and varying heights adds instant depth to your open shelf display without sacrificing flow.
I show you how to mix materials, scales, and verticals so every piece earns its place. Start with a neutral base, add tactile accents, and stagger heights for rhythm.
- Matte ceramic contrasts with glass
- Woven baskets at different sizes
- Books spine out and horizontal stacks
- Flagship piece framed by greenery
Layering Heights: Tall Stacks and Short Stacks
Layering heights in a kitchen display isn’t about fluff; it’s about creating visual rhythm that’s also functional.
I love mixing tall stacks with short ones to guide the eye and keep essentials reachable. Place everyday items high, decorative pieces low, and group similar colors for cohesion.
Keep gaps intentional, so shelves feel curated, not crowded or chaotic.
Budget-Friendly Upgrades for a Polished Look
Polished doesn’t have to mean pricey. I’ll share budget-friendly upgrades that elevate open shelves without breaking the bank, so you feel confident and calm.
You’ll see tiny changes add up fast, from finishes to layout. Let’s keep it practical and doable.
- Swap hardware with brushed nickel or matte black for instant uplift
- Add a cohesive color group to reduce visual chaos
- Use uniform, shallow baskets for tidy texture
- Illuminate with a slim, under-shelf LED strip for glow
Maintenance Habits That Preserve the Vibe
Now that we’ve shaved off clutter and picked a cohesive look, keeping that vibe steady comes down to simple routines.
I keep a quick checklist: wipe spills immediately, dust weekly, rotate items so frequently used pieces stay accessible, and wipe shelves with a mild cleaner monthly.
I admire your space’s calm, so I reinforce it with consistent, casual upkeep.
You’ve got this.
Troubleshooting Common Open-Shelf Aesthetics
If your open shelves look off, I’ll share quick fixes that balance display and practicality.
We’ll cover display balance basics to keep items visually calm, plus nightfall lighting tips that add warmth without glare.
Let’s get practical about what to tweak first so your shelves feel intentional, not cluttered.
Display Balance Basics
When you’re organizing open shelves, balance is what sells the look—so you don’t end up with a crowded or uneven display.
I keep weight even, group similar items, and mix heights for rhythm. Here’s where your eye lands:
- Vary heights to guide the gaze
- Pair metals with wood tones
- Place a focal piece off-center
- Space items for breath and function
Nightfall Lighting Tips
Choosing lighting for open shelves can make or break the look, just like balance does.
Nightfall lighting tips feel practical: I suggest dimmable warm LEDs, low-profile fixtures, and angled accents to reduce glare.
Use a couple of spotlights for drama, plus ambient strips for softness.
Keep cords hidden, test scale with objects, and adjust until the glow feels inviting, not heavy.
Conclusion
Open shelves aren’t just storage; they’re a story you tell every day. Picture your kitchen glow—glassy reflections, warm ceramics, brushed metal catching morning light. When you group items by hue, mix textures, and place shelves at human heights, you’ll feel a calm, collected energy in the room. With a little mindful maintenance and budget-friendly upgrades, your open shelves will age gracefully, becoming a living vignette that welcomes guests and inspires everyday cooking. Your story starts with one shelf.


