I love open-plan layouts because they blend cooking and gathering into one friendly, flowing space. To copy 15 standout setups, I look for strong flow, clear zoning, and smart island versus peninsula choices that fit my space. I’ll test movement paths, add layered lighting, and use furniture to define zones without walls. I favor cohesive materials and practical storage that stay calm and welcoming. If you keep exploring, you’ll uncover tips that fit your home perfectly.
What Open-Plan Kitchen-Dining Sets Out to Do
Open-plan kitchen-dining sets aim to blend cooking and gathering into one fluid space.
I see them as a design choice that champions connection, function, and flow.
I explain how hubs stay versatile, adapt to meals or conversations, and keep sightlines clear.
You’ll feel invited to move, prep, and chat without barriers, making daily routines calmer, more intentional, and simply more practical. Additionally, this design approach fosters a sense of community, as it encourages harmonious interactions among family and friends while cooking and dining together.
Evaluate Flow and Traffic: A Quick Guide
Flow and traffic in open-plan kitchens can make or break how you use the space.
I’ll share a quick, practical check: mark main zones, guarantee at least 36 inches of clearance, and keep pathways clear of obstacles.
Test movement by walking routes during meal prep, plating, and conversations.
Adjust furniture placement until traffic feels natural, not forced. Additionally, consider the importance of open kitchen zoning to enhance the overall functionality of your space.
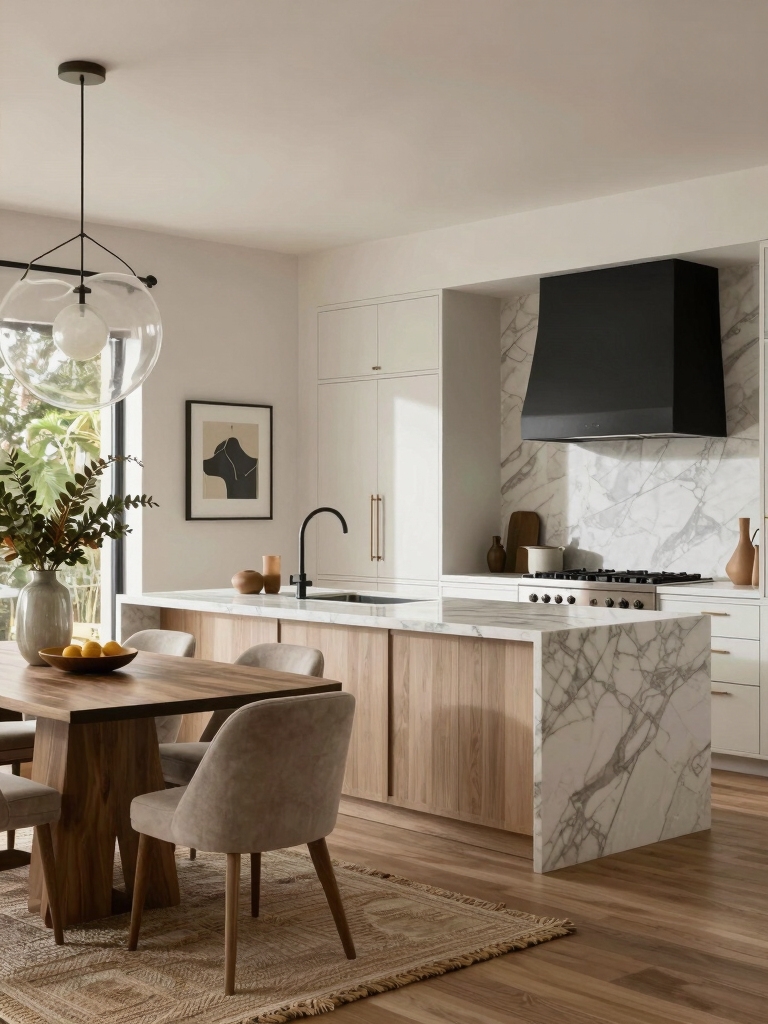
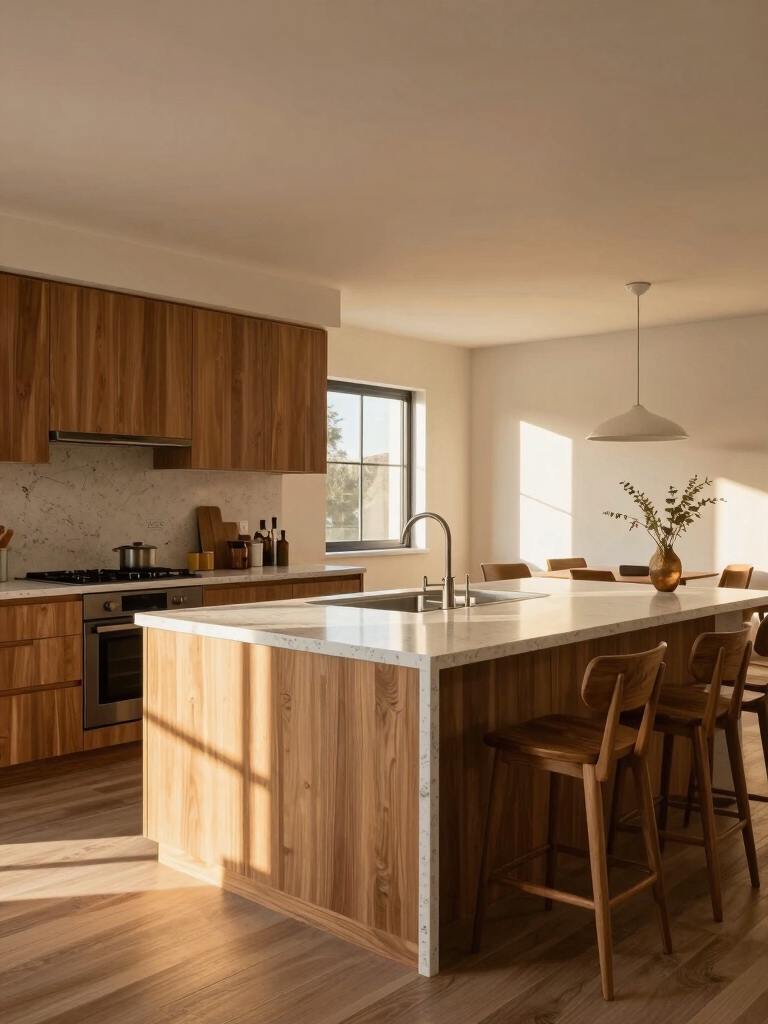
Central Island vs. Peninsula: Which Works for You

I’m weighing central islands against peninsulas, and I’ll share the solid pros of each so you can decide what fits your space.
A central island brings prep power and social hub vibes, while a peninsula can keep traffic open and add seating without reconfiguring walls.
Let’s compare these points head‑to‑head so you can choose what serves your cooking, dining, and flow. An open kitchen design can enhance social interaction and create a more inviting atmosphere for gatherings.
Central Island Pros
Central islands offer a practical focal point in an open kitchen, and they work best when you balance function with flow.
I choose a central island for daily tasks, quick meals, and socializing, keeping prep near chores and appliances.
It boosts storage, seating, and multitasking without crowding.
You gain efficiency, cohesion, and a welcoming hub for family and guests. Additionally, incorporating kitchen island setups can enhance both aesthetics and functionality in your space.
Peninsula Pros and Cons
Peninsulas offer a friendlier screen between cooking and conversation, giving you a defined edge without fully closing off the room.
I like how a peninsula blends prep space with social flow, yet keeps sightlines open.
Pros: integrated seating, easier movement, budget-friendly tweaks.
Cons: limited cabinet depth, potential crowding, occasional traffic jams.
Balance your space, needs, and daily rhythms. Additionally, a peninsula can effectively integrate a small kitchen island, maximizing small kitchen island ideas that enhance functionality and style.
Define Space Without Walls: Zoning With Furniture

I find that zoning with furniture helps create a clear flow, even in an open space. Visual boundaries—like varied rugs, seating groups, and differently scaled pieces—mark functional areas without walls. Let’s explore how these elements define zones while keeping the room cohesive and inviting. Additionally, incorporating diverse open kitchen designs can enhance the overall aesthetic and functionality of your space.
Zoned Flow With Furniture
Zoned flow with furniture defines spaces without walls by using strategically placed pieces to carve out distinct zones. I guide readers toward clean, practical layouts where furniture marks function, not borders, creating smooth passages between kitchen and dining.
- Use sofas as room dividers without blocking light.
- Choose low-profile pieces to keep sightlines open.
- Place islands to anchor traffic and zones.
- Favor color cohesion for visual unity.
Incorporating open island kitchen designs as a central feature can enhance both functionality and aesthetic appeal in these arrangements.
Visual Boundaries Create
Visual boundaries can define space without walls by using furniture to carve zones with purpose and rhythm.
I show you how a sofa, rug, or console can mark dining from prep areas, guiding flow without barriers.
Think scale, alignment, and repetition. You’ll create distinct zones that feel cohesive, accessible, and calm—inviting conversation while preserving open, practical kitchen-dining harmony.
Incorporating open plan kitchen diner ideas allows for a seamless integration of living and dining spaces, enhancing the overall ambiance of your home.
Functional Areas Defined
To define functional areas without walls, use furniture as the guide—a sofa cluster, a low credenza, or a dining bench can carve zones with purpose and rhythm.
I’ll share practical cues that keep traffic clear and spaces calm.
- Place a focal grouping first
- Align scales to flow
- Use color to differentiate zones
- Maintain sightlines and accessibility
Layered Lighting for Open-Plan Kitchens and Dining
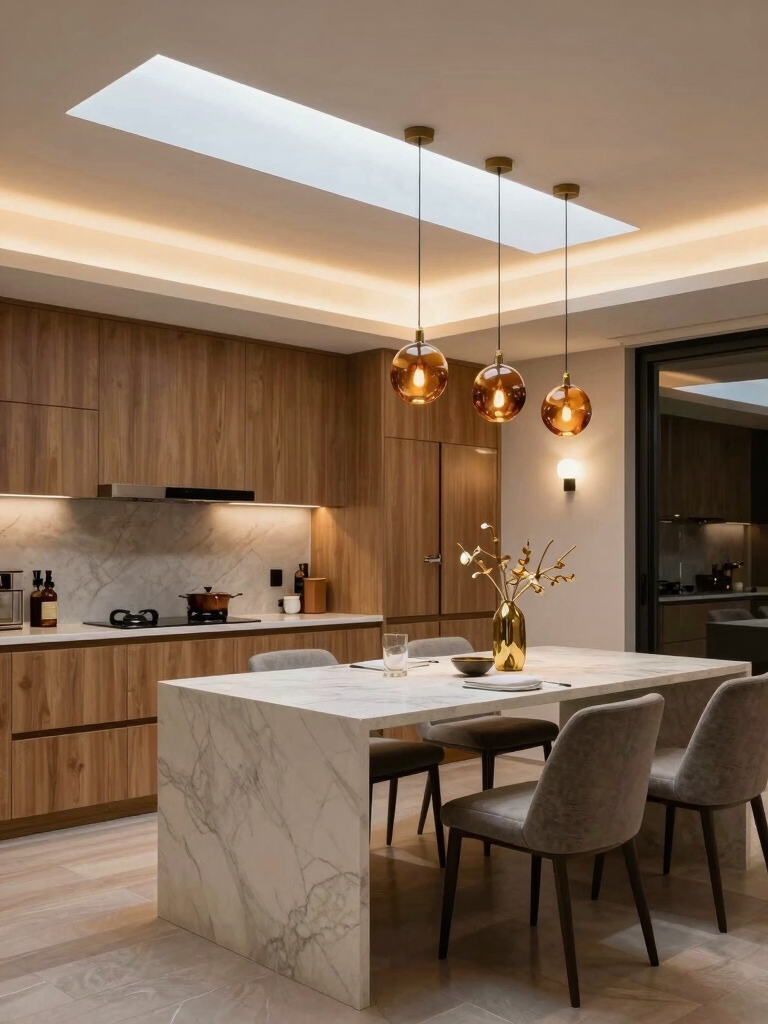
Layered lighting in open-plan kitchens and dining areas isn’t about a single fixture but a thoughtful mix of task, ambient, and accent lighting that works together.
I guide you to combine focused task lights for prep, warm ambient glow for evenings, and subtle accents that highlight architecture.
This approach feels practical, welcoming, and adaptable to daily rhythms and gatherings.
Storage and Appliance Placement for Seamless Meals
Efficient storage and thoughtful appliance placement make open-plan kitchens feel effortless, radiant, and ready for daily meals.
I’ll guide you to keep essentials accessible without clutter, so prep flows smoothly.
- Zone frequently used tools within arm’s reach
- Group appliances by function for quick access
- Use vertical storage to free counter space
- Label bins and pull-out shelves for clarity
Seating That Encourages Conversation and Flexes for Guests
Curious how seating can spark conversation and adapt to different gatherings?
I design spaces that invite dialogue and fluid shifting. Think a curved banquette, a pair of movable stools, and a central island you can circle.
I prefer clear sightlines, comfortable distances, and quick reconfigurations so guests chat, linger, and mingle without friction or fuss.
Practical, welcoming, thoughtfully flexible seating.
Color and Materials Across Kitchen and Dining
I’m exploring how color harmony joins kitchen and dining, creating a steady rhythm from room to room.
I’ll look at material shifts in open plans and how they guide eye movement and flow.
We’ll pair cabinetry finishes thoughtfully to keep the space cohesive yet distinct.
Color Harmony Across Spaces
Color harmony across spaces is about tying the kitchen and dining area together through thoughtful color choices and materials; by repeating tones, textures, and finishes, the rooms feel cohesive yet distinct.
- Use a shared neutral backbone across both zones
- Mirror wood tones for warmth and continuity
- Introduce accent colors through textiles and art
- Choose durable, low-maintenance surfaces for cohesion
Material Transitions In Open Plans
Material shifts in open plans hinge on how the eye moves from kitchen to dining space.
I choose cohesive materials that flow, not clash, guiding passages with subtle texture and color steps.
I favor durable surfaces near kitchens and warmer tones in dining zones, linked by shared grout, finish, and scale.
This calm, practical approach keeps spaces integrated.
Cabinetry Finishes Pairings
To create cabinetry finishes that pair well across kitchen and dining, I start by choosing colors and textures that echo each zone while staying distinct enough to define spaces.
I keep contrasts gentle, surfaces durable, and lighting honest, so the flow remains seamless.
1) Match warm wood tones with cool neutrals
2) Pair matte finishes with subtle gloss accents
3) Use consistent hardware naming and chrome or brass
4) Balance texture—paint, veneer, and stone respectively
Small-Space Open Plans: Maximize Light and Function
Maximizing light and function in a small open-plan space starts with thoughtful zoning and simple choices.
I design with you in mind, highlighting flow over clutter and using light-boosting finishes.
Keep sightlines clear, choose compact dining, and integrate storage into walls.
I’ll guide you to balance zones, maximize brightness, and preserve a welcoming, practical, efficient kitchen-dining feel.
Budget-Friendly Upgrades for Open Plans
I’m sharing budget-friendly zoning tricks and affordable finishes that subtly redefine open-plan spaces.
You’ll find simple methods to separate areas and add character without breaking the bank.
Let’s explore practical details you can use to upgrade your open plan with style and thrift.
Budget-Friendly Zoning Tricks
Creating distinct zones in an open-plan kitchen-dining setup doesn’t have to break the bank.
I’ll share practical, budget-friendly zoning tricks you can apply today.
1) Use furniture placement to designate each area without walls
2) Pick a cohesive color or material for subtle separation
3) Layer lighting to cue different zones
4) Add area rugs to anchor dining and define flow
Affordable Finishes and Details
When you’re upgrading an open-plan space on a budget, small, well-chosen finishes make a big impact.
I’m sharing practical picks: paint instead of wallpaper for cohesion, affordable geometric tiles as a focal punch, satin hardware for a refreshed feel, lighting that highlights zones, and durable textiles.
Simple upgrades, clear drafts, and stronger flow without blowing the budget.
Multifunctional Islands: Storage, Prep, and Social Hub
A multifunctional kitchen island acts as the heart of the open plan, blending storage, prep space, and a social hub into one efficient center.
I’ll show you practical, compact ideas that work daily and feel welcoming.
- Smart storage: drawers, shelves, and charging stations within easy reach
- Prep zone: clear counter, dishwasher nearby, ample elbow room
- Seating: intimate chats without crowding
- Lighting: layered options for tasks and ambience
Acoustic Tips to Keep Conversations Clear
Good acoustics make open-plan kitchens feel calm and connected, so I’ll share practical tweaks that keep conversations clear even with activity around you.
I favor low-tech, high-impact fixes: soften hard surfaces with textiles, position speakers and speakers’ direction, use area rugs to dampen footsteps, and live with sensible zoning.
Clear sightlines help nonverbal cues, and intentional spacing reduces echo and overlap.
Smart Tech and Power Planning in Open Layouts
Smart tech and power planning in open layouts isn’t about gimmicks; it’s about smooth, intentional integration.
I guide you to wire for flexibility, conceal cords, and choose multi-outlet hubs. Your kitchen-dining flow stays clean while devices stay ready.
- Map outlets to work zones
- Prioritize USB-C charging points
- Use wireless charging pads discreetly
- Opt for integrated lighting and tech hubs
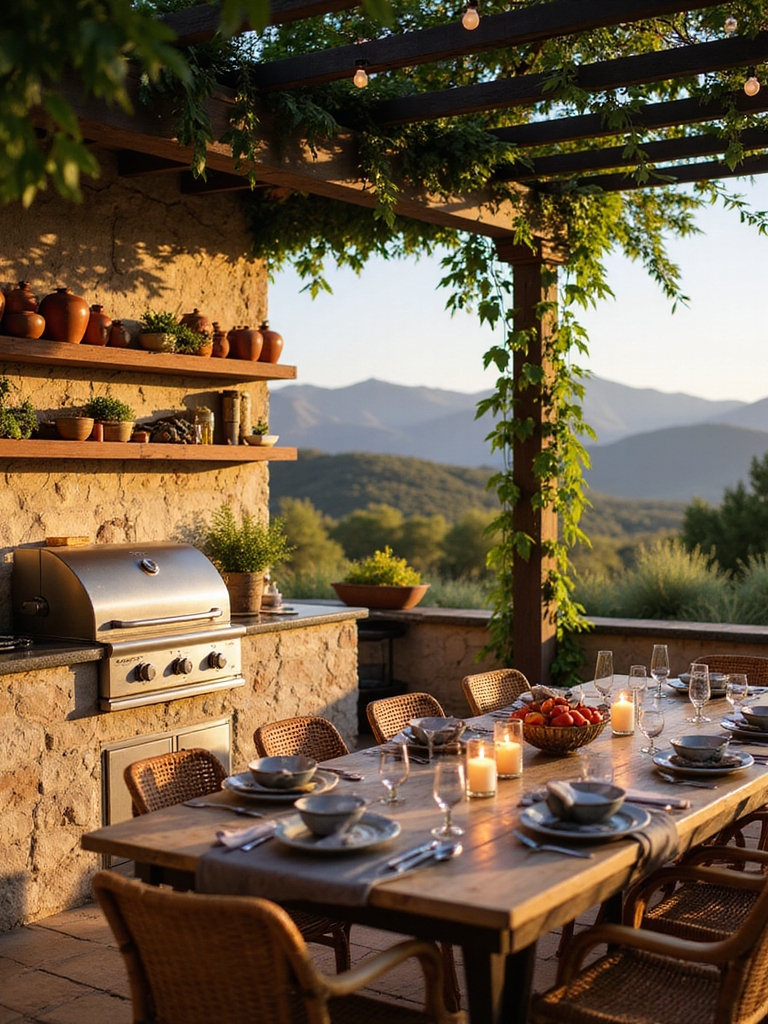
Real-World Open-Plan Setups: 15 Standout Examples
From real homes to bold renderings, 15 standout open-plan setups show how kitchen, dining, and living areas flow without fighting each other.
I’ve studied layouts that keep zones clear, paths open, and materials cohesive, so you can borrow ideas confidently.
You’ll notice practical tweaks— Seating, lighting, storage—that make every open space feel deliberate, comfortable, and effortlessly inviting for daily life.
Tailoring an Open-Plan to Your Lifestyle and Home Size
Tailoring an open-plan to your lifestyle and home size starts with honesty about how you live today.
I’ll guide you to adapt spaces, define zones, and keep flow intact, so your home fits you now—without overhauls.
- Assess daily patterns
- Prioritize essential zones
- Use flexible furniture
- Plan for future changes
Conclusion
If you’re shaping an open-plan kitchen, you’re charting a living map—where scent of coffee meets the hum of chatter. Start with flow, not walls, and let a central island or smart zoning guide the eye. Layer light, soften with texture, and tune tech to your rhythms. Remember: it’s not one perfect plan, but your own lived-in balance. Pull ideas, trim excess, and welcome a space that grows with you—clear, warm, utterly workable.