

I’ve found that you can tackle 14 outdoor kitchen build projects without needing a pro crew. Start with one simple corner, plan a tight grill nook, and add a small brick-and-tile prep station. I’ll show weatherproof storage, a mobile cart, and vertical herb ideas for fresh flavor. I’ll also cover safe DIY electrical and smart timelines. If you stick with me, you’ll pick up practical tips that keep costs down and setups flexible as you go.
Start Simple: Pick One DIY Outdoor Kitchen Corner

If you’re just starting out, choose one small corner of your outdoor space to design around.
I pick a spot with good sun, shade for afternoon lounging, and nearby water access, so setup stays simple.
I’ll map a narrow footprint, then add a single grill, prep area, and seating.
Start small, adjust as you learn, and expand thoughtfully later. Additionally, consider incorporating stunning patio kitchen ideas that can enhance your outdoor cooking experience.
Plan on a Budget: Build a Grill Nook That Fits

I’m planning a grill nook that fits your space and budget, using budget-friendly materials and smart layouts that maximize every inch.
I’ll share space-smart ideas for compact, functional setups and simple steps you can tackle without a huge toolbox.
Let’s walk through practical, concrete choices that keep installation straightforward and durable. Additionally, consider incorporating simple outdoor kitchen ideas that enhance both functionality and aesthetics in your backyard.
Budget-Friendly Materials
When you’re planning a grill nook on a budget, start by value-hunting materials that hold up outdoors and won’t break the bank.
I’ll share practical picks that resist weather, costs, and wear without sacrificing function.
- Treated lumber or composite boards for framing
- Stainless steel or coated aluminum hardware
- Weatherproof plywood with exterior-grade sealing
- Recycled stone or concrete pavers for surfaces
Additionally, consider exploring affordable outdoor kitchen ideas that can inspire your project and keep costs low.
Space-Smart Layouts
Space-smart layouts start with the footprint you actually use, not what you wish you had.
I design grill nooks by measuring walkways, clearance, and access, then fit essentials tightly without crowding.
I prioritize workflow: prep, grill, serve, and clean nearby.
I favor modular pieces, hidden storage, and a single line of sight to the food.
Planning saves costs and space. Incorporating stylish outdoor kitchen designs can elevate the overall look and feel of your space without breaking the bank.
Simple Assembly Steps
Rolling up my sleeves, I’ll outline simple, budget-friendly steps to assemble a grill nook that fits your space and needs.
- Measure site and mark stud locations; account for clearance and venting.
- Cut framing to fit, assemble base, and secure to studs.
- Attach shelves, panels, and weatherproofing in stages.
- Install doors, seal gaps, and test stability.
Additionally, consider that compact outdoor kitchens can maximize functionality in smaller areas while still providing an enjoyable cooking experience.
Small, Smart Prep Station With Brick-And-Tile

I’ll share how a brick-and-tile prep station can keep your outdoor kitchen organized, sturdy, and easy to clean.
With brick tile, I’m focused on a durable surface that wipes down fast and hides stains, while pairing the tile with a compact layout that saves counter space.
We’ll cover brick tile prep, compact workspace tips, and durable material choices so you can plan a smart, long-lasting setup. Additionally, using rustic design elements can enhance the overall aesthetic of your outdoor space.
Brick Tile Prep
To prep a small, smart brick-and-tile station, I keep the workflow simple and focused: I lay out the tools and materials, measure twice, and cut once, so everything fits cleanly into a compact workspace.
1) Gather bricks, tiles, mortar, spacers
2) Prep surfaces, clean dust, seal edges
3) Dry-fit layout, mark grout lines
4) Mix mortar, apply evenly, wipe excess
In addition, a well-designed workspace can enhance indoor outdoor kitchen flows, making your cooking experience more enjoyable and efficient.
Compact Workspace Tips
Setting up a compact prep station streamlines the brick-and-tile workflow, so I keep the workspace tight but efficient. I mount a wall rail to hang tools within reach, and I choose a narrow, easy-clean counter with a sloped edge for drip-off. A small trash bin, cutting board, and sponge kit live under a hinged cabinet for quick cleanup and steady prep rhythm. Incorporating cozy outdoor kitchen design tips can further enhance the overall functionality and comfort of your space.
Durable Material Choices
Durable material choices matter more in a compact brick-and-tile prep station, where every surface must stand up to heat, moisture, and daily use.
I pick smart options that last. Here’s what I prioritize:
- Heat-resistant countertops
- Porcelain or ceramic tiles
- Stainless hardware
- Sealed grout for easy cleaning
Weatherproof Outdoor Storage That Lasts

A weatherproof outdoor storage system should protect your gear year after year, and I’ll show you practical ways to build or buy options that hold up in sun, rain, and humidity.
I choose durable materials, seal gaps, and ventilate to prevent mold. Use lockable cabinets, stainless hardware, and elevated bases; inspect annually, clean surfaces, and replace worn gaskets promptly for lasting performance.
DIY Pallet Bar Cart for Quick Entertaining
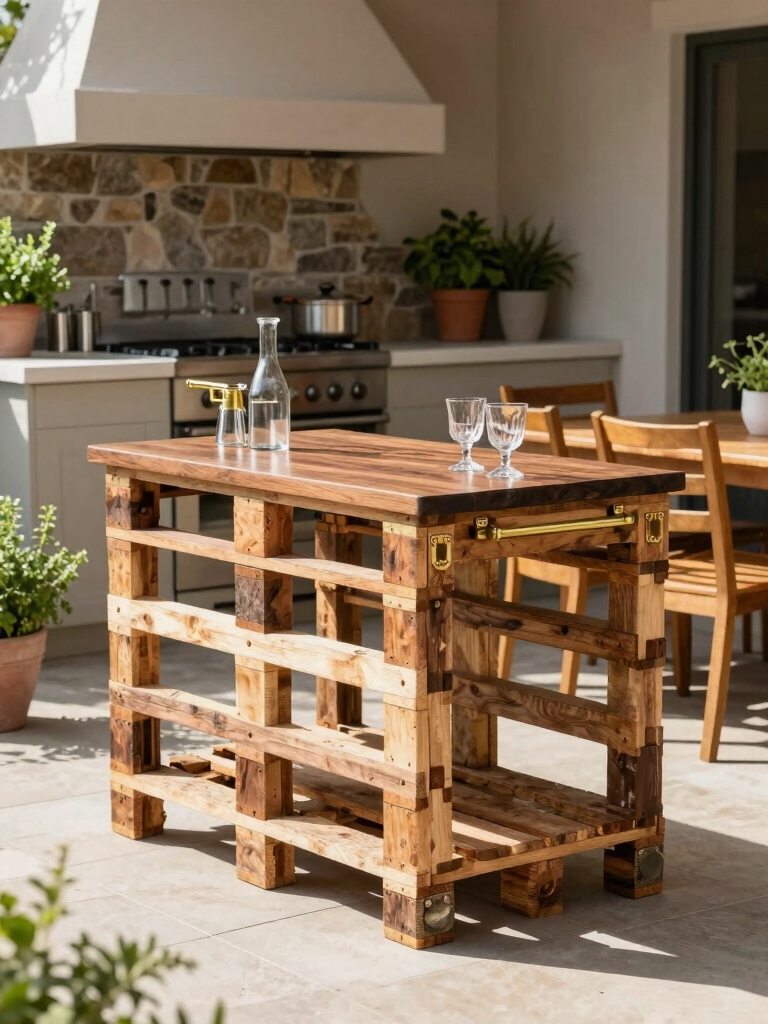
I’m sharing how I assemble a pallet bar cart that’s ready for quick entertaining, focusing on sturdy Pallet Bar Assembly without overcomplicating the setup.
I’ll cover practical tips like choosing the right pallets, securing joints, and adding wheels or handles for easy mobility.
If you’re aiming for fast, functional entertaining, these steps set a solid foundation and keep the conversation flowing.
Pallet Bar Assembly
I built this pallet bar cart to keep entertaining simple and stylish, so you can mix drinks and snacks without hauling a bulky setup around.
I assembled it with moisture-resistant screws, sanded edges, and caster wheels for mobility, then added a wine rack and a simple bottle shelf.
- Gather materials
- Sand thoroughly
- Assemble frame
- Attach wheels and rails
Quick Entertaining Tips
Turning a pallet bar cart into a quick entertaining setup is all about fast, no-fuss prep.
I keep it simple: stock essentials, pre-measure garnishes, and set ice trays ready to grab.
I place a small Bluetooth speaker, a menu card, and napkins within reach.
I rotate drinks weekly, label containers, and wipe surfaces between guests for steady flow and relaxed vibes.
A Mobile Island: Flexible Outdoor Cooking Surface
A mobile island makes outdoor cooking flexible and practical, letting you shift workspace where you need it most.
I’d design mine to roll smoothly, store tools, and keep a prep area close to flame.
Here’s what matters:
- sturdy casters
- ample counter space
- weather-resistant finish
- secure storage for spices and utensils
Outdoor Sink Without Major Plumbing
I’m tackling a Plumbing-Free Sink Design that keeps things simple and movable, so you can place a sink without hard lines behind you.
I’ll cover Water Source Options that fit outdoor use, plus Easy Install Techniques that don’t require remodeling—think portable tanks, gravity feeds, or hand-pump setups.
If you’re curious how to balance practicality with reliability, I’ll walk you through quick layouts and checklist basics to get started.
Plumbing-Free Sink Design
A simple, self-contained sink system can be built without major plumbing by using a gravity-fed design.
I’ll walk you through practical, proven steps you can trust.
- Choose a container with a tight-sealing lid and spigot.
- Elevate the reservoir to create steady flow without pumps.
- Route clean water via braided hose to a sturdy basin.
- Use gravity to drain into a catch tray for easy disposal.
Water Source Options
When you’re set on a gravity-fed outdoor sink, your water source options hinge on simplicity and reliability.
I favor a gravity-fed jug backup or a small reservoir with a secure lid, plus a vented cap to prevent siphoning.
Use a hand-pump or siphon line for controlled release, and keep hoses sealed, clean, and accessible for quick refills and maintenance.
Easy Install Techniques
Setting up an outdoor sink without major plumbing can be quick and straightforward, especially if you plan around simplicity and mobility.
I’ll share practical steps you can follow now.
- Choose a portable basin with drain hose and stopper
- Use a freestanding cart or cabinet for stability
- Install a gravity-fed water container or pump
- Hook up a compact, chemical-free filter and simple waste bin
Covered Seating: Minimal Framing, Maximum Comfort
Covered seating is all about balance: we want sturdy framing that disappears behind the comfort.
I design with minimal materials, using hidden-lap joints and slim supports, so the eye stays on cushions, not structure.
I select weathered finishes, fasten safely, and leave easy-access storage beneath.
I test clearance, seat depth, and backrest angle for practical, all-day use.
Brick-Oven/Fire Pit Hybrid for Flavor
A brick-oven and fire pit hybrid amps up flavor by combining heat, smoke, and a reliable cooking surface in one unit.
I use it to sear, bake, and mellow wood-fire notes, then coax guests outside for a smoky finish.
Here’s how I maximize payoff:
- Plan chimney routing for steady smoke
- Build a modular firebox for easy tuning
- Insulate for even temps
- Season with quick, bold dishes
Polished Concrete Countertops for Small Plots
Polished concrete countertops are a smart, space-saving choice for small plots because they’re durable, seamless, and easy to clean.
I’ll walk you through selecting a finish that resists stains, choosing edge profiles that maximize prep space, and planning for gentle slope drainage.
I emphasize correct sealing, crack prevention, and color consistency so your compact kitchen feels sleek, not compromised.
Vertical Herb Gardens for Fresh Flavors
Vertical herb gardens let you harvest fresh flavors right at counter height, and they’re easier to maintain than you might think.
I share practical steps you can use today, without clutter, to maximize yields and flavor.
- Choose compact, sun-loving herbs for vertical frames
- Use stackable planters to save space
- Install drip irrigation for consistency
- Label herbs and rotate crops seasonally
Lighting Solutions to Cook Later With Ease
Ever wonder how lighting can extend your outdoor cooking time without draining energy or breaking the mood?
I use layered lighting: amber LEDs for ambience, cool task lights over prep zones, and solar capsules along paths.
Dimmer switches let me pace the evening, while battery packs back up under clouds.
Timers keep meals on schedule, and warm glow invites lingering chats afterward.
Safe DIY Electrical for Outdoor Kitchens
Safety isn’t optional when you’re wiring an outdoor kitchen; it’s the foundation that lets you cook, entertain, and enjoy the space with confidence.
I’ll keep it clear and practical, focusing on safe habits, quality materials, and smart planning so you don’t overload circuits or create tripping hazards.
- Inspect weatherproof outlets and GFCIs
- Use outdoor-rated cables and boxes
- Install proper grounding and disconnects
- Plan circuits for appliances separately
Planning, Permits, and Quick Timelines for DIY Projects
Planning a DIY outdoor kitchen starts long before the first tool hits the surface. I map permits, codes, and utility checks early, so surprises don’t derail progress.
I recommend timelines with milestones, buffers, and realistic delays. I discuss inspections, trade availability, and material lead times frankly, then adjust.
Stay organized, communicate with neighbors and inspectors, and keep changes documented for a smooth build.
Conclusion
If you’re considering DIY outdoor kitchen projects, start with one small win and build from there. I did this with a compact grill nook: a real home setup upgraded in a weekend, with a weatherproof cabinet and a smart prep space that still works when it pours rain. Stay practical: plan, budget, and prioritize safety. You’ll gain confidence fast, then tackle a pallet bar cart or herb wall next, expanding your outdoor kitchen one simple step at a time.


