I’ve built rustic, budget-friendly outdoor kitchens that punch above their price. Start with a sturdy layout, use salvaged and repurposed materials, and keep debris out with permeable drainage. I plan stations that save steps, add dual-bin waste, and stash tools in repurposed crates. For seating, I swing between pallet benches and weatherproof accents. Finishes are simple but sturdy, with solar lighting and planters for charm. If you stick with me, you’ll pick up practical, money-saving tricks and ideas.
Foundations: Designing an Affordable Rustic Outdoor Kitchen

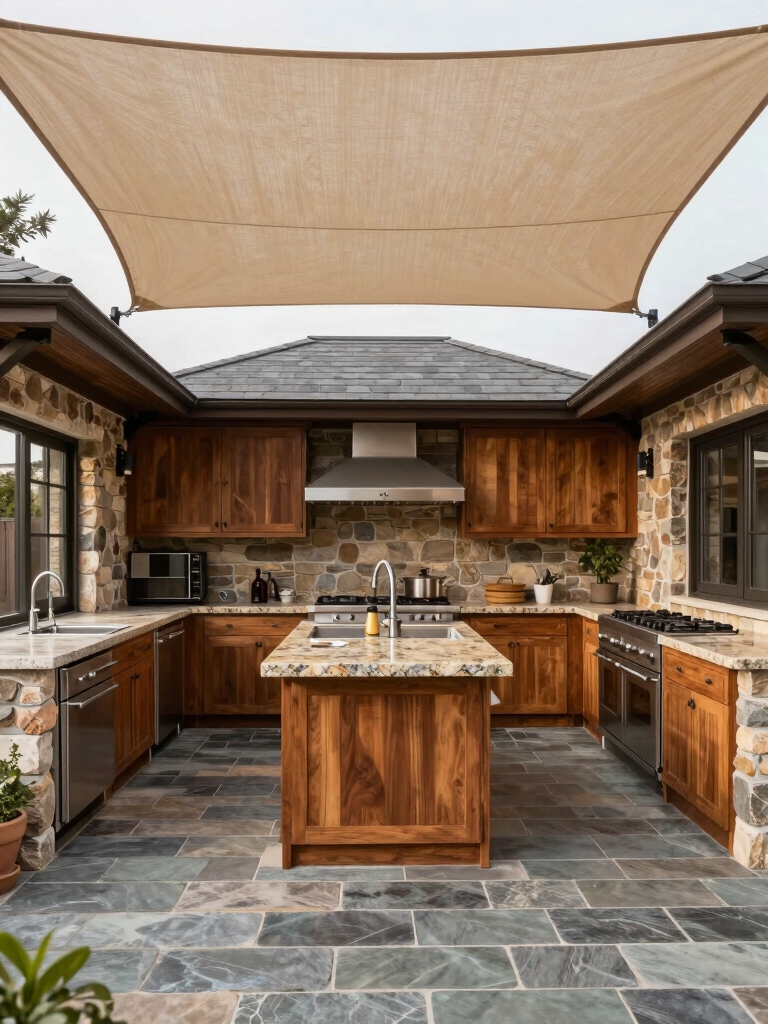
Foundations set the whole project up for success, so I start with a simple, solid plan: map out a level, stable base using affordable materials and smart spacing.
I choose compact pavers, crushed stone, and a compacted gravel bed, ensuring drainage and load balance.
I keep margins tight, tools handy, and measurements clear, so setup stays reproducible and sturdy for years of practical, rustic cooking moments. Additionally, incorporating outdoor BBQ kitchen elements can enhance the overall experience, making your gatherings even more enjoyable.
How to Choose a Layout That Fits Your Space

So what layout fits your space best? I start by mapping flow: prep, cook, serve, and clean in distinct zones.
Keep paths clear, avoid crowding, and let doors swing without hindrance. Measure your grill, sink, and counter height, then sketch a simple triangle for efficiency. Consider incorporating a smart kitchen island that optimizes your workflow and maximizes storage in limited spaces.
Adapt to shade, wind, and grass, choosing a compact, functional setup that still feels welcoming.
Budget-First Material Choices: Salvaged and Repurposed Shines

Salvaged and repurposed materials let you get a sturdy outdoor kitchen without breaking the budget, and they often add character you can’t buy.
I value practicality, so I pick durable, easy-to-find pieces—like reclaimed timber, salvaged metal, and secondhand countertops.
You’ll avoid overpaying while still building a space that feels warm, lived-in, and uniquely yours. Simple care keeps it lasting. Additionally, using budget-friendly DIY outdoor kitchen ideas can inspire creativity while keeping costs low.
Core Cooking Stations That Save Time and Money

Let me show you a few time- and money-saving cooking stations that fit right into a rustic setup.
I’ll walk you through practical prep areas that streamline cutting, marinating, and grilling, without clutter or extra fuss.
Together, we’ll sketch stations that balance efficiency with homestyle charm, keeping costs and effort low. Incorporating core cooking stations can enhance your outdoor experience and make entertaining a breeze.
Time-Saving Cooking Stations
Time-saving cooking stations are the heart of a budget-friendly outdoor kitchen, and I’ve learned a few simple setups that pay off fast.
- Prep zone near grill for quick assemblies
- Dual-bin trash and compost within reach
- On-deck cold storage for veggies and oils
- Covered prep table to protect from weather
Additionally, incorporating outdoor kitchen designs that focus on efficiency can significantly enhance your cooking experience.
Budget-Friendly Prep Areas
Budget-Friendly Prep Areas are the backbone of a tight-budget outdoor kitchen, and I’ve learned a few core setups that cut both time and costs.
I lean on a simple, single-workspace plan: a sturdy prep table, nearby sink, and organized tool hooks.
Clear labeling, reusable containers, and a dedicated waste station keep cleanup quick, so more cooking, less wandering. Incorporating outdoor cooking essentials can further enhance your efficiency and enjoyment in the kitchen.
Seating and Dining Zones That You Can Build Yourself

I’m sharing simple DIY seating ideas and budget-friendly dining zones you can tackle this weekend.
We’ll use rustic materials that fit any outdoor kitchen vibe, with practical layouts that maximize space and comfort.
Let’s explore how to mix seating options with easy, sturdy builds that don’t break the bank.
Incorporating farmhouse outdoor kitchen touches can elevate the charm of your space while keeping costs low.
DIY Seating Ideas
If you’re tackling an outdoor kitchen on a budget, start with seating that’s sturdy, comfortable, and flexible enough to host a crowd or a quiet coffee break. I’ll show simple builds:
- Pallet bench with cushions
- Reclaimed wood stools
- Concrete block seating with lids
- Folding chairs stored nearby, ready to expand guests.
Incorporating rustic design elements into your seating can enhance the charm and character of your outdoor kitchen space.
Budget-Friendly Dining Zones
From the seating ideas above, you can pair them with simple dining zones that keep the whole setup flexible and inviting.
I prefer compact, budget-friendly options: a sturdy picnic table, DIY benches, and a portable island with stools.
Use pallets or reclaimed lumber, weatherproof finishes, and basic cushions.
Add a small grill-side cart and a couple of foldable chairs for easy hosting.
Simple, doable, cozy.
Rustic Materials Guide
Here’s a practical, homespun guide to rustic seating and dining zones you can build yourself, using simple materials and steady hands.
I share straightforward tips, no fluff.
- Use reclaimed wood for benches to add texture.
- Build a sturdy table from pallet boards and treated legs.
- Pair metal brackets with thick screws for durability.
- Finish with weatherproof sealant to extend life.
Weatherproof Finishes for Wood and Stone That Last
Weatherproof finishes protect your outdoor wood and stone from rain, sun, and cold, and they don’t have to be complicated.
I favor breathable seals on wood to prevent peeling, and penetrating stains for stone to guard pores without masking texture.
Reapply as seasons change, clean surfaces first, follow product directions, and pick low-VOC options for a safer, long-lasting look.
Lighting to Set Mood and Safety, on a Budget
I’ll walk you through budget-friendly lighting that keeps your outdoor kitchen safe and inviting, from easy solar options to simple string lights.
We’ll cover safe outdoor illumination tips and where to place fixtures for even, glare-free coverage.
Let’s explore mood-enhancing ideas that don’t break the bank and still feel right at home.
Budget-Friendly Lighting Choices
Good lighting is essential for both mood and safety when you’re cooking outdoors, and you don’t have to break the bank to get it.
- Use solar-string lights along eaves for ambient glow
- Add battery-powered lanterns near prep areas
- Opt for cool-white LEDs for clearer visibility
- Choose dimmable fixtures to adjust mood and task lighting
Safe Outdoor Illumination Tips
Now that we’ve covered budget-friendly lighting, I’ll show you how to keep outdoor spaces bright and safe without overspending.
I keep routes clear with stake lights and motion sensors, so guests never stumble.
Use warm, low-watt bulbs and shielded fixtures to protect bulbs from rain.
Regularly check cords, tighten outlets, and store plugs properly after use for lasting safety.
Mood-Enhancing Fixture Placement
Mood and safety go hand in hand, so I place lights where they guide you and set the vibe without costing a fortune.
- Use string lights along shelves for soft glow.
- Add a solar lantern at the prep station.
- Install motion LEDs by the doorway for safety.
- Dimmer switches keep mood and control.
Smart Storage Tricks to Reduce Clutter and Cost
Small changes can make a big difference: smart storage keeps my outdoor kitchen tidy without blowing the budget.
I repurpose crates for tall tools, install magnetic bar racks, and use labeled jars for spices and seeds.
Foldaway prep surfaces, weatherproof bins, and clear containers banish chaos.
I plan ahead, group by use, and avoid duplicates to save space and money.
Warmth on a Budget: Fire Features and Accessories
When you’re building warmth into your outdoor kitchen on a budget, simple fire features and practical accessories go a long way.
I’ve learned a few essentials that fit a tight budget and big impact.
- Pivoting grill grate for even sear
- Small smokeless fire pit to cut smoke
- Budget ember rack for cozy flames
- Heat-resistant rug for touchable comfort
Simple Water and Plumbing Solutions for DIY Projects
Let’s talk simple water and plumbing for DIY projects, starting with your water filtration choices so you don’t haul full-on mugs of questionable taste.
I’ll cover easy drain solutions and a few basic piping hacks you can actually pull off without a pro, so your setup stays practical and affordable.
If you’re aiming for steady water flow and dependable basics, we’ll keep it straightforward and actionable.
Water Filtration Choices
To keep DIY outdoor kitchens safe and simple, I’ll walk you through practical water filtration options that you can install without a pro.
- Brita-style pitcher filters for quick, small-scale use
- inline carbon filters for faucets and hoses
- ceramic filters for low-tech reliability
- sediment prefilters to extend system life
These choices balance cost, ease, and dependable results.
Simple Drain Solutions
Simple drain solutions aren’t glamorous, but they’re essential for a smooth outdoor kitchen.
I keep drainage simple: a gravel trap, a sloped surface, and a sand bed to prevent puddles.
I use a basic inline filter to catch debris, then route water to a discreet sump or garden bed.
Regular checks stop clogs before they upset meals.
Practical, budget-friendly, quiet.
Basic Piping Hackery
I’ve had good luck carrying over the same simple mindset from drainage to piping: keep it straightforward, affordable, and easy to fix.
Here’s how I approach Basic Piping Hackery:
- Measure routes before buying parts
- Use flexible hoses for angles
- Seal joints with simple plumbing tape
- Test systems slowly, then finalize adjustments
Quick DIY Upgrades That Add Character Fast
Quick DIY upgrades can give your rustic outdoor kitchen character in no time, and you don’t need to break the bank to do it.
I sneak in simple touches: weathered shelves, a chalkboard menu, mason jar lighting, and a sturdy, repurposed door as a prep station.
Small changes, big charm—practical, fast, and totally doable for you.
Eco-Friendly Touches That Make a Difference
Eco-friendly touches aren’t about trendy gimmicks—they’re about practical choices that last.
I’ll share simple keepsakes you can trust on a budget:
- Reclaimed wood for countertops
- Solar-powered lights for evenings
- Permeable gravel for drainage
- Cast-iron tools that endure
Small, honest picks keep character without waste.
You’ll feel proud every cookout, and the space stays durable.
Finishing Touches That Elevate Without Breaking the Bank
Finishing touches can lift your outdoor kitchen without draining the budget, and they pair nicely with the practical, durable choices we already made.
I’m sharing small tweaks I’ve used: warm lighting, simple hardware, and comfortable seating that invites lingering conversations.
A well-placed rug, weatherproof cushions, and a thoughtful planter elevate the space without costing a fortune.
Practical, personal, and testably durable.
Real-World Budget Snapshots: Case-Study Breakdowns
Real-world budget snapshots bring our plans to life.
I’ve learned mornings with a calculator beat boasts and evenings with a mockup feel doable.
Here’s the gist:
- Choose affordable basics first
- Reuse materials when safe
- Target simple upgrades over flashy fixes
- Track every dollar, adjust monthly
Snapshots stay practical, honest, and useful for steady progress.
Maintenance Habits to Keep Costs Down Over Time
Maintenance that lasts is built on simple, steady habits you can stick with.
I keep my budget in check by cleaning surfaces after each use, sealing gaps before summer, and drying tools to prevent wear.
I schedule seasonal checks for paint, hinges, and fuel lines, using affordable replacements.
Consistency beats flashy upgrades, and small fixes save big over time.
Plan Your Own Rustic Outdoor Kitchen on a Budget: A Step-by-Step Guide
Starting with a clear plan makes building a budget-friendly rustic outdoor kitchen doable.
I’ll walk you through a simple, practical path you can follow tonight:
- Define must-haves and nice-to-haves.
- Source affordable, durable materials.
- Sketch a compact layout for flow.
- Budget, then adjust as you go.
Conclusion
I’ve learned that a rustic outdoor kitchen on a budget can feel warm and lived-in without breaking the bank. You don’t need fancy gear to cook, just smart planning and a dash of creativity. Think salvage, simple layouts, and DIY seating that invites conversation. When you mix thrift with practical corners, it’s like weaving a cozy story—every brick and bench a line in a shared moment. Your own affordable oasis is closer than you think.