
I’ll share 15 genius kitchen organization tricks that truly change the way you cook. Start with maximizing vertical storage using adjustable shelves, then group like items for quick access and standardize pot and pan stacks by size. Create a central prep zone with a mobile cart, label every bin and bottle, and set up a pull-list pantry system you can actually use. Add a command center, tiered under-sink trays, and schedule a quarterly redesign to refresh flow—you’ll see more soon.
Maximize Vertical Kitchen Storage With Adjustable Shelves

Maximizing vertical storage in the kitchen starts with adjustable shelves.
I show you how to tailor height between tiers for tall cans, jars, and rarely used appliances. Measure, mark, and install sturdily, so each shelf supports weight without sag.
Use labeled bins on the middle levels and free up lower space for everyday essentials. Additionally, maximizing every single inch in your pantry can lead to more efficient cooking and meal preparation.
Quick, practical, accessible organization.
Group Like Items for Quick Access
Grouping like items together makes it faster to grab what you need without digging through drawers or cabinets.
I show you how I group common kitchen tools and ingredients so access is instant, not a hunt.
- Group spices, oils, and vinegars on a single shelf
- Keep baking essentials (flour, sugar, cocoa) together
- Store utensils—spoons, spatulas, whisks—in one tray
- Assemble meal-prep jars by recipe type
Additionally, consider using space-saving techniques to maximize your limited kitchen area.
Create a Central Prep Zone With a Mobile Cart
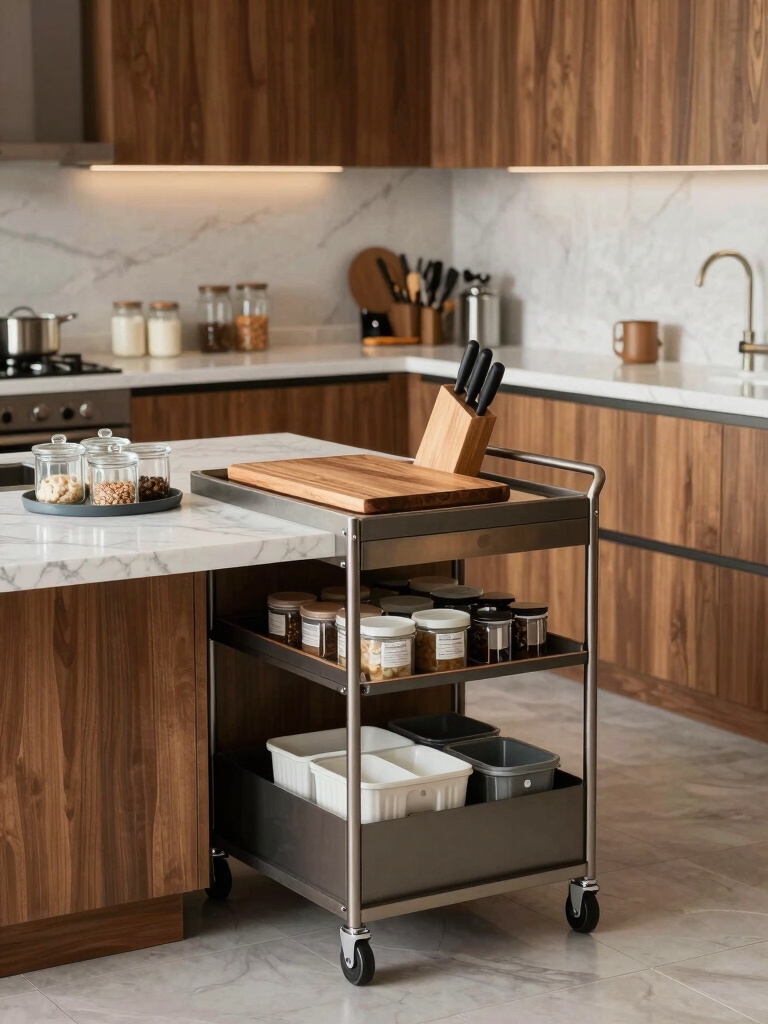
A mobile prep cart transforms a cluttered kitchen into a streamlined workspace you can roll to the counter whenever you cook.
I keep staples, knives, and towels within arm’s reach, so meal assembly stays efficient.
Prioritize a compact footprint, sturdy wheels, and a non-slip top.
I assign zones for produce, proteins, and prep basics, then roll as needed.
Incorporating smart storage ideas can further enhance your kitchen’s functionality and maximize limited space.
Label Every Bin and Bottle for Fast Restocks

Labeling each bin and bottle speeds restocks by giving me instant visibility into what’s low and what’s full.
When the labels mirror what’s on the shelf, there’s no guesswork—signals are clear and replacements stay consistent.
I’ll walk you through a simple labeling system that keeps inventory accurate and restocks efficient. Additionally, maintaining a clutter free cooking zone is essential for enhancing your cooking experience and efficiency.
Labeling Boosts Speed
Label every bin and bottle to speed restocks.
I explain how labeling saves time by guiding quick checks and reorders, so you stay on top of needed items without hunting. Adding labeled bins in your kitchen can also help you quickly identify and access your frequently used items.
Try these practical tips:
- Label by category and useable date
- Color-code shelves for quick glance
- Maintain a single label style
- Review weekly for accuracy
Clear Inventory Signals
Clear signals come from clear labeling across every bin and bottle, so restocks happen fast and with fewer trips.
I keep labels simple: item name, date, and quantity at a glance. For jars, use color stickers; for bottles, a bold marker on the cap.
I rotate stock routinely, verify counts weekly, and tweak labels when changes occur. Clarity saves time. Additionally, using budget-friendly DIY ideas can enhance your organization system without breaking the bank.
Consistent Replacements Emerge
Consistent replacements show up quickly when I label every bin and bottle.
You’ll notice fast restocks because labels cue memory and speed.
Here are four practical steps:
1) Assign clear names
2) Use uniform sizes
3) Color-code by category
4) Review weekly and adjust labels
In addition, having essential pantry staples readily available can help streamline your cooking process and make meal preparation more efficient.
See It, Use It, Love It: A Pull-List Pantry System

I’m starting with See It, Use It, Love It, Organize It to set up a pull-list pantry that’s simple to navigate.
I’ll show you how labeling, placement, and a quick check-in routine keep the most-used items front and center so you actually reach for what you need. Additionally, implementing smart cabinet organization can enhance the overall efficiency of your kitchen space.
Let’s make a system you’ll use daily and love to maintain.
See It, Use It
If you want a pantry you actually use, start with a pull-list system: visible, accessible, and organized so you grab what you need without digging.
Here’s how I keep it tight:
- Group staples by function
- Use clear containers and labels
- Place daily items at eye level
- Refresh weekly, discard expired items
Love It, Organize It
Love It, Organize It: once you’ve got a pull-list pantry that’s visible, accessible, and easy to use, the next step is to fall in love with it by keeping it tidy and intentional.
I keep items grouped, label clearly, and return things to their zones. Regular checks prevent clutter, guarantee freshness, and make cooking faster, calmer, and more satisfying.
Use Clear, Uniform Containers With Freshness Tags
Using clear, uniform containers with freshness tags makes it easy to see what you have, what you’ve used, and what needs to be replenished.
I’ll keep it simple and practical:
- Label each jar with contents and date
- Transfer pantry staples into consistent sizes
- Choose airtight lids for longevity
- Set a weekly check to rotate items
Organized, efficient, and ready when you cook.
Magnetic Strips: Keep Your Everyday Tools at Arm’s Reach
I’m curious how magnetic strips can boost tool accessibility, letting you grab what you need in a moment.
With quick-release mechanisms for knives and sturdy holds for everyday tools, you’ll streamline prep and reduce rummaging.
Let’s explore setups that keep your essentials visible, organized, and within arm’s reach.
Magnetic Tool Accessibility
Magnetic strips are a simple, efficient way to keep your everyday tools within arm’s reach.
I tell you, this setup saves steps and speeds prep. Stay organized, stay safe, and cut clutter without fuss.
- Mount strips at eye level for quick visibility
- Pair tools by task to minimize searches
- Use labeled magnets to avoid mix-ups
- Keep frequently used items front and center
Quick-Release Knife Access
Quick-release knife access with magnetic strips keeps your blades ready while staying safe.
I position knives with steady confidence, grasping a handle, and releasing one blade in a smooth, controlled motion.
No rummaging; just a precise pull, a quick click, and your tool is there.
I use sturdy mounts, keep edges protected, and teach clean, efficient storage every time.
Spice Station Mastery: Drawer Dividers for Quick Grabs
One simple way to speed up cooking is by keeping spices within easy reach, and a well-organized drawer divider makes that possible.
I share practical picks you can trust, right now.
- Sort spices by frequency for quick grabs
- Use adjustable dividers to fit tins and bottles
- Label fronts clearly for instant identification
- Leave a compact, wipe-clean surface for spills
Over-the-Din Storage: Extra Cabinet Space, Instant Access
Over-the-din storage is the simplest way to free up cabinet space without sacrificing accessibility.
I use slim, vertical bins and adjustable dividers tucked behind doors, keeping essentials visible and reachable. No rummaging; everything has a defined spot.
I rotate items monthly, label quietly, and measure door clearances to prevent jams. Practical, efficient, and easy to maintain.
Daily Prep Mock Tabletop: Layout, Tools, and Flow
Daily prep starts with a clean, clear tabletop and a simple layout I can trust every morning.
I’m guiding you through a mock setup that’s practical, not fancy, so you can cook with calm focus.
- Prioritize reachable tools
- Group by task
- Leave empty space for flow
- Test before cooking
Streamline Dirty Dishes With a Two-Bin Tray
After I’ve got a clean tabletop and a practical layout from daily prep, I’m ready to tackle dirty dishes with a simple two-bin tray setup.
I separate pre-rinse from sink wash, loading scraps into the waste bin first.
Soak stubborn pots, then scrub in the second bin.
Air-dry everything, return to cabinets, and save time for the next step.
Standardize Pot and Pan Stacks by Size
Standardizing pots and pans by size keeps my kitchen organized and saves me time searching for the right piece.
I group by diameter, depth, and nesting ability, then label stacks. This reduces chaos and speeds cooking.
- Measure and sort by diameter
- Nest pots inside larger pans
- Align lids by size
- Use labeled trays for quick access
Create a Kitchen Command Center for Mail, Keys, and Notes
A kitchen command center keeps important items in one trusted spot, so I set up a dedicated station for mail, keys, and notes right near the door.
I use a slim tray for mail, a key hook, and a small notepad.
Daily glance, quick actions, and a tidy space prevent clutter and lost momentum before cooking begins.
Simple, consistent routines.
Elevate Under-Sink Organization With Tiered Trays
I’m showing how tiered trays in the under-sink space can multiply storage without chaos.
With two levels, I keep cleaners and brushes separate yet easy to grab, boosting under-sink efficiency.
Let’s explore practical setups that maximize every inch and reduce clutter as we organize.
Tiered Tray Organization
Tiered trays are a simple, practical way to elevate under-sink organization.
I share a straightforward setup that saves space and speeds access.
- Layer items by use: daily staples, then backups, then cleaning supplies
- Label each tier for quick identification
- Use small bins on each level to group similar items
- Rotate products to avoid clutter and waste
Under-Sink Efficiency Gains
Under-sink spaces can feel chaotic, but tiered trays make every inch count and cut the time you spend searching for basics.
I organize by height, label compartments, and keep Essentials at eye level. I pull often-used items forward, stash cleaners in a labeled bin, and rotate backups monthly.
You’ll notice faster access, less clutter, and calmer Cooking routines.
Quarterly Redesign: Refresh Your Kitchen Flow and Storage
To refresh your kitchen flow and storage, I start with a quick, practical assessment: what works, what doesn’t, and why.
- Map your current zones and label peaks of use.
- Remove duplicates and obsolete tools.
- Reassign drawers for daily needs.
- Test a quarterly calendar for reorganization changes.
Conclusion
You’ve got the blueprint; now it’s time to put it to work. Start small, then scale, like stacking blocks into a sturdy tower of efficiency. I’m cheering you on as you label, reorder, and glide through your kitchen with ease. Picture your space as a well-tuned instrument—every drawer a note, every shelf a rhythm. Implement one change today, and watch the workflow harmonize, turning meals from chaos into confident, joyful creation.


