

I shoot white-cabinet kitchens to feel warm, layered, and true-to-life by timing light, controlling glare, and adding tactile accents. I favor soft morning or golden-hour side light, large diffusers, and foam-board reflectors to lift shadowed nooks without flattening texture.
I add matte woods, honed stone, and soft brass for contrast, keep compositions calm and aligned, and expose for highlight detail. Want practical setups, camera settings, and styling tips to make them sing?
Understanding Light and White Surfaces

Because white reflects everything around it, I always start by watching how light moves through a kitchen at different times of day. I notice color casts, shadow edges, and where highlights blow out.
I balance exposure, choose complementary accents, and position reflective objects to control mood.
White becomes a canvas—I sculpt depth with contrast, texture, and selective composition to keep images crisp and inviting.
Designers often prefer white cabinets because they create a timeless, versatile backdrop that adapts to changing styles and lighting.
Choosing the Right Time of Day to Shoot
I usually schedule shoots for soft morning light when whites feel pure and details pop without harsh shadows.
For a cozier, film-like mood I’ll come back at golden hour to coax warm highlights from the cabinetry and brass hardware.
Both times let the layouts read true while giving you two distinct looks to choose from.
Brightening task lighting can also help banish shadows in pictures, especially under cabinets with task lighting.
Soft Morning Light
Catching soft morning light in a kitchen with white cabinets changes everything — I aim for that quiet hour after sunrise when shadows are gentle, colors read true, and details pop without harsh contrast. I move slowly, adjust angles, and wait for calm.
Light tips:
- Open curtains for diffuse glow
- Use reflectors to lift shadows
- Avoid overhead bulbs
- Capture subtle textures
A well-chosen backsplash can enhance this effect by reflecting light and adding depth, especially when paired with perfect backsplash choices.
Golden Hour Warmth
Basking in golden hour warmth transforms white cabinets into something cozy and cinematic, so I time shoots for that low, honeyed light just after sunrise or before sunset.
It sculpts texture, warms whites without yellowing, and casts elegant shadows that read like soft film grain.
I adjust exposure, warm white balance slightly, and use minimal fill to keep the vintage-meets-modern mood intact.
White cabinets are a perennial favorite in kitchens for their timeless appeal and versatility, often featured in collections of irresistible white cabinet designs people can’t stop pinning.
Balancing Highlights and Shadows

When I step into a kitchen with white cabinets, I look for the way light sculpts form — where bright highlights meet soft shadows tells me the space’s personality.
I adjust framing to honor contrast and texture, emphasizing edges, grain, and silhouette.
- Emphasize edges, not flatness
- Preserve texture in paint and wood
- Let shadow shapes read clearly
- Keep highlights detailed and gentle
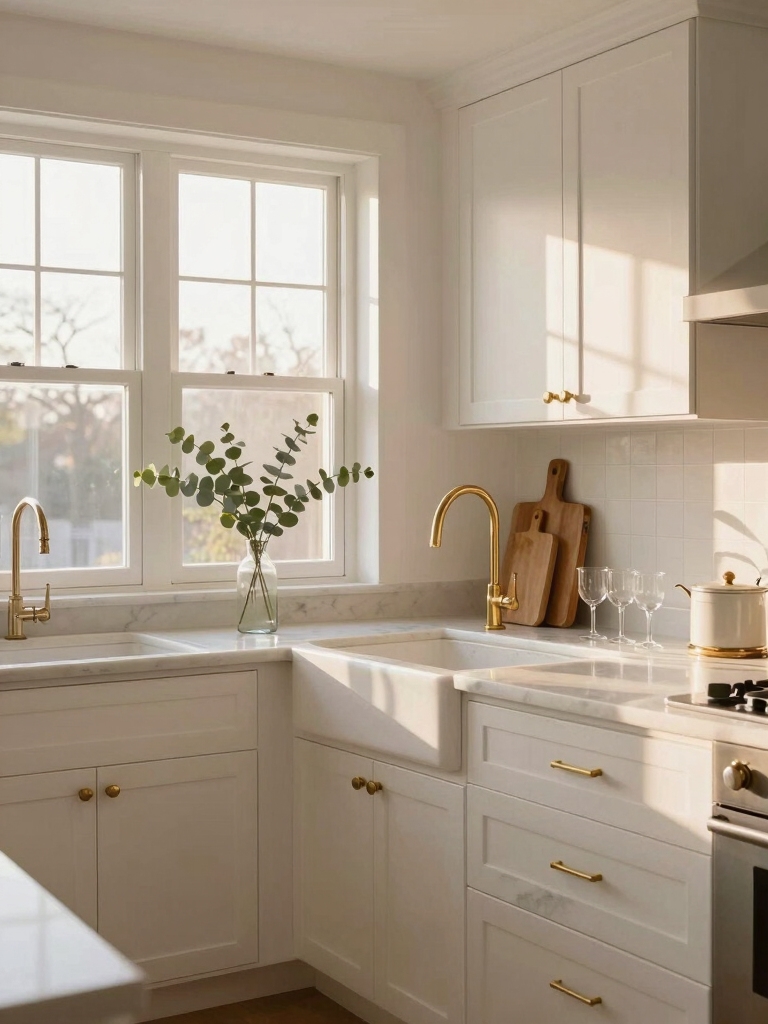
Timeless pairings like wood countertops and brass hardware create lasting harmony and complement white cabinets by adding warmth and contrast to the scene, especially when photographed with attention to wood and brass.
Using Reflectors and Diffusers Effectively

I like to use simple reflectors and soft diffusers to tame harsh sunlight before it hits my white cabinets, so finishes stay crisp without glare.
A strategically placed reflector will fill shadowed corners and keep open shelving readable, while a diffuser over a window or pendant helps control specular highlights on glossy surfaces.
Let me show you easy, budget-friendly setups that achieve all three without changing your layout.
Airy light grey cabinets can also help smaller kitchens feel more open and photograph well when paired with proper lighting and reflectors, making them a great choice for compact spaces Airy Light Grey Cabinets.
Soften Harsh Sunlight
Although bright sunlight can make a kitchen feel lively, it can also wash out finishes and create glare, so I rely on reflectors and diffusers to tame it without losing warmth.
I position tools thoughtfully, balancing softness and contrast.
- Use a silk diffuser for even, creamy light
- Angle reflectors to bounce warmth into cabinets
- Fold flags to control streaks
- Keep setups minimal and chic
Natural light can be enhanced in small spaces by strategically placing windows and reflective surfaces to flood natural light while maintaining balance.
Fill Shadowed Corners
To lift dark corners without over-brightening the room, I use reflectors and diffusers to gently spread light where cabinets and countertops swallow it.
I bounce warm, soft light into shadowed nooks with angled foam board or a pale fabric reflector, then soften edges with a translucent diffuser.
The result feels airy, intentional, and quietly vintage—highlighting texture without flattening depth.
Control Specular Highlights
After softening shadowed nooks, I turn my attention to specular highlights—the bright, often distracting glints that can make glossy cabinets or polished hardware shout when the rest of the kitchen whispers.
I use reflectors and diffusers to balance shine, control contrast, and keep mood intact.
- Soften with large diffusers
- Redirect with silver reflectors
- Flag unwanted glints with black cards
- Test angles, tweak subtly
Selecting Complementary Materials and Textures

Harmony matters when you pair materials and textures in a kitchen with white cabinets, and I’ll show you how to balance contrast without overdoing it.
I favor matte woods, honed stone, and soft brass to add warmth without stealing the spotlight.
Introduce tactile textiles, patterned tile backsplashes, and subtle grain variation to create layered interest that reads clean, curated, and timeless in photographs.
Styling Countertops for Depth and Warmth
Layering countertops is where I dial in depth and warmth without competing with white cabinetry.
I balance surfaces to feel lived-in yet crisp, choosing materials that age beautifully and photograph richly.
- Reclaimed wood butcher block for softness
- Honed stone for subtle texture
- Warm-toned quartz for durability
- Matte brass trays to anchor displays
These choices add tactile contrast and cozy depth.
Accent Colors That Enhance White Cabinets
I love pairing white cabinets with warm wood tones to bring in a cozy, lived-in feeling while keeping the palette clean.
Soft pastel accents—think mint, blush, or powder blue—add a gentle, vintage charm without overwhelming the space.
For a more modern punch, I’ll use bold contrasting hues like deep navy or forest green to create striking focal points.
Warm Wood Tones
Pairing white cabinets with warm wood tones instantly grounds a kitchen and gives it a lived-in, stylish feel I love to create.
I balance oak or walnut accents to keep spaces cozy without heaviness.
Consider these uses for warmth and texture:
- Open shelving in medium oak
- Walnut island countertop
- Reclaimed wood range hood
- Honey-toned bar stools
Soft Pastel Accents
Bringing soft pastels into a white-cabinet kitchen adds a gentle, curated energy that feels both fresh and timeless.
I layer mint, blush, and powder blue in textiles, glassware, and a painted island to create subtle contrast without overpowering clean cabinetry.
These hues photograph beautifully, lending nostalgic charm and modern restraint while keeping the space light, airy, and effortlessly edited.
Bold Contrasting Hues
After working with soft pastels, I like to punch the palette up with bold contrasting hues that make white cabinets sing.
I choose accents that bring depth and vintage charm while keeping a modern edge.
- Deep navy island for graphic structure
- Burnt orange for warm focal points
- Emerald backsplash for luxe contrast
- Matte black hardware to ground the scheme
Composition Strategies for Clean Lines
When I plan white-cabinet layouts, I focus on how elements align and interact so every joint, edge, and gap reads as intentional rather than accidental.
I favor horizontal runs, consistent reveal widths, and aligned hardware to create a calm rhythm.
I balance negative space with curated accents—open shelving, a single pendant—so lines stay crisp, proportions feel measured, and the composition photographs effortlessly.
Best Angles for Open and Galley Layouts
I like shooting open and galley kitchens from three go-to angles that show how white cabinets work in real life.
A wide-angle corner shot captures flow and sightlines, a counter-height eye-level view feels human-scale, and an overhead prep perspective clarifies workflow. Let’s look at how each angle highlights layout and material choices.
Wide-Angle Corner Shots
From a corner vantage point I can capture how open and galley kitchens breathe differently—one feels expansive, the other efficient—and that difference guides where I place a wide-angle shot.
I frame to show flow, scale, and material contrasts, letting white cabinets anchor the composition.
- Emphasize pathway and sightlines
- Include foreground details
- Keep verticals straight
- Balance light and shadow
Counter-Height Eye Level
Shifting my framing down to counter-height eye level lets me show how white cabinets meet the everyday human scale—how handles line up with sight, how appliances tuck under counters, and how movement flows between work zones.
I use this angle for open and galley layouts to emphasize tactile details, island relationships, and sightlines, capturing rhythm and proportion without resorting to heroic or overhead drama.
Overhead Prep Perspective
When I raise my camera to an overhead prep perspective, I get a clear read on how white cabinets organize the work triangle and frame movement through open and galley kitchens.
I survey lines, texture, and flow, then compose shots that celebrate function and warmth.
- emphasize traffic lanes
- capture prep zones
- highlight contrasting hardware
- show layered surfaces
Highlighting Architectural Details and Hardware
I lean into trim profiles and knob choices to make white cabinets feel intentional, not invisible.
I accentuate cornices, beadboard, and recessed panels to add shadow and character, and select aged brass or matte black hardware for contrast.
I photograph close-ups of joins and dovetails, letting texture and scale tell the story so layouts read as curated, lived-in, and quietly sophisticated.
Working With Natural and Artificial Light Sources
After showing the small details and hardware that give white cabinets personality, I look next at how light sculpts those choices.
I balance daylight and fixtures to reveal texture, warmth, and shadow, then tweak color temperature for mood.
- Maximize morning window light
- Layer overhead, task, and accent lighting
- Use dimmers for flexibility
- Choose bulbs that flatter whites and brass finishes
Managing Reflections and Glare on Glossy Finishes
Although glossy white cabinets can feel crisp and luxe, they also throw reflections that can distract or exaggerate imperfections, so I manage them deliberately to keep the look polished and comfortable.
I diffuse harsh light with sheer curtains, position soft lamps to fill shadows, and remove clutter that creates busy reflections.
I also use matte accents and strategic angles to tame glare and preserve depth.
Camera Settings for True-to-Life Whites
Soft lighting and careful layout help tame glare, but getting whites to read accurately in photos takes some camera know-how.
I dial in settings that respect nuance and avoid blown highlights. I recommend:
- Set custom white balance using a gray card.
- Expose to preserve highlight detail.
- Shoot RAW for latitude.
- Use low ISO and neutral picture profile for clean, true whites.
Post-Processing Tips to Preserve Texture
When I process images of white cabinetry, I focus on preserving the tactile details that make surfaces feel real rather than flat, so I prioritize subtle clarity and restrained contrast.
I gently lift midtone texture with targeted clarity, dodge/burn delicately to shape form, avoid over-sharpening, and use localized noise reduction.
I keep color casts neutral and check prints to make sure texture translates.
Staging Small Kitchens to Feel Spacious
If you want a small kitchen to read larger without losing warmth, I stage it to maximize sightlines, scale, and light while keeping vintage charm intact.
I edit clutter, pick petite seating, and layer soft textures so photos feel airy but lived-in.
- slim-profile stools
- open shelving with curated ceramics
- pale reflective surfaces
- strategic mirror or glass accents
You’ve got the tools to make white cabinetry sing on film — from mastering light to taming reflections and choosing textures that add depth.
When you shoot, think like a chef plating a simple dish: each element should highlight the main ingredient without stealing the show.
Keep settings honest, stage with restraint, and nudge whites with careful edits. Do this, and your kitchen photos will look curated, calm, and utterly inviting — like sunshine in a teacup.


