

I’ve mapped out 19 L-shaped outdoor kitchen layouts that maximize corner space, so you’ll get a practical, efficient setup that fits your yard. I’ll show you how to spot the ideal corner, balance work zones, and pair weatherproof materials with smart accessories. You’ll see options for inward vs. outward corners, compact footprints, and budget-friendly picks. If you keep scrolling, you’ll pick up tips that keep planning smooth and clutter-free.
Spot the Ideal Corner for Your L-Shaped Outdoor Kitchen

Choosing the right corner is half the battle. I look for protection from prevailing wind and steady shade at key cooking times, so smoke stays off me and guests stay comfy.
I favor a corner with easy access to prep, storage, and seating, plus strong footing. Test sightlines from grill to sink, and verify utility hookups are nearby and accessible. Additionally, consider incorporating elements like Big Green Egg setups that enhance both functionality and aesthetics in your outdoor kitchen design.
Core Principles: Work Flow, Sightlines, and Weatherproof Zones
I’ll walk you through how I map work flow, sightlines, and weatherproof zones so your L-shaped kitchen feels effortless.
We’ll keep the prep, cook, and cleanup zones clearly ordered, with sightlines that keep you aware of guests and traffic.
And I’ll lock in weatherproof zones early, so rain or sun never interrupts your time outside.
Work Flow Clarity
Clear work flow is the backbone of a functional L-shaped outdoor kitchen.
I design stations so prep, cooking, and cleanup follow a natural arc, minimizing steps. I keep appliances and prep surfaces close, with clear sightlines to diners.
I favor weatherproof zones near the door, ensuring rain won’t disrupt tasks. Clarity fades when clutter appears; tidy corners sustain momentum. Additionally, incorporating covered outdoor kitchen design elements can enhance your cooking experience throughout the year.
Sightline Planning
Sightlines guide how you move around an L-shaped kitchen, so I start by prioritizing what you want to see from each zone.
I keep sightlines clear, linking prep, cook, and serve areas for smooth flow. You’ll notice intentional angles, eye lines, and doorway views that shorten steps and reduce clutter.
- Align prep with the door you enter
- Line up grill and sink for quick transfers
- Maintain open sightlines to serving space
In addition, creating a seamless outdoor kitchen experience is essential for enhancing your overall cooking and entertaining enjoyment.
Weatherproof Zoning
Weatherproof zoning keeps outdoor kitchens usable in every season by placing wet, heat, and cold areas into protected, well-sealed zones.
I design layouts that isolate splash zones from cooking zones and keep wind crosses minimized.
I’ll route drainage, shade, and storage to shield cold snaps and heat days.
Practical zoning hubs streamline workflow, protect materials, and reduce maintenance, year-round.
From Planning to Action: One-Wall Prep Plus L-Shaped Dining

I’ll show how One-Wall Sync keeps prep efficient while you shift to an L-shaped dining setup that invites guests to mingle.
We’ll map the dining flow from prep to plate, so your layout supports both quick meals and relaxed gatherings.
Then I’ll outline practical planning-to-action steps to lock in the right gear, schedule, and spacing. Incorporating small kitchen ideas on a budget can elevate your outdoor kitchen’s aesthetic without breaking the bank.
One-Wall Sync Benefits
One-Wall Sync is all about keeping prep, cooking, and service tightly coordinated, so your outdoor kitchen connects smoothly with your L-shaped dining zone.
I’ve seen how this streamlines flow, minimizes steps, and speeds service.
- Centralized work zone
- Clear sightlines to dining area
- Consistent tool accessibility
L-Shaped Dining Flow
We’ve got to map out how the L-shaped dining flows from planning to action, so you can move smoothly from prep to plating without missing a beat.
I design the path to keep dishes flowing, stations clearly linked, and foot traffic predictable.
I’ll suggest practical spacing, intuitive routes, and responsive tweaks so your guests feel effortless, not crowded, during every outdoor gathering.
Planning To Action Steps
From mapping the L-shaped dining flow in the previous section, we’re ready to turn planning into action.
I’ll outline concrete steps you can follow tonight, then customize as needed.
- Confirm measurements and traffic flow before laying any materials
- Source compact, multi-use appliances for one-wall prep plus dining
- Schedule installation in stages to avoid clutter and delays
- Consider incorporating outdoor kitchen design layout formulas to enhance functionality and aesthetics.
Compact Footprint, Full-Function Zones: Essential Components

A compact footprint doesn’t mean you skip any function.
I design each zone with purpose: a prep nook, a grill station, a clean-and-store area, and a sink within reach.
Think flow over fancy: keep clear paths, weatherproof everything, and tie storage to nearby work surfaces.
Prioritize durable materials, easy maintenance, and modular options that grow as your needs evolve. Additionally, consider outdoor kitchen designs that not only enhance functionality but also elevate the aesthetic appeal of your patio.
Inward vs. Outward Corners: Which Layout Fits Your Space

Inward corners feel snug and intimate, while outward corners maximize prep space and traffic flow.
I weigh both options by how you cook, entertain, and store gear, then pick what suits your space today.
- Space efficiency vs. open movement
- Accessibility to grill, sink, and prep
- Future tweaks without reconfiguring the whole layout
Integrated Seating Ideas: Built-In Benches and Bar Stools
I’ll walk you through matched built-in seating that stays comfortable and clean, with precise height options and clear sightlines for the L-shaped layout.
We’ll cover how to calibrate seating depth and back support in built-ins, so guests aren’t crowded or cramped.
I’ll also share bar stool placement tips to balance access, flow, and conversation across the kitchen’s work zones.
Built-In Seating Calibrations
Built-in seating isn’t just about looks; it’s about comfort, flow, and clean lines that fit your space.
I tune height, depth, and knee space so guests wait less and chat more. Consistency matters—reveal edges, avoid gaps, and choose durable cushions.
- Align benches with counter height
- Plan footroom for worst-case stretch
- Integrate storage under seats
Incorporating outdoor kitchen bars can enhance the social atmosphere, allowing for seamless interaction with guests.
Bar Stool Placement Tips
Bar stools are the finishing touch that ties an L-shaped outdoor bar together, so placement matters more than you might think.
I place stools where traffic flows, not just where the view is best. Leave 24 inches for knee room, align with counter height, and stagger seating for conversation.
Keep occasional gaps for cleaning and weather access. Additionally, consider how indoor outdoor kitchen flows can enhance the overall functionality of your space when planning your seating arrangement.
Grilling Zones That Fit an L Layout Without Crowding
Ever wondered how to place grilling zones in an L-shaped outdoor kitchen without feeling crowded?
I’ve found practical moves that keep airflow and prep smooth, without sacrificing flame. Place the grill near the elbow for accessibility, stagger work zones to avoid overlap, and use a portable cart to expand counter space when needed.
- Align grill with prep sink for efficient flow
- Use a slim island edge for clearance
- Choose compact, dual-purpose tools
Corner Countertop Planning for Maximum Efficiency
Corner countertops should feel like a natural extension of your grilling and prep zones, not an afterthought.
I plan for a smooth workflow: place prep near the grill, set out utensils within arm’s reach, and leave a clear line to the sink.
Use durable, easy-clean materials, and allocate space for small appliances so traffic stays fluid and efficient.
Storage Strategies That Maximize Corner Nooks
Storage in corner nooks can feel tight, but with smart organization, you’ll gain accessible stash without crowding the space.
I keep essentials visible, labeled, and easy to grab, so you stay efficient.
- Use slim pull-out bins behind doors
- Install adjustable shelves for tall containers
- Hang hooks for utensils and lids within reach
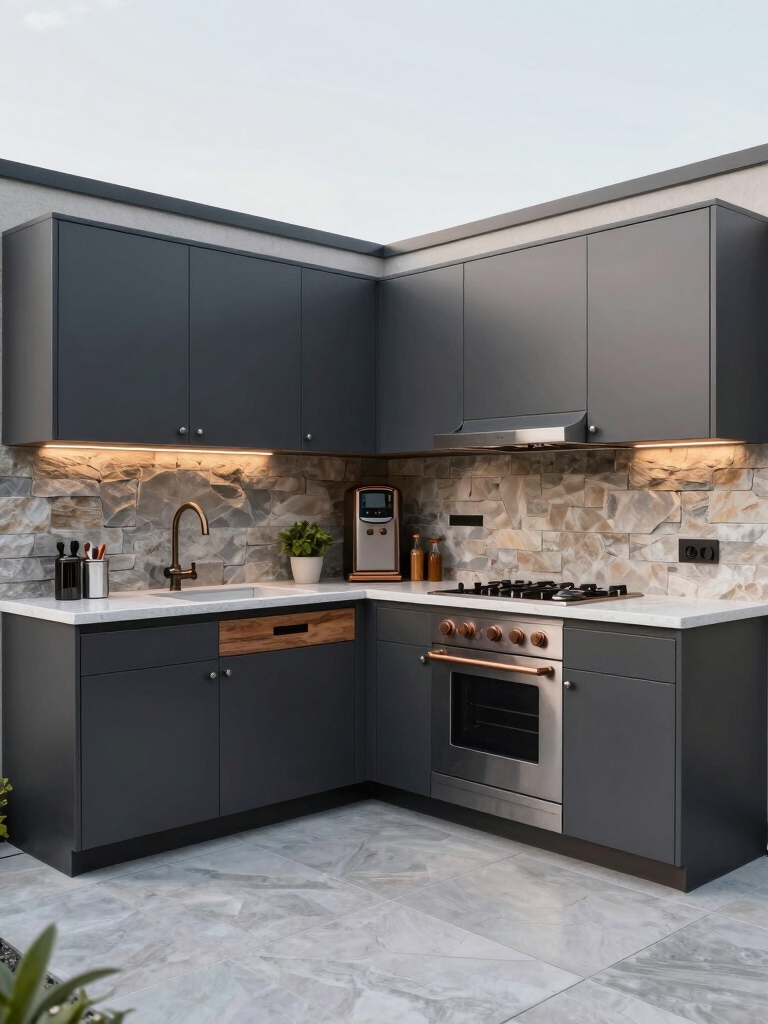
Appliance Placement for Smooth L-Shaped Workflow
When shaping an efficient L-shaped kitchen, I place the main appliances along the two legs to minimize steps and keep the work zones tight.
I align fridge, grill, sink, and prep area in a logical sequence, ensuring easy access from any corner.
I avoid cross-traffic, prioritize stable counter space, and keep cords and clutter out of active paths.
Lighting and Weatherproofing for Corner Kitchens
I’ll walk you through choosing weatherproofing materials that stand up to our climate and kitchen use, so your corner setup stays dry and durable.
Then I’ll share practical lighting placement tips that illuminate work zones without glare, while keeping the space safe and inviting.
Finally, we’ll touch on corner kitchen ventilation to move smoke and moisture away efficiently, so you can cook comfortably year-round.
Weatherproofing Materials Guide
Weatherproofing is as important as design when you’re planning a corner outdoor kitchen, because the right materials keep lighting and outlets safe and reliable year round.
I choose durable seals and weatherproof boxes, plus rust‑resistant fittings to prevent corrosion and trips.
- Use IP-rated outlets and covers
- Seal joints with exterior-grade caulk or sealant
- Pick weatherproof electrical boxes and conduit
Lighting Placement Strategies
Lighting is the backbone of a corner outdoor kitchen, especially when weatherproofing margins the space.
I pick lights that cover prep, cooking, and hosting zones without glare. Use dimmable LEDs, weatherproof fixtures, and targeted under-cabinet strips for shadows-free tasks.
I place outlets and switches for easy access, and keep cords tucked. Practical, safe lighting keeps gatherings effortless.
Corner Kitchen Ventilation
Ventilation goes hand in hand with lighting and weatherproofing in a corner kitchen, so I’ll keep the focus practical: a well-ventilated space prevents fumes from lingering and keeps outdoor cooking comfortable, even when the weatherproofed zones are tight.
- Choose a high CFM vent and duct routing that minimizes outdoor exposure
- Seal gaps around cabinetry and railings to reduce moisture
- Use weatherproof, rust-resistant fans for durability
Water and Waste Hooksups in Tight Corners
When you’re squeezing water lines and waste drains into a tight corner of an L-shaped outdoor kitchen, practical layout matters more than grandeur.
I keep hookups accessible, tucked, and clearly labeled, so repairs don’t become a scavenger hunt. Use slim, corrosion-resistant fittings, short runs, and a single slope.
Plan access panels for trims, not surprises. Practical efficiency beats ornate routing.
Materials That Keep Corners Feeling Open and Breathable
I’m thinking about materials that keep corners feeling open and breathable, so I’ll focus on breathable options and open corner design elements.
Think lightweight, permeable surfaces and slim profiles that don’t trap heat or clutter the view.
Let’s explore how these choices can maintain airflow while still delivering durability and style.
Breathable Material Choices
Materials that stay open and airy around corners really help an outdoor kitchen feel spacious.
I choose breathable materials that shed heat, resist staining, and forgive weather.
I’ll share practical picks that keep airflow and vibe high without clutter.
- Perforated screens and slatted panels
- Water-friendly, quick-drying textiles
- Light-toned, porous stone or concrete grout
Open Corner Design Elements
Open corners stay airy when I choose edge treatments that barely whisper at the edges.
I select materials and profiles that disappear visually, like slim steel, recessed trim, and open-pore stone.
I avoid heavy borders, stacked crowns, or bulky corners.
This keeps sightlines clean, enhances airflow, and makes prep zones feel less crowded for you and me.
Practical, intentional design.
Modular Components for Scalable Outdoor Kitchens
Modular components let you build an outdoor kitchen that grows with your needs.
I’ll show you practical builds: lightweight panels, modular cabinets, and plug‑in utilities that swap as you scale.
- Flexible cabinet modules for varying storage
- Removable counters and portable grills
- Integrated hookups (gas, water, power) with simple interfaces
Privacy, Shade, and Wind Considerations at the Corner
As we move from modular components to a corner layout, privacy, shade, and wind become practical design tools you can use right away.
I consider sightlines, nearby neighbors, and plant screens to create intimate zones without feeling closed in.
I favor adjustable shade like pergolas, and lightweight screens that soften wind without sacrificing airflow or cooking efficiency.
Budget Tiers: Smart Picks for Small and Larger Yards
Budget tiers matter more than you might think: they shape what you can actually build, from compact lessons in efficiency to bigger, yard-spanning setups.
I’ll pick smart, scalable elements that fit your space and budget. Start small, grow later.
- Compact island with basic grill and fridge
- Modular cabinets for future expansion
- Durable materials that weather well
Maintenance-Friendly Finishes and Layouts for Corners
Corners are tricky, so I’ll focus on finishes that stand up to weather and daily use while keeping layouts simple and repair-friendly.
I prioritize non-slip, easy-clean surfaces and modular components that can be swapped without full redoes. Choose neutral tones, durable composites, and stainless hardware.
Plan tight access for maintenance, label panels, and run cleanable joints to minimize ongoing upkeep.
Case Studies: Three Standout L-Shaped Setups in Small Yards
Small yards demand smart, punchy layouts, and three standout L-shaped setups show how to make the most of limited space.
I’ve seen tight corners transform with careful zoning, compact prep, and accessible seating. Here are three quick takeaways:
- Compact workflow: grill, prep, clean in a straight line
- Vertical utilities: wall-mounted storage and hooks
- Integrated seating: wraparound bench for social cooking
Common Mistakes to Avoid in Corner-L Designs
Corner-L designs can look sleek, but they’re easy to screw up if you don’t plan layout logic from the start.
I’ve seen tight corners collapse when the grill, sink, or prep zone clash with traffic flow. Avoid random placements; map clear zones, keep a functional triangle, and allow walkways.
Measure door swings, seating reach, and storage access before swinging a hammer. Practical, precise planning saves frustration.
Conclusion
I’ve stood where walls breathe and doors sigh, watching corners turn into kitchens that kiss the outdoors. Think of the L as a compass, guiding your habits and prayers for shade, heat, and heart. The corner isn’t empty space—it’s a quiet harbor where meals anchor, stories circle, and tools become trusted sailors. Plan with flow, tint with weatherproof charm, and let the setup speak softly, then work loudly, delivering comfort where the yard already invites you home.


