I keep dinners alive in a tiny eat-in kitchen by squeezing in banquette seating with hidden storage, slim stacking stools, and a narrow pedestal table so everyone fits without crowding. I use rolling prep carts and zone my workspace for cooking, plating, and cleanup.
Vertical racks, magnetic knives, and open shelves free counters, while layered lighting and washable textiles make the nook feel cozy. Stick around and I’ll show how to make each trick work in your space.
Maximize Seating in a Tight Footprint

When space is tight, I focus on seating that does double duty and fits the room’s rhythm; banquettes, fold-down tables, and stools that tuck under counters keep traffic flowing without sacrificing spots.
I pick slim-profile chairs, mix bench cushions with textured fabrics, and mount narrow ledges for drinks. Clever lighting and layered textiles make the nook feel intentional, cozy, and ready for meals.
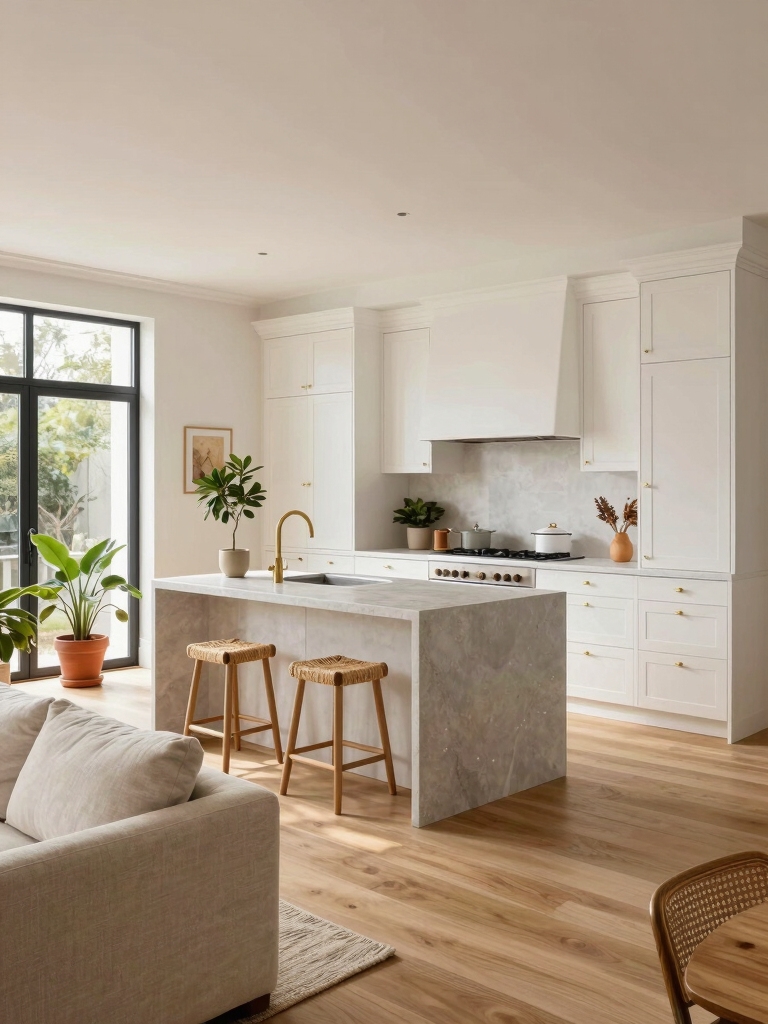
Many small kitchens benefit from cozy kitchen island seating to maximize usable spots without overwhelming the room.
Choose Multi-Purpose Furniture

I lean on multi-purpose pieces to make a small eat-in kitchen feel like it does more than one job — a console that doubles as a prep surface, a storage ottoman that adds extra seating, or a drop-leaf table that expands for guests and tucks away on weekdays.
I choose durable finishes, hidden storage, and slim silhouettes so each piece layers function and style without crowding.
Small kitchen islands designed for tiny floorplans can serve as seating, prep, and storage all in one, making them a practical centerpiece for compact spaces with clever storage solutions.
Create a Flexible Layout for Flow

I like to think of the kitchen as a few mini-workshops, so I zone by task—cooking, prep, and dining—so everything has a clear place.
I also keep moveable prep surfaces like a rolling cart or folding table handy so I can shift workspace as needed. That flexibility keeps traffic flowing and makes a small kitchen feel much larger.
Adding smart storage and layout tricks, like using zone-based design to organize work areas, makes the space more efficient.
Zone by Task
Although a tiny kitchen can feel cramped, I map out clear zones for prep, cooking, cleanup and storage so everything moves smoothly from one task to the next.
I group tools, frequently used ingredients and dedicated surfaces nearby each zone, layer open shelving with hooks for visibility, and keep pathways uncluttered so I can move confidently between tasks without wasting steps or hunting for essentials.
Small Space Kitchen Storage Ideas That Wow includes tips on maximizing vertical space and using multifunctional furniture for efficiency, like combining seating with hidden storage to keep clutter down.
Moveable Prep Surfaces
Pull together a few lightweight pieces and you’ve got a kitchen that adapts to how you cook.
I use a rolling cart, a slim butcher block and folding tray tables to extend surfaces where needed. They tuck away when guests arrive, swap roles for prep, serving or drinks, and keep traffic flowing.
It’s simple, layered, and endlessly practical. Many of these ideas come from clever design strategies for tiny spaces.
Use Vertical Storage Smartly

I like squeezing extra function into small kitchens by thinking up instead of out — wall-mounted pot racks free up cabinets and keep frequently used pans within reach.
Adding overhead shelving units above the eat-in area or stove gives you room for bowls, plants, or pretty cookbooks without stealing floor space.
Together these vertical moves layer storage and style so the whole room feels organized and intentional.
Clever Small Kitchen Cabinet Ideas often include wall-mounted pot racks to maximize every inch without remodeling.
Wall-Mounted Pot Rack
A wall-mounted pot rack is a space-saver and a style move I reach for in small kitchens, since it clears cabinet clutter while keeping cookware within easy reach.
I like that it’s practical and decorative — here’s how I use it:
- Hang everyday pans for quick access.
- Display colorful pots as decor.
- Add hooks for utensils.
- Keep lids organized and visible.
A simple pot rack is a quintessential vertical storage solution that hides clutter while maximizing usable space.
Overhead Shelving Units
If you liked how the pot rack freed up cabinet space, overhead shelving does the same thing but up high — I use it to make every inch count.
I layer open shelves above counters for glassware, baskets, and seasonal items, mixing textures and colors.
It keeps daily tools reachable, looks airy, and turns storage into a styled display that’s practical and personal.
Install Lighting That Sets the Mood

Often I reach for lighting first when I rethink a small eat-in kitchen, because it instantly changes how the space feels and functions.
I layer fixtures to balance task and atmosphere, and I want you to try simple choices:
- Dimmable overhead.
- Pendant over the table.
- Under-cabinet strips for prep.
- A warm accent lamp for evenings.
Define the Eating Area With Rugs and Paint
I like to anchor a small eat-in spot with layered rugs to give the area texture and define the floor plane.
Then I use an accent wall or a painted color zone to visually separate the eating area from the cooking space. Together those layers make the nook feel intentional without taking up square footage.
Anchor With Layered Rugs
With a few layered rugs and a pop of paint, I’ll define the eating nook so it reads as its own cozy zone within a small kitchen.
I layer textures and scale to anchor the set.
- Start with a flatweave base.
- Add a patterned rug for warmth.
- Keep proportions to the table.
- Finish with a small washable topper.
Accent Wall Color Zones
By painting a single wall and grounding it with a layered rug, I make the eating nook read like its own intentional room instead of an afterthought in a small kitchen.
I pick a warm, contrasting hue and echo it in cushions or art, so the zone feels cohesive. Rugs define footprint; paint gives mood. Together they create a cozy, styled-layering corner for meals.
Opt for Slimline Tables and Expandable Options
Although space is tight, I still want a table that feels intentional rather than an afterthought.
I choose slimline pieces and expandable tops to stay flexible. Consider:
- Narrow pedestal table for legroom.
- Drop-leaf option for guests.
- Wall-mounted foldaway when not in use.
- Extendable leaf that tucks away neatly.
These layered choices keep the room curated and ready.
Incorporate Built-In Banquettes and Underseat Storage
I love using built-in banquettes to squeeze in space-saving seating solutions without crowding the room.
I tuck cookware, linens, or kids’ toys into underseat hidden storage compartments so everything stays within reach but out of sight.
The result is a cozy, multifunctional nook that serves as dining spot, homework station, and extra storage all in one.
Space-Saving Seating Solutions
Think of a built-in banquette as your kitchen’s multitool: it tucks into a corner, creates a cozy dining nook, and hides smart storage beneath the seat.
I use layered cushions and mixed fabrics to add depth without clutter. Try these space-saving seating ideas:
- Narrow bench with tapering legs
- Fold-down table
- Stackable stools
- Corner L-shaped banquette with slim profile
Hidden Storage Compartments
You can make seating do twice the work by building storage right into it — I like banquettes with lift-up seats or hidden drawers so dishes, linens, and kid gear stay out of sight but close at hand.
I pick durable upholstery, mixed baskets, and sectioned compartments to keep things organized. It feels stylish and lived-in, layering textures while maximizing every inch.
Cozy Multifunctional Nook
When I’m designing a cozy, multifunctional nook, I lean into built-in banquettes with underseat storage so the space feels both intentional and effortless.
I tell you to layer textures and practical zones:
- Cushioned banquette for lounging.
- Pull-out drawers for linens.
- Hidden cubbies for cookware.
- Floating shelf for plants and books.
It becomes comfy, neat, and unexpectedly versatile.
Keep Countertops Clear With Clever Organizers
Tucking away clutter is my go-to trick for making a tiny kitchen feel roomy — and clever organizers do most of the heavy lifting.
I rely on slim utensil rails, magnetic knife strips, under-shelf baskets, and tiered cabinet risers to free up workspace.
Pocketed door organizers and labeled jars keep essentials visible but off counters, so prepping feels calm and dinners come together with less stress.
Add Personal Touches That Invite Conversation
Something as simple as a well-chosen print or a stack of vintage bowls can make guests pause and start a conversation, so I pepper my eat-in nook with pieces that tell a story.
I mix textures and memories, so each meal feels curated:
- Heirloom plates
- Travel postcards
- Woven placemats
- Handwritten recipe cards
They spark chat and feel like home.
Streamline Meal Prep With Zone Planning
Because I want cooking to feel less like a puzzle, I divide my eat-in kitchen into clear zones—prep, cooking, plating, and cleanup—so each task has a dedicated spot and tools are always within reach.
I keep cutting boards, knives, and bowls near prep; pans and utensils by the stove; plates and garnishes at the plating area; and trash and dish tools by cleanup for smooth flow.
Select Materials That Stand Up to Daily Use
Once I’ve laid out zones that make cooking flow, I pick materials that can actually handle daily life without drama. I want surfaces and finishes that age well, feel good, and clean fast.
I choose:
- Quartz counters for toughness.
- Matte laminate for easy maintenance.
- Porcelain tiles for durability.
- Solid wood for warmth and repairability.
Make Small Appliances Work Harder
I lean on small appliances to fill gaps big appliances can’t, so I arrange and choose them with purpose: a compact convection oven that doubles as a toaster, a slimline dishwasher tucked under the counter, and a multi‑function blender that replaces a dozen single‑use gadgets.
I stack functions, use vertical storage, and keep cords neat so each device earns its spot, ready for quick dinners and tidy counters.
Use Mirrors and Reflective Surfaces to Open the Space
After I’ve pared down gadgets and given each small appliance a clear job, I look to mirrors and shiny surfaces to make the room feel twice as big without adding square footage.
I layer reflective tricks for depth and light:
- Mirror backsplash
- Glossy cabinets
- Stainless appliances
- Glass shelving
Each adds sparkle, amps light, and visually stretches the dining nook.
Rotate Seasonal Table Settings and Centerpieces
Switch things up seasonally to keep a small eat-in kitchen feeling fresh without rearranging furniture or buying new pieces every month.
I swap linens, placemats and napkins for color and texture, then layer a simple centerpiece—fresh fruit in summer, a low greenery bundle in spring, warm-hued candles in autumn, pine sprigs in winter.
It’s easy, budget-friendly, and makes dinner feel intentional.