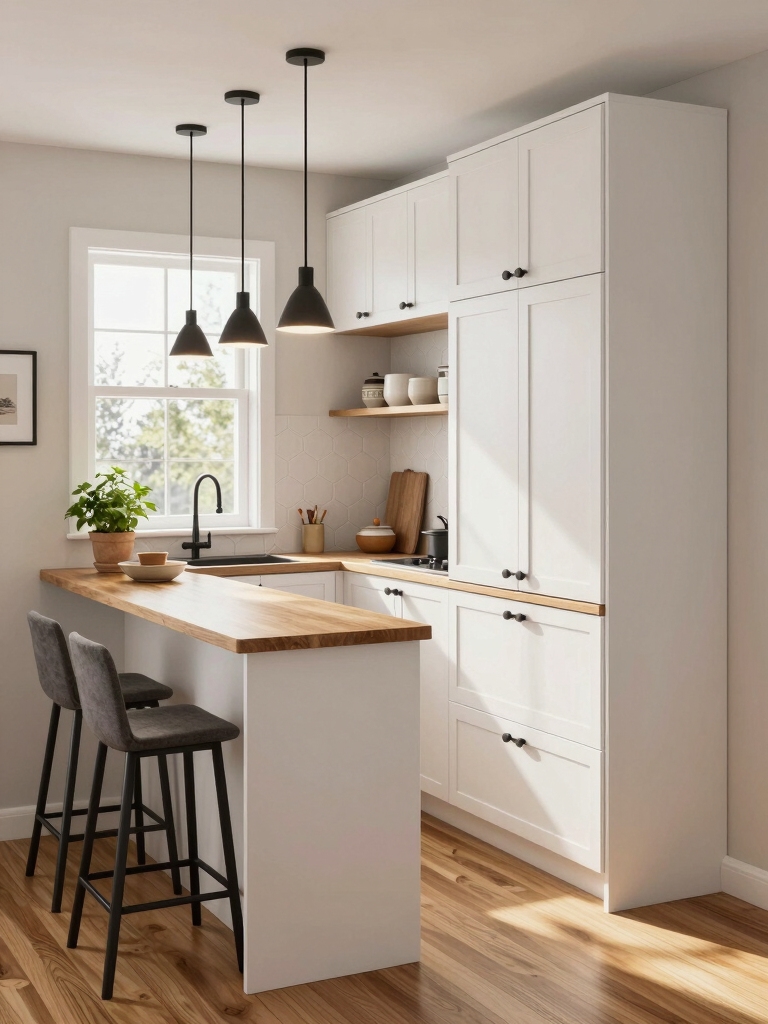
I’ve found that a slim, floating peninsula often beats an island in a small kitchen — it keeps sightlines open, preserves floor space, and still gives you prep surface, storage, and seating. I like L-shaped peninsulas for creating compact work triangles and dual prep zones, and multi-level tops for a tidy divide between cooking and casual dining.
With light finishes, layered lighting, and under-counter drawers you get big impact on a small budget. Keep going to see practical layouts and styling tips.
Choosing the Right Peninsula Shape for a Small Kitchen

Shape matters: pick a peninsula that fits your flow and frees up space.
I’ll help you choose between straight, L-shaped, and angled options based on traffic patterns and prep zones.
I favor streamlined profiles when aisles are tight and L-shapes when you need extra counter or seating.
Measure pathways, consider sightlines, and opt for a shape that simplifies movement and chores.
Also consider how a peninsula can serve multiple functions—space-saving storage adds value without expanding your footprint.
Floating Peninsula Designs to Maximize Floor Space

I love how a floating peninsula keeps sightlines open, making a tiny kitchen feel larger and more connected to the rest of the home.
I’ll show you smart underneath storage options—hidden drawers, open shelving, or dangling baskets—that don’t block the visual flow.
With the right proportions, you get both clear floor space and practical storage without crowding the room.
Smart kitchen islands can fit into compact layouts when sized and designed thoughtfully, including space-saving options like slim profiles and multifunctional storage.
Open Visual Flow
When I’m working with tight kitchens, I favor a floating peninsula because it keeps sightlines open and lets traffic flow around the space without feeling boxed in.
I choose slim profiles, light finishes, and minimal supports so the room breathes. That visual continuity makes a small kitchen feel larger, more connected to adjacent rooms, and effortlessly stylish without blocking movement or conversation.
I also often recommend exploring small kitchen island ideas that use compact footprints and multifunctional designs like space-saving layouts to make the most of limited floorplans.
Underneath Storage Solutions
With a floating peninsula, I like to turn the open space beneath into practical storage that keeps the kitchen airy while corralling clutter.
I add slim drawers, pull-out baskets, and inset shelves mounted low so cleaning stays easy and sightlines remain open.
Hidden compartments for trays and cutting boards preserve style, while castered bins offer flexible overflow without blocking flow or feeling bulky.
These layouts borrow clever small kitchen cabinet ideas like compact pull-outs to make every inch count.
L-Shaped Peninsula Layouts for Efficient Workflows

I love how an L-shaped peninsula naturally locks your sink, stove, and fridge into a compact triangle so you can move smoothly while cooking.
I’ll show how to tweak that triangle and carve out dual prep zones on either arm of the peninsula for simultaneous tasks.
Let’s walk through simple tweaks that keep traffic clear and prep efficient.
Small kitchens often use clever layouts to maximize function, including smart small kitchen solutions that save space and boost efficiency.
Optimize Triangle Workflow
Because I cook most evenings, I’ve learned that an L-shaped peninsula can make the kitchen feel both open and rigorously efficient—especially when you plan the work triangle deliberately.
I position sink, stove, and fridge so paths are short and unobstructed, keeping prep zones between them.
Thoughtful placement, clear sightlines, and tight distances speed cooking and reduce steps without crowding style or storage.
Small U-shaped kitchens that hug every wall can inspire similar efficiency in compact spaces.
Dual-Zone Prep Stations
Having arranged the sink, stove, and fridge for tight, unobstructed movement, I like to split the peninsula into two dedicated prep zones so cooking feels organized instead of cramped.
One side becomes a clean staging area for plating and chopping, the other handles messy prep and cookware.
Clear tools, dedicated trash, and matching surfaces keep workflow smooth and the kitchen feeling calm and chic.
Designers often recommend compact layout strategies to maximize efficiency in small kitchens.
Integrating a Breakfast Bar Without Crowding the Room

When I want to add a breakfast bar to a small kitchen without making it feel cramped, I focus on slim profiles and smart placement so the space breathes.
I pick narrow stools, a cantilevered surface, and keep sightlines clear. Lighting and minimalist finishes make the bar feel intentional, not intrusive, giving morning routines a cozy, efficient spot that doesn’t dominate the room.
Multi-Level Peninsulas: Prep Zones and Seating Solutions

I love using a multi-level peninsula to split tasks without sacrificing flow — a lower prep surface keeps chopping and mixing contained while a raised ledge hides crumbs and doubles as casual seating.
I recommend contrasting materials for visual separation, comfortable stool height, and clear sightlines so cooks and guests interact effortlessly.
It’s a smart, stylish solution that balances function and socializing in tight spaces.
Built-In Storage Ideas Under the Peninsula
You can make the most of a multi-level peninsula by using its underside as smart storage that keeps clutter out of sight and tools within reach.
I love installing shallow drawers for cutting boards, pull-out bins for recycling, and slatted racks for baking sheets.
Magnetic knife strips, concealed appliance garages, and integrated wine cubbies keep surfaces clear while staying stylish and highly functional.
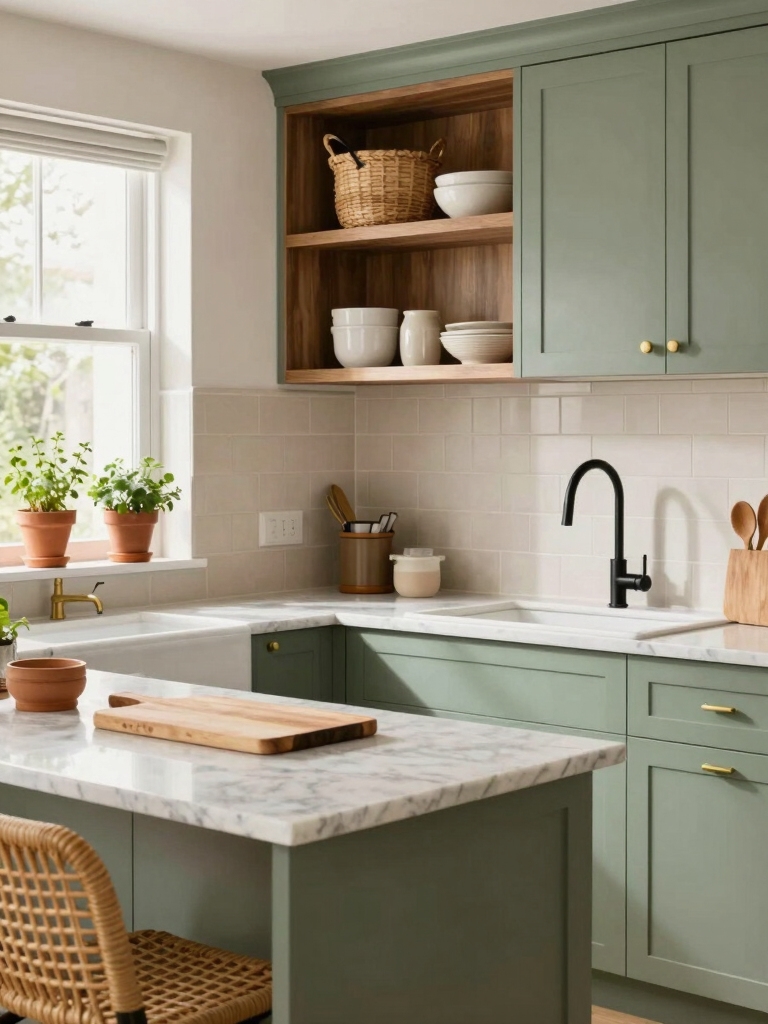
Combining Open Shelving and Closed Cabinets for Balance
I like to mix open shelving with closed cabinets on a peninsula to keep the visual flow light while hiding clutter where it matters.
It gives you a practical storage mix — dishes and pretty glassware on display, pots, pans and less attractive items tucked away.
I’ll show how styling and accessibility can work together so everything looks intentional and stays easy to reach.
Visual Balance and Flow
Although open shelving can make a small kitchen feel airy, I like to pair it with closed cabinets to keep the space looking tidy and intentional.
I balance visual weight by alternating open and closed sections, anchoring heavier cabinet blocks near the peninsula.
This creates effortless flow, guides the eye, and lets curated items breathe without overwhelming the room. It’s calm, modern, and practical.
Practical Storage Mix
Mixing open shelving with closed cabinets lets me keep a small peninsula both stylish and highly functional.
I use closed cabinets for clutter, appliances, and less pretty pantry items, while open shelves display dishes, cookbooks, and a few plants.
That contrast keeps the space airy yet organized, gives quick access to daily items, and feels intentional rather than chaotic.
Styling and Accessibility
When I pair open shelves with closed cabinets on a small peninsula, I aim for a look that’s both curated and usable—so the things I reach for every day are easy to grab while less attractive items stay tucked away.
I style open shelves with a few ceramics, cookbooks, and greenery, keeping closed cabinets for appliances and clutter, balancing visual calm with practical access.
Narrow Peninsulas That Still Offer Plenty of Function
If you’re working with a tight footprint, I’ve found that a narrow peninsula can still pull double duty—serving as prep space, a casual dining spot, and extra storage—without crowding the room.
I choose slim profiles, under-counter drawers, and overhang seating to keep flow.
Think vertical storage, integrated cutting boards, and clever lighting so the peninsula feels purposeful, not cramped.
Using Materials and Finishes to Visually Expand the Space
I like using light-reflective surfaces like glossy backsplashes and polished countertops to bounce light around a tight kitchen and make the peninsula feel less boxy.
Keeping the flooring color continuous between kitchen and adjoining rooms lets the eye travel uninterrupted, visually stretching the space.
Together, those choices keep a small peninsula feeling airy and cohesive without changing the square footage.
Light-Reflective Surfaces
Bouncing light off glossy surfaces and bright finishes can make a tiny peninsula feel like it belongs to a much larger kitchen.
I recommend high-sheen cabinetry, lacquered backsplashes, polished quartz, and mirrored accents to amplify daylight and fixtures.
They create depth without clutter, so the peninsula reads airy and intentional. Choose finishes that reflect subtly, not glare, for a refined, open look.
Continuous Flooring Color
Glossy surfaces help light travel, and matching that brightness underfoot helps the room read larger — so I look to continuous flooring color to lengthen sightlines and unify the peninsula with the rest of the kitchen.
I pick a neutral, slightly warm tone that flows from entry through prep zones, avoiding abrupt shifts. That simple continuity visually widens the space and feels intentionally calm.
Lighting Strategies to Highlight a Compact Peninsula
When I’m lighting a compact peninsula, I think about layers first: task lights for prep, accent lights to draw the eye, and ambient light to keep the space feeling open.
I prefer clean, subtle fixtures that flatter surfaces and scale.
- Pendant over workspace for focused light
- Under-cabinet LEDs for prep
- Toe-kick strips for soft glow
- Dimmer controls to set mood
Seamless Transition Between Kitchen and Living Areas
Because the kitchen often flows directly into the living area, I focus on small design moves that make the shift feel intentional rather than accidental.
I use consistent materials, subtle rugs, and coordinated color accents to tie zones together.
Low-profile seating keeps sightlines open, while layered lighting creates mood without walls. The result feels cohesive, relaxed, and deliberately designed for everyday life.
Appliance and Sink Placement on Small Peninsulas
I place appliances and the sink on a small peninsula with purpose, treating that strip of counter as both a workhorse and a social anchor.
I balance function and flow, keeping prep zones efficient and sightlines open.
- Position sink near plumbing for efficiency
- Keep cooktop away from overhangs for safety
- Reserve clear prep space between appliances
- Use under-counter drawers for tidy storage
Smart Seating Options for Tight Peninsula Spaces
I usually pick seating that feels intentional and compact, treating the peninsula as both a functional ledge and a cozy gathering spot.
I favor slim stools with low backs or tucked benches to save circulation space, swivels for easy access, and varied heights for casual dining or work.
Choose materials that read light—metal, cane, or slim-profile upholstery—to keep the area airy and inviting.
Styling Tips: Backsplash, Countertop, and Edge Details
When I’m styling a small peninsula, I treat the backsplash, countertop, and edge details as a coordinated trio that can either widen the visual field or make the space feel boxed in. I choose contrasts deliberately and keep lines clean.
- Use continuous backsplash to visually extend surface
- Pick lighter counters to open sightlines
- Opt for eased edges for softness
- Match grout to tile for cohesion
Budget-Friendly Peninsula Upgrades That Make an Impact
I often find small, high-impact tweaks make a big difference on a tight budget, so I focus on changes that punch above their cost.
I swap cabinet hardware, add peel-and-stick backsplash, paint the peninsula base a bold contrast, install affordable under-cabinet lighting, and use a stylish runner or stool to elevate the look.
These moves feel luxe without breaking the bank.