I’ve perfected 19 deep-drawer configurations that streamline my kitchen workflow and keep tools instantly accessible. I prioritize measuring twice, using adjustable dividers, and stacking smartly to maximize every inch. I’ll show you budget-friendly makeovers, soft-close features, and modular inserts for pots, lids, and gadgets. You’ll learn to transform corner dead space with narrow slides and clear containers for quick spotting. If you keep going, you’ll reveal even more practical setups for clutter-free drawers.
Why Deep Drawers Sharpen Kitchen Workflow

Deep drawers streamline every kitchen task by keeping the right tools close at hand and easy to access. I notice how faster prep becomes when I can grab a peeler, tongs, or measuring cups without digging. With organized depths and labels, routines stay smooth, mistakes drop, and cleanup is simpler. You’ll feel the workflow tighten, consistently efficient, and stress-free. Additionally, implementing smart organization tips can enhance your kitchen’s functionality even further.
Measure Before You Buy: How to Size Deep Drawers

Before you buy, I’ll walk you through measuring for deep drawers so everything fits right.
We’ll cover drawer depth details, fitment, and sizing steps you can actually use in your kitchen.
Let’s keep it practical: measure twice, note clear dimensions, and compare against your chosen drawer options.
Measure Before Buying
When you’re sizing deep drawers, measure twice and buy once to avoid costly mistakes.
I’ll walk you through a practical, no-nonsense approach: know your existing cabinet openings, note drawer rails, and consider clearance for handles.
Don’t overestimate capacity—prioritize usable space.
I’ll sketch templates, compare sizes, and confirm with a quick mock-up, ensuring each drawer fits current needs precisely.
Drawer Depth Details
If you’re sizing deep drawers, start with a precise measurement plan that keeps everything usable.
I outline depth first, then width, then clearance for pulls and dividers, so items aren’t buried. This guarantees smooth slides, avoids wasted space, and supports common kitchen tools.
- Measure total cabinet depth and subtract slides and liners
- Account for utensil tray height and tall containers
- Leave few extra millimeters for easy opening
Fitment And Sizing Guide
So let’s start with measuring before you buy: how deep your drawers are, how wide the cabinet opening is, and how much clearance you’ll need for pulls and dividers.
I’ll outline fitment basics: note drawer height, track style, and any interior obstructions.
Then, compare specs to your space, add a small margin, and confirm compatibility before purchasing to avoid surprises. Additionally, consider incorporating space-saving solutions like drawer dividers to maximize your storage efficiency.
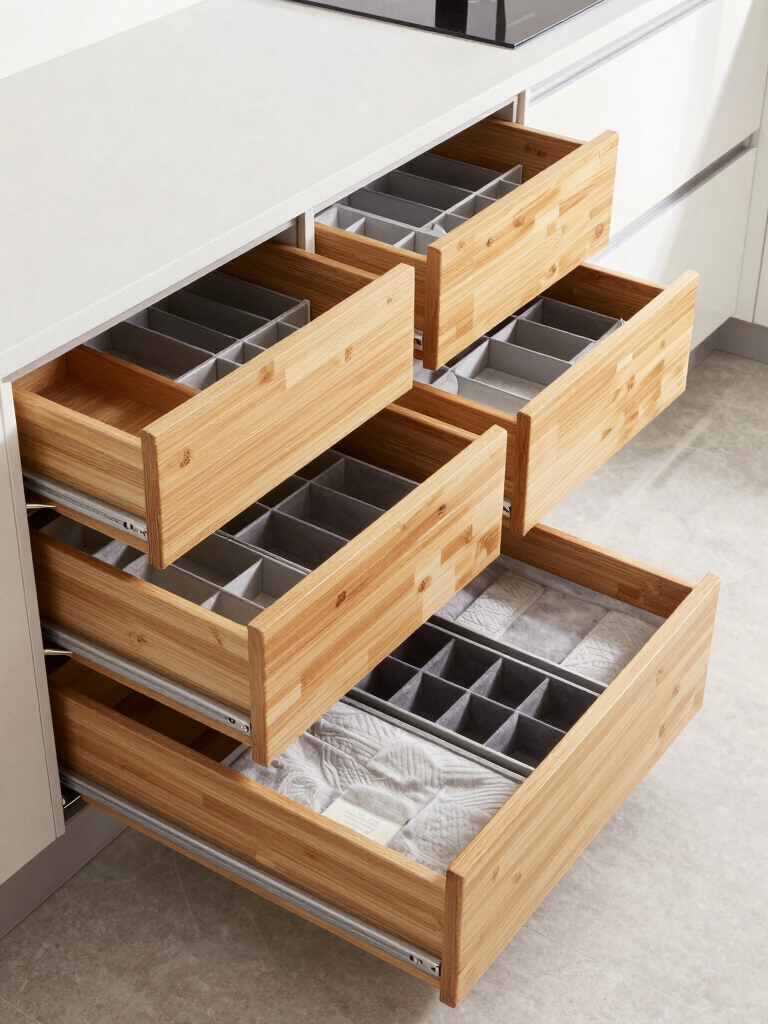
Choose Adjustable Dividers for Any Gadget

I like how flexible divider options let me tailor each drawer to any gadget.
Quick-adjust partitioning keeps things tidy as I switch between categories, from large tablets to tiny lids.
With gadget-specific alignments, I can optimize space without guessing where every piece should go.
Flexible Divider Options
Flexible divider options let you tailor a drawer to any gadget, from spatulas to smartphone docks.
I show you practical setups that adapt as needs change, avoiding bulk and clutter.
You’ll swap sections, reconfigure depths, and seal edges for quiet use.
Let’s implement options that keep tools accessible, organized, and ready when you reach in, every time.
- Use modular grids for varied widths
- Incorporate soft-touch liners for delicate items
- Label pockets for quick identification
Additionally, implementing smart kitchen cabinet organization techniques can further enhance your storage efficiency.
Quick-Adjust Partitioning
When I set up a drawer for any gadget, adjustable dividers are my go-to. I position slim panels to create clean niches, then tweak heights as needed for bulky chargers or tiny cables. Quick-adjust mechanisms save time, letting me reconfigure on the fly without tools. This keeps items organized, accessible, and adaptable for evolving gadget stacks and daily tasks. Additionally, using kitchen drawer organization techniques can further enhance your efficiency and streamline your workflow in the kitchen.
Gadget-Specific Alignments
Gadget-specific alignments hinge on choosing adjustable dividers that let each item sit snugly in its own spot.
I tailor the layout to each gadget’s shape, weight, and use, then test access and return paths. You’ll gain calm, confident drawers that stay organized.
- Reserve a shallow slot for cables and tiny adapters
- Create a deeper bay for bulky gadgets
- Label each section for quick grab-and-go access
Additionally, consider implementing smart cabinet organization techniques to make the most of your drawer space and enhance overall efficiency.
Modular Inserts for Pots, Pans, and Lids

Modular inserts for pots, pans, and lids keep a drawer from turning into a jumble: they hold each piece securely, so you can grab what you need without digging.
I design mine to fit standard sizes, with adjustable dividers that adapt as you add or swap pieces. This setup reduces chaos, speeds prep, and preserves cabinet space with simple, practical organization. Additionally, using smart storage ideas ensures that every inch of your kitchen is utilized efficiently.
Put Vertical Space to Work: Stacking and Spacing

We’ve sorted the lids and tall items with modular inserts, but there’s still wasted space up top and in between.
I stack smartly and space evenly, using height tiers, narrow bins, and slim spacers to maximize every inch. You’ll feel the difference as items stay upright, accessible, and visually tidy.
- Use vertical dividers for lids and bottle necks
- Create micro-stacks with uniform heights
- Add slim spacers to level uneven rows
Additionally, consider implementing smart cabinet organization strategies that can further enhance your kitchen’s efficiency.
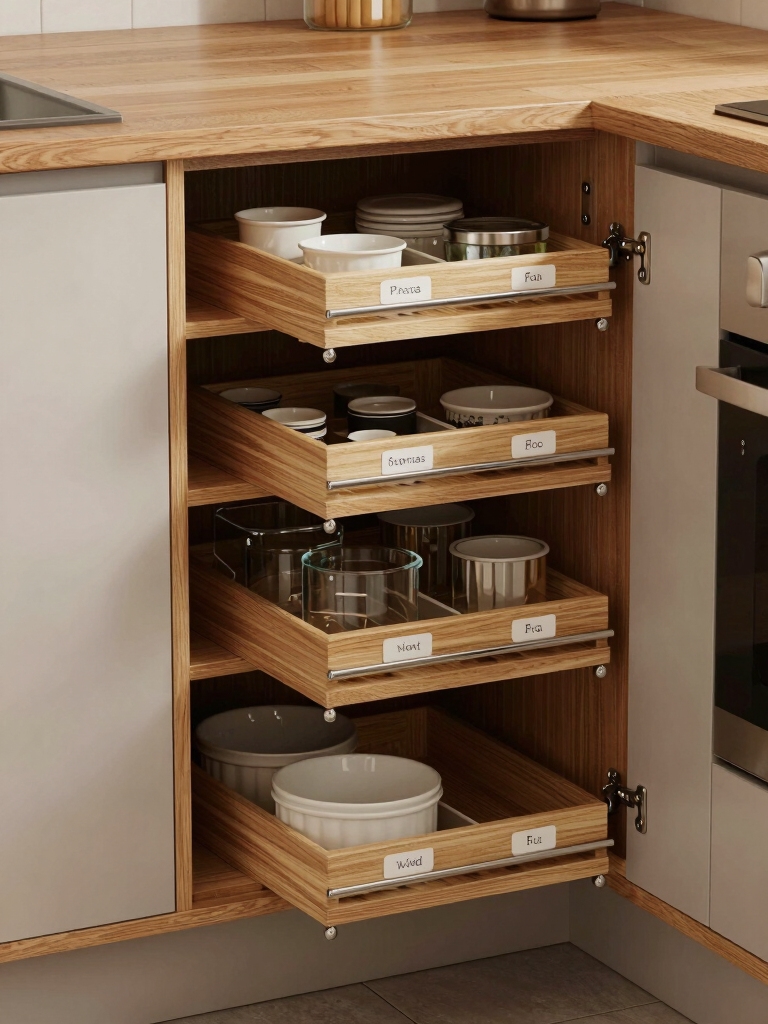
Pull-Out Corner Solutions That Eliminate Dead Space
I’m excited to show you how pull-out corner units can boost efficiency and cut dead space.
We’ll explore options that maximize every inch, so you can reach spices, lids, and small gadgets without digging.
Let’s look at practical designs that fit your corner, glide smoothly, and keep your countertop clutter-free.
Pull-Out Corner Efficiency
Corner space in a kitchen is precious, and pull-out solutions turn dead space into drawer-ready storage.
I show you practical tweaks that boost efficiency without clutter. You’ll reach every niche fast, and avoid wasted motion.
Let’s render access smooth, stable, and predictable.
- Narrow slides for tight corners
- Tiered trays maximize vertical use
- Soft-close, so doors stay quiet and steady
Additionally, incorporating small kitchen ideas can further enhance the functionality of your space.
Dead Space Elimination Solutions
Dead space in the corner doesn’t have to stay wasted.
I’m sharing practical, pull-out solutions that reclaim every inch. I thrift smart organizers, install slim slides, and customize dividers to suit your items.
With smooth motion and clear labeling, you’ll access pots, lids, and spices without bending or digging.
This approach minimizes clutter and maximizes usable storage efficiency.
Safe, Easy Access: Knife and Utensil Zones
A safe, easy-access knife and utensil zone starts by choosing a dedicated drawer or organizer that keeps sharp blades secure yet reachable.
I guide you to practical, quick setups that prevent chaos and accidental cuts, while keeping essential tools at hand for prep.
- Use a blade-safe tray and tall slots for larger knives
- Include a shallow utensil tray for frequently used tools
- Label sections and maintain clean, dry surfaces
Pantry in a Drawer: Dry Goods Without Clutter
From a knife-and-utensil zone, we can reimagine a drawer that functions like a compact pantry for dry goods.
I keep staples organized by type and shelf height, label containers, and use clear vessels to spot needs at a glance.
We minimize clutter with slim bins, a weekly restock, and one-drawer access to essentials—efficient, reachable, and tidy.
Built-In Tray Dividers for Baking Essentials
Built-in tray dividers make baking essentials easy to access and measure.
I arrange spatulas, measuring spoons, and parchment in dedicated slots, so every item has a home and your prep stays efficient. No digging, no guesswork, just quick picks and clean lines that keep counters clear.
- Spatula and whisk slots for easy grab-and-go
- Measuring spoon rails aligned by size
- Parchment paper and liners tucked in nearby
Hide Small Appliances and Cords in Drawers
I’ll show you how to hide cords efficiently and keep small appliances stowed neatly in drawers.
We’ll explore appliance stowage solutions and practical drawer organization techniques that reduce clutter and make daily use easier.
You’ll get simple steps to keep cords tangle-free and appliances accessible when you need them.
Hide Cords Efficiently
When I’m organizing a kitchen drawer, I start by tucking cords and small appliances into designated zones so everything stays neat and within reach.
I use simple dividers, label cords, and wrap tails to prevent tangling. This keeps cleanup quick and limits pull-out chaos.
- Use shallow trays for cords
- Label each bundle
- Group by function and height
Appliance Stowage Solutions
We can tuck small appliances and cords into drawers by designating compact stowage zones and using smart dividers.
I test-fit lids, cables, and bases, then group by function for quick grabs.
I prefer pull-out trays and labeled pockets to prevent clutter.
Timely cord wraps, shallow bins, and a dedicated power strip keep counter chaos down and drawers neat, efficient, user-friendly.
Drawer Organization Techniques
Drawer organization techniques for hiding small appliances and cords are all about quick access without clutter.
I share practical steps you can use now, with simple tools and a calm plan. You’ll save space, reduce snagging, and find what you need fast.
- Use shallow drawers with labeled zones
- Install cord dividers and grommets
- Store essentials in clear, stackable bins
Glassware and Plates in Deep Drawers: Best Practices
Glassware and plates belong in deep drawers when you plan for easy access and safe handling, so I’ll share practical setups that protect delicate items while maximizing space.
I organize by item type, use adjustable dividers, and keep heavier pieces lower. I label sections, rotate usage weekly, and avoid stacked height that risks chips.
This approach blends accessibility with gentle handling for everyday use.
Cleaning Tools: A Dedicated Pull-Out System
I’ll show you how a dedicated pull-out makes cleaning tools easy to grab and put away.
We’ll focus on pull-out efficiency and keeping a tool-zone that’s obvious at a glance.
This setup helps you grab the right tool fast and keeps counters clear.
Pull-Out Efficiency
A dedicated pull-out system makes cleaning tools easy to grab and stow, so I can sweep through a drawer without juggling items. It speeds access, reduces chaos, and makes routine cleanup feel effortless.
- Places like tweezers and scissors align with quick slides
- Dividers keep brushes upright and visible
- Snap-in bins catch small items before they vanish
Tool-Zone Organization
Now that the drawer has a smooth pull-out system, I set up a dedicated Tool-Zone for cleaning tools.
I group brushes, scrubbers, sprays, and cloths in labeled lanes, using adjustable dividers for quick access.
A slim side bin catches lost screws, while a magnet strip holds metal essentials.
This setup minimizes clutter and speeds routine cleanup.
Practical, accessible, efficient.
Family-Friendly Tools: Kids’ Kitchen Organization
Getting kids involved in the kitchen starts with kid-friendly tools that fit their reach and abilities, so I’m sharing simple setups that make organizing both practical and fun.
I’ll keep tasks brief, safe, and repeatable, helping little hands gain independence while you maintain order.
- Child-sized measuring cups and spoons
- Snap-on magnetic measuring spoons
- Light, non-slip tool tray with grab-and-go utensils
Durable Divider Materials: What Works Where
Durable divider materials matter just as much as kid-friendly tools did, because sturdy gaps keep things organized without quick wear or misalignment.
I choose materials based on load, moisture, and cleaning ease, matching them to drawer depth and item weight.
I prefer high-density plastics or coated metals for flexibility, with non-slip surfaces to prevent shifting during opening or closing.
Practical, durable choices win.
Color-Coded Cues That Actually Help
Color-coded cues can streamline everyday use by making it quick and obvious where everything belongs.
I’ve found simple color tags, labeled dividers, and matching containers cut search time and avoid mix-ups. You’ll notice consistency builds habit, too.
- Color tags on liners for utensils
- Labeled sections by hue groups
- Reusable, color-coded bins for spices
Soft-Close and Quiet-Run Drawer Features
Soft-close and quiet-run drawers make daily use noticeably calmer.
I favor soft-close slides because they reduce slams and pinched fingers, especially near tight cabinets. Quiet hardware keeps noise to a practical hum, so I can think, focus, and finish tasks without distraction.
Installation matters: precise rails, balanced weight, and clean alignment guarantee smooth, reliable performance every day.
Budget-Friendly Deep Drawer Makeovers
Budget-friendly deep drawer makeovers start with a clear plan and simple upgrades that maximize space without breaking the bank.
I’ll guide you through practical, budget-friendly tweaks that deliver real results without clutter. Use these quick wins to transform organization efficiently:
- Add adjustable dividers for flexible sections
- Install slim liners to reduce sliding mess
- Label zones for quick access and consistency
Routine Maintenance for Glide-Perfect Drawers
Routine maintenance keeps drawers glide-smooth and frustrations at bay.
I show you quick checks: wipe tracks, lubricate with dry silicone, and tighten screws monthly.
Clear crumbs, residue, and wedging objects to prevent jams.
Label sections, use felt pads on edges, and test full extension gently.
If resistance returns, reassess alignment and rails before forcing movement.
Practical, simple, consistent care.
Real-World Transformations: Before and After Deep Drawers
We’ve covered keeping glide-smooth drawers through routine maintenance, so now we’ll look at real-world transformations that come from applying smart organization to deep drawers.
- Before: cluttered utensils, after: categorized compartments speed meals and reduce search time
- Before: tangled lids, after: labeled dividers, stacks stay neat and accessible
- Before: scattered gadgets, after: dedicated zones, tools fetchable in seconds
Conclusion
Ever hear a drawer sigh as it opens? I did—and it changed everything. Imagine the phantom chaos of pans, lids, and gadgets organized into perfect, quiet harmony. You glimpse a slim divider here, a vertical stack there, a glide that feels almost like magic. Now picture your routine: faster, calmer, less hunting. The suspense isn’t in the change alone, but in how confidently you reach for what you need—and it’s waiting, ready, just a drawer away.