I’ll help you design an island with an attached dining table that keeps cooking, serving and socializing effortless—think clear 36–42-inch walkways, knee space for varied seating, and an island height that blends smoothly to a table.
I favor coordinated materials so the piece reads intentional—quartz or butcher block with a warm wood table edge—and layered lighting for task and mood. With smart storage, sink and dishwasher placement, and comfy stools, it’ll feel both elegant and practical; keep going to see how.
Benefits of Combining an Island and Dining Table
I’ll dive right in: combining an island with a dining table lets you get more from one footprint, blending prep, serving, and social time into a single, streamlined hub.
I love how it maximizes counter space, creates casual seating, and invites conversation while I cook.
It feels intentional and flexible, marrying efficient workflow with a warm, curated centerpiece for gathering.
A seamless design can be achieved by creating a kitchen island with attached dining that flows naturally from prep area to dining surface.
Planning Your Layout for Flow and Function
When I plan a layout for an island with an attached dining table, I start by mapping the kitchen’s workflow—cooking, cleanup, prep, and serving—so each zone feels intentional and unobstructed.
I prioritize clear paths, sightlines, and comfortable seating circulation, then place storage and appliances to support tasks.
The result is a warm, curated space that functions effortlessly and looks thoughtfully layered.
I also consider proven island layout templates to ensure the island’s size and placement support both cooking and dining.
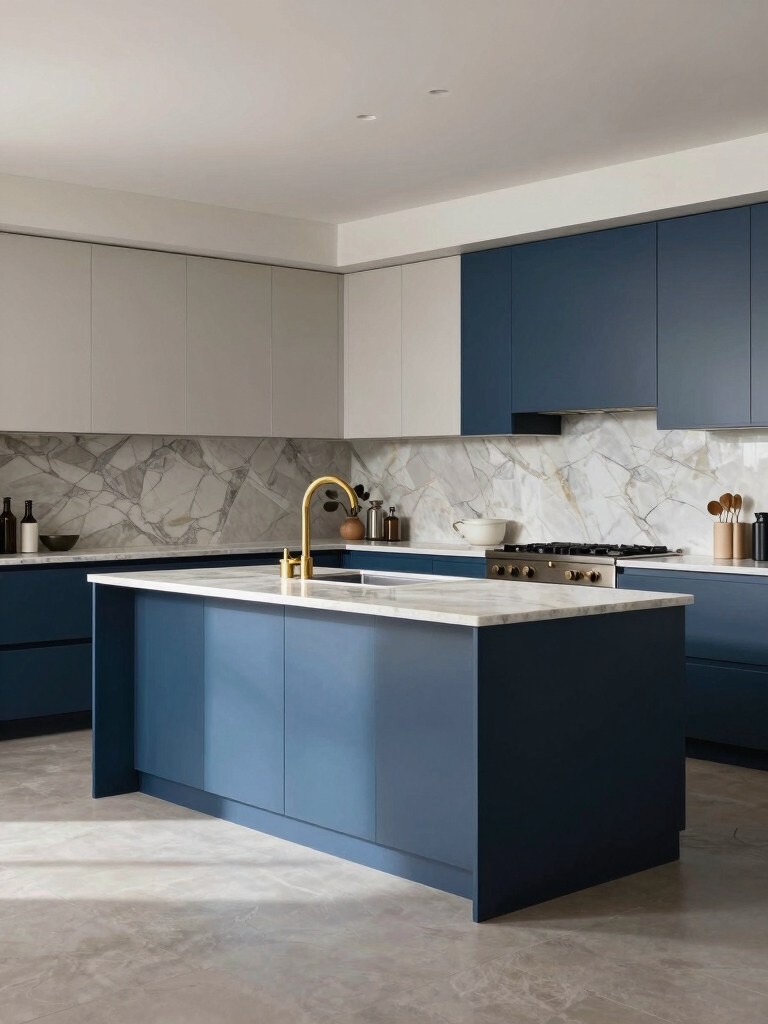
Choosing the Right Size and Scale

Size matters, but so does proportion: I start by measuring available floor space and sightlines so the island and attached table feel intentional, not tacked on.
I balance seating depth, circulation paths, and appliance clearances, aiming for comfortable elbow room and visual harmony.
Scale should relate to ceiling height and adjacent furniture, creating a cohesive, lived-in centerpiece that welcomes daily use.
Additionally, choosing a layout appropriate to your room’s overall dimensions can help optimize function and flow, especially when considering different island layout options.
Materials and Finishes That Coordinate

I’ll walk you through how the countertop and attached table can sing together so the whole piece feels intentional rather than tacked on.
We’ll look at matching or complementary cabinet finishes to keep sightlines calm, then consider small accent materials and textures—like a brass pull or a leather stool seat—that add character without clutter.
I’ll help you balance practicality and visual richness so the island and table read as one thoughtful composition.
Kitchen Island Ideas You’ll Want to Screenshot Immediately includes practical layouts and inspiring visuals to save for your remodel, and it highlights kitchen island designs worth keeping in mind.
Countertop and Table Harmony
Harmony matters: I choose materials and finishes so the countertop and attached table feel like a single, intentional piece rather than two competing surfaces.
I mix texture and tone thoughtfully to unite function and form.
- Warm veined quartz for continuity.
- Matte wood apron to soften edges.
- Brass edge trim to tie accents together.
Budget-conscious builds can achieve this cohesive look with proper planning and material choices, especially when considering budget-friendly kitchen islands that prioritize coordinated finishes.
Matching Cabinet Finishes
When I choose cabinet finishes for a kitchen island with an attached dining table, I aim for cohesion that feels deliberate rather than matchy-matchy.
I balance painted and stained surfaces, repeat a trim color, and pick hardware that ties elements together. Subtle tonal shifts add depth without competing, so the island and table read as one composed, lived-in design that welcomes daily use.
Architects often follow island kitchen design rules to ensure proportions and finishes create a seamless flow.
Accent Materials and Textures
Having settled on cabinet finishes that read as one cohesive piece, I look to accent materials and textures to give the island-and-table combo personality without overpowering the room.
I choose tactile details that nod to the rest of the house:
- Leather-wrapped pulls for warmth.
- Reclaimed wood table edge for history.
- Brushed brass lighting to catch the eye.
Designers also often recommend layering finishes and decor to create depth and a curated look, including thoughtful kitchen island decor tricks like accent layering that subtly tie rooms together.
Seating Options and Comfort Considerations

Because we’ll use this island every day, I focus first on how seating feels as much as how it looks.
I choose stools and chairs with supportive backs, cushioned seats, and appropriate seat height for the counter-to-table changeover.
Armrests, swivel options, and durable, easy-clean fabrics matter.
Proportion, legroom, and modestly tapered silhouettes keep the look curated yet comfortable for long meals.
Integrated Storage Solutions
I also think about how storage can be both beautiful and practical, since seating affects how we use the island day to day.
I favor integrated solutions that stay graceful and accessible:
- Deep drawers for pots and hidden cutlery trays.
- Open shelves for ceramics and a curated vignette.
- Pull-out bins for recycling and linens.
These choices keep the island tidy and inviting.
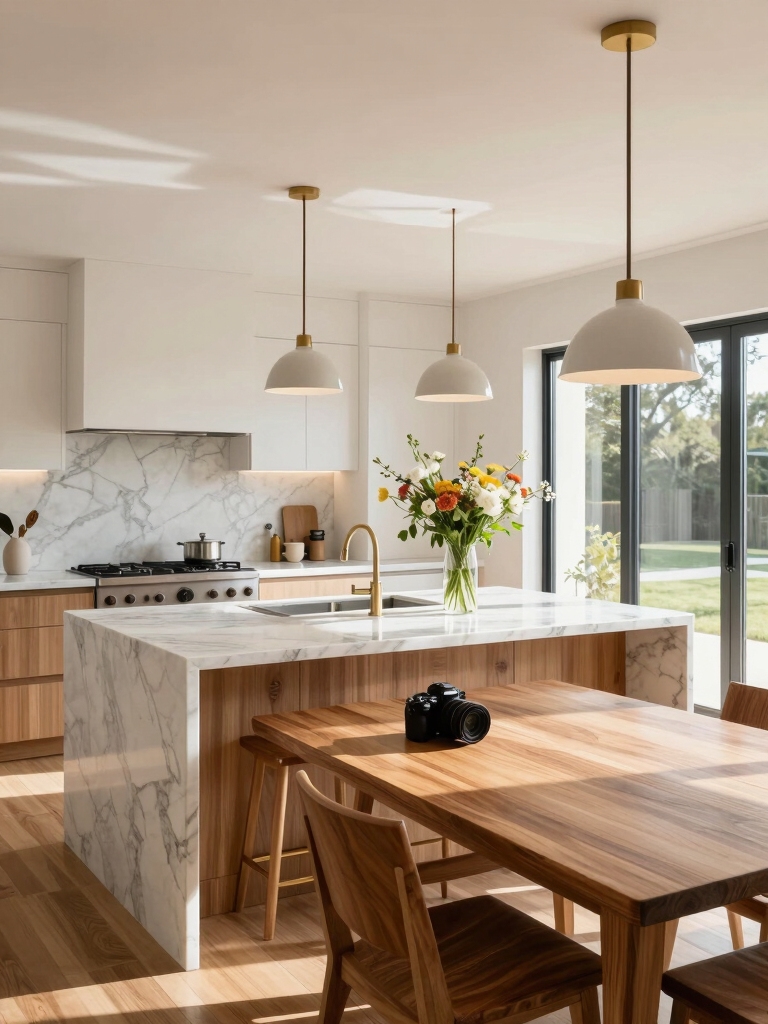
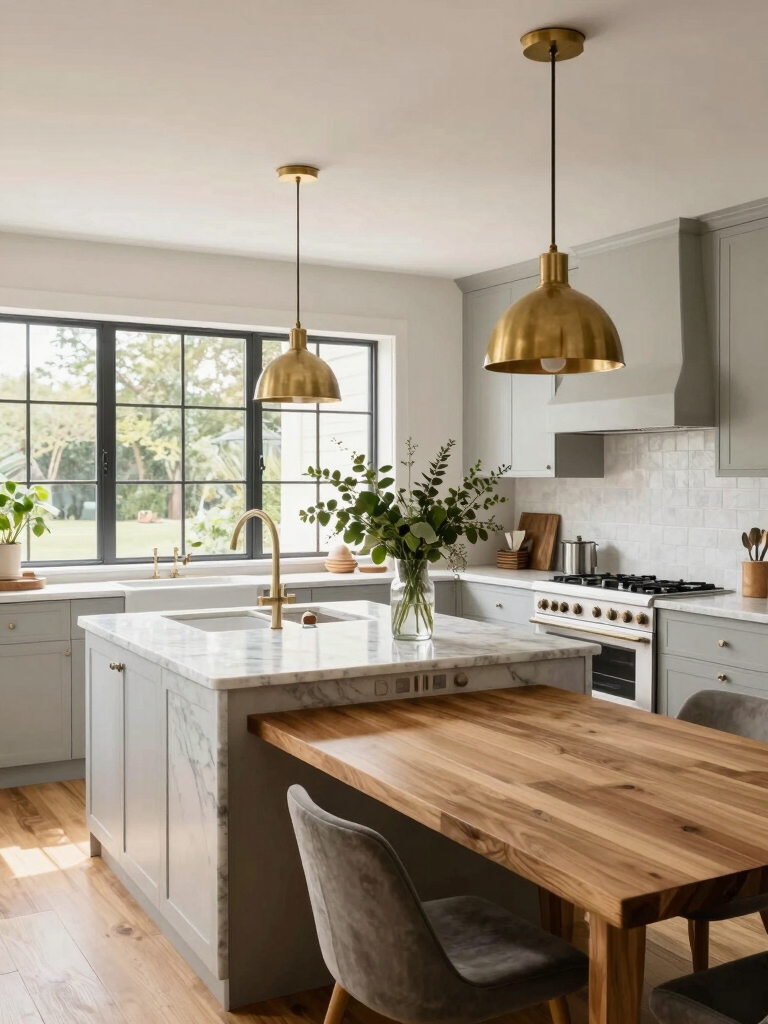
Lighting Strategies for Dual-Purpose Zones
While I love how an island doubles as a workspace and a dining spot, lighting is what lets both functions shine without compromise.
I layer task lights over prep zones, warmer pendants above the table, and dimmable controls to shift mood.
Mixed fixtures with complementary finishes add curated charm, while glare-free undercabinet strips keep cooking precise and conversation cozy.
Plumbing and Appliance Placement Tips
I’ll walk you through practical choices for placing the sink on your island so it serves both prep and dining without crowding the table.
We’ll also map out dishwasher adjacency for efficient loading and consider drainage and venting so everything works quietly and reliably.
With a few smart placements you’ll keep the island elegant, functional, and plumbing-ready.
Sink Location Strategy
Because the sink anchors both function and flow, I place it where prep, cooking, and cleanup meet so everything feels effortless; that usually means situating it on the island nearest the cooktop but offset enough to allow comfortable dish staging.
I favor sightlines and easy access:
- Centered for shared prep
- Offset for staging and drying
- Near trash and food prep zones
Dishwasher Adjacency Planning
When planning dishwasher placement, I keep plumbing efficiency and daily workflow front and center so unloading and hookup both feel effortless; placing the dishwasher next to the sink and near a pull-out trash or compost bin saves steps and minimizes plumbing complexity.
I also orient door swing to avoid traffic, allow adjacent drawer storage for utensils, and reserve counter space for staging clean dishes—small choices that elevate everyday ease.
Drainage and Venting
Balancing drainage and venting is one of those behind-the-scenes details that makes a kitchen island with an attached dining table live as smoothly as it looks.
I prioritize short trap runs, accessible cleanouts, and a properly sized vent stack. Consider:
- Consolidate drains near the sink.
- Install a vent within code distance.
- Guarantee future appliance access for maintenance.
Creating Clear Traffic Paths
With an island and dining table sharing real estate, I plan circulation like choreography so people move without bumping into chairs or each other.
I keep clear aisles, set 36–42-inch walkways where cooks pass, and allow generous entry points.
I position stools and table edges to avoid pinch points, using sightlines and subtle rugs to guide movement with effortless, curated practicality.
Styles That Work: Modern to Traditional
Style matters as much as scale, and I pick elements that let an island-and-table combo feel cohesive whether you’re leaning toward sleek modernity or lived-in tradition.
I recommend mixing finishes, textures, and focal details:
- Matte cabinetry, marble top, slim metal legs.
- Warm wood island, turned table legs, vintage lighting.
- Painted base, butcher-block table, woven stools.
Balance contrast to feel intentional.
Budgeting and Cost-Saving Ideas
I’ll help you set a clear budget by prioritizing structural needs first—support, plumbing, and electrical shouldn’t be skimped on.
Then we’ll choose cost-effective materials like butcher block or engineered stone for visible surfaces while saving splurges for focal details.
I’ll also weigh DIY versus hiring pros so you can decide where to save money without risking safety or finish quality.
Prioritize Structural Needs
Before I start picking finishes and seating, I prioritize the island’s structural needs so the whole project doesn’t wobble on an aesthetic whim.
I check load-bearing points, plumbing/electrical routing, and attachment methods. Then I plan smartly:
- Reinforce frame where table joins island.
- Confirm footing and floor supports.
- Coordinate utility access for future tweaks.
Choose Cost-Effective Materials
I focus on materials that give the look and durability you want without blowing the budget, so I weigh cost per square foot against longevity and maintenance.
I favor engineered stone or butcher block for warmth and savings, reserve solid surface for high-wear spots, and choose painted cabinetry with quality hardware.
Small design choices—edge profiles, tile backsplashes—stretch value without shouting economy.
DIY Versus Professional Trade-Offs
When weighing DIY against hiring pros, I look at where my skills actually save money and where they risk costly mistakes. I balance time, expertise, and finish to respect budget and beauty.
- Labor I can handle: sanding, painting, simple assembly.
- Hire for: plumbing, electrical, structural changes.
- Split tasks to keep quality and cut costs.
Custom vs. Prefab Island-Table Options
Although cost and convenience matter, I tend to recommend weighing custom and prefab island-table options by how well they’ll fit your space, lifestyle, and long-term plans.
I favor custom when you need unique dimensions, integrated storage, or tailored finishes.
Prefab appeals for quicker installation and predictable pricing.
Match choice to workflow, aesthetics, and resale goals so the piece feels both intentional and effortless.
Child-Friendly and Accessible Design Features
Because kids and guests of all abilities should be able to gather comfortably, I design island-tables with safety, ease, and flexibility in mind.
I focus on durable rounded edges, varied seating heights, and unobstructed knee space.
Practical touches include:
- Slip-resistant flooring and rounded corners
- Adjustable-height seating and drop-leaf sections
- Clear circulation paths and accessible storage within reach
Styling and Decorating the Combined Space
If I were arranging the island and attached dining table, I’d treat them as one cohesive stage for daily life and entertaining, balancing function with the personal touches that make a kitchen feel lived-in.
I’d layer textures—wood, metal, woven—anchor with a signature centerpiece, mix vintage finds with streamlined lighting, and keep flow clear so styling feels intentional, comfortable, and ready for use.
Maintenance and Longevity Advice
I’ll walk you through simple daily cleaning habits that keep both the island and attached table looking fresh without fuss.
I’ll also cover how to protect different surfaces—wood, stone, and laminate—so spills and heat don’t leave lasting marks.
Finally, I’ll share a compact preventive maintenance schedule to catch small issues before they become costly repairs.
Daily Cleaning Routine
I usually start my day by wiping down the island and attached dining table with a soft microfiber cloth and a mild cleaner, keeping crumbs and spills from settling into seams or finish.
I follow a simple routine to keep things calm and curated:
- Sweep crumbs into the bin.
- Spot-clean sticky areas.
- Arrange placemats and fresh flowers.
Protecting Surfaces Properly
Because the island and attached table see so much use, I treat surface protection as essential rather than optional:
I use cutting boards, trivets, and coasters every day, and I make a habit of lifting rather than dragging dishware to prevent scratches.
I also wipe spills promptly with a soft cloth, apply gentle cleaners suited to the material, and rotate pads to distribute wear, keeping everything graceful and durable.
Preventive Maintenance Schedule
You can think of surface protection as the daily habit that feeds a broader maintenance rhythm; to keep the island and attached table looking and performing their best, I follow a simple preventive maintenance schedule.
- Weekly: wipe, inspect seals, clear crumbs.
- Monthly: oil wood, tighten hardware, check finish.
- Yearly: deep clean stone, reseal where needed, professional tune-up.
Bringing an island and dining table together has been a game-changer for my home — it blends work, meals, and conversation into one seamless hub. With thoughtful scale, durable materials, and comfy seating, it’s both pretty and practical.
Whether you go custom or prefab, aim for kid-safe finishes and easy upkeep so it lasts.
It’s the icing on the cake for everyday living: warm, eclectic, and effortlessly usable, ready for whatever life serves up.