

I’ll show you how an island can squeeze every inch of use from your kitchen: a slim galley island or peninsula adds prep, seating and storage without blocking flow; a multi-level or L-shaped island separates prep, serving and bar seating.
Deep drawers, vertical trays and pull-outs reclaim corner space; under-counter fridge, charging drawers and stack ovens keep counters clear; and a small castered island or homework cubby makes zones flexible — keep going and you’ll get layout-by-layout solutions.
Galley Kitchen With Slim Island for Narrow Spaces
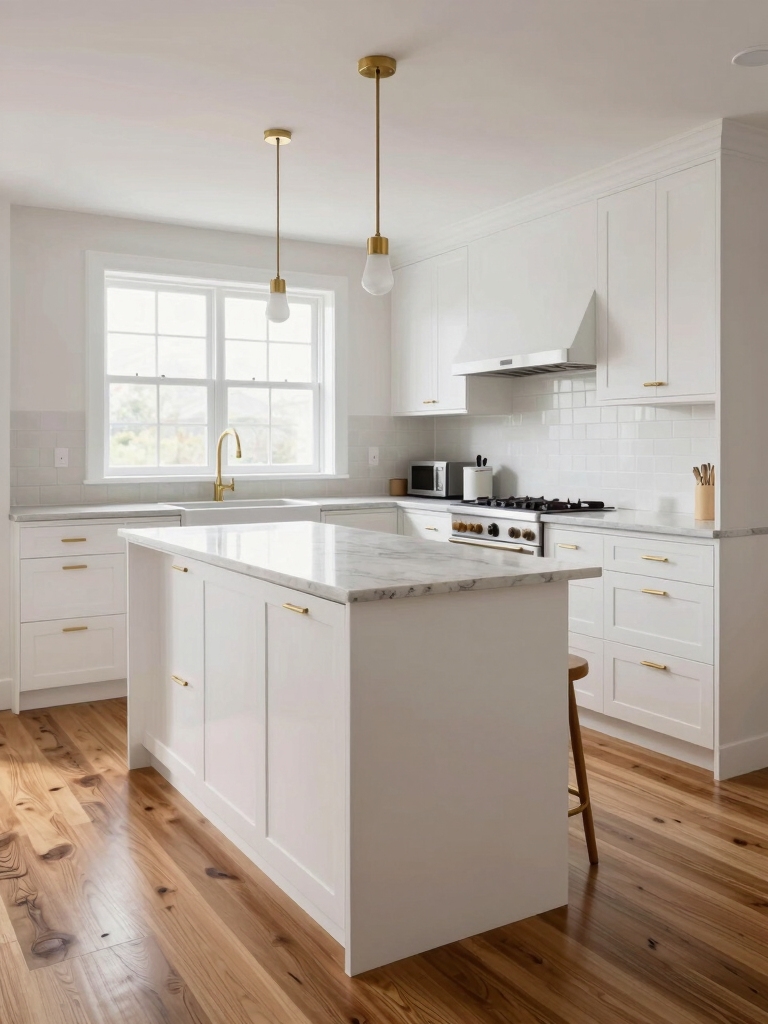
In a narrow galley kitchen, I like to think of a slim island as a practical backbone rather than extra clutter; it gives you work surface, storage, and a casual eating spot without blocking the flow.
I suggest slimline cabinets, open shelving ends, and a butcher-block top. I prioritize clear walkways, task lighting, and dual-function drawers for utensils and trays.
Many homeowners are surprised by dramatic results when they see the galley kitchen with island before-and-afters, which highlight smart layouts and storage transformations.
L-Shaped Layout With Multi-Function Island

Moving from a slim galley island to an L-shaped plan opens up more possibilities for seating, prep, and storage without sacrificing flow.
I love fitting a multi-function island into the corner: one side for prep with a sink, the other for casual dining, plus drawers tuned for pots and pantry overflow.
It creates distinct zones while keeping sightlines open and chores efficient.
These L Kitchen layouts often include islands designed to maximize work zones and actually function for both cooking and entertaining.
U-Shaped Kitchen Optimized With Central Island
I like arranging a U-shaped kitchen with a central island because it keeps the work triangle tight between sink, stove, and fridge while giving me a clear focal point for prep.
I often specify deep drawers, vertical dividers, and appliance garages in the island to maximize storage without cluttering the counters.
I also size the island and leave a 42–48 inch circulation path so traffic flows smoothly and guests don’t cross my prep zone.
I also prioritize efficient zoning to ensure each task area is organized and accessible.
Work Triangle Efficiency
Because I want your U-shaped kitchen to feel effortless, I focus on tightening the work triangle between sink, stove, and refrigerator while keeping the island as a functional hub rather than an obstacle.
I position appliances for direct sightlines, preserve 36–48 inch walkways around the island, stagger prep zones to reduce cross-traffic, and use consistent countertop heights so movement stays intuitive and fatigue-free.
I also take inspiration from U-Shaped Kitchen Ideas With Stylish Islands by arranging the island to enhance flow and provide storage U-shaped kitchen without compromising circulation.
Island Storage Solutions
Frequently I treat the island as the kitchen’s storage backbone, and I plan its cabinets and drawers to support how you actually cook.
I mix deep drawers for pots, pull-out trays for cutting boards, and vertical slots for baking sheets.
Open cubbies display frequently used items, while hidden compartments hide clutter.
Labels, adjustable dividers, and soft-close slides keep everything efficient and calm.
Small kitchens can still fit an island when designed with careful scale and multifunctional features, especially in small kitchen layouts that actually fit.
Traffic Flow Control
Having the island serve as storage backbone means I also design it to steer movement around the kitchen, especially in a U-shaped plan where paths can get cramped.
I place the sink or prep zone facing open sightlines, leave 42–48 inches between island and counters for two-way traffic, add rounded corners, and assign clear work aisles so cooks, guests, and delivery drops glide through without blocking each other.
I also plan the island so it contributes to seamless circulation and complements flow-friendly layouts throughout the kitchen.
Open-Plan Kitchen Island That Defines Zones
I like using an island to mark different zones in an open-plan kitchen, positioning it so the prep area faces the cooktop while the seating side opens to the living space.
I often suggest multi-level surfaces—one level for meal prep with a deep countertop and a raised bar for casual dining—to keep tasks and traffic separate.
Small details like overhang depth, material shifts, and integrated storage make those levels functionally clear and visually cohesive.
Open kitchens often pair islands with seating and serving features to enhance entertainment flow and guest interaction.
Zone-Defining Island Placement
When you walk into an open-plan kitchen, I like using the island as a deliberate boundary that channels activity without closing the space off; it becomes the hinge between cooking, dining, and living zones.
I place it to guide sightlines, anchor traffic paths, and offer distinct work, seating, and serve areas. Thoughtful clearance, lighting, and material shifts communicate function while keeping flow intact.
Multi-Level Island Surfaces
Think of a multi-level island as a tiny neighborhood in your kitchen where each tier speaks a different purpose;
I use dropped surfaces for prep, raised bars for casual dining, and a mid-level ledge for serving or homework so every activity has its own comfortable zone.
I choose contrasting materials, stagger heights for ergonomic flow, and tuck storage beneath each plane to keep zones tidy and efficient.
Peninsula-Style Island for Compact Footprints
A peninsula-style island tucks into tight floor plans without sacrificing function, and I’ve found it’s one of the smartest moves for compact kitchens.
I like using it as a divider that adds counter space, casual seating, and storage. Choose narrow cabinetry, open shelving, or a butcher-block top to keep traffic flowing.
It’s efficient, adaptable, and visually expands small footprints.
Island With Integrated Sink for Efficient Workflows
Installing an island with an integrated sink streamlines meal prep and cleanup by putting the work triangle right under your feet, and I’ve found it transforms how a kitchen functions day-to-day.
I love its practicality and charm:
- Centralized washing speeds prep.
- Hidden storage beneath keeps counters clear.
- Secondary workspace doubles as serving station.
It’s efficient, tidy, and surprisingly sociable.
Island With Cooktop and Downdraft Venting
If you liked having a sink on the island for prep flow, putting the cooktop there brings the action center right where guests gather and I’ve seen it make entertaining much easier.
I prefer downdraft venting on islands for clean sightlines and flexible hood placement. It demands careful spacing, heat-resistant surfaces, and clear cook-to-seating separation so splatter and steam don’t interrupt conversation or comfort.
Multi-Level Island for Dining and Prep Separation
I love how a multi-level island keeps cooking and casual dining clearly separate, so crumbs and prep mess stay out of sight when guests sit down.
Having varied surface heights lets you set a lower workbench for chopping and a raised bar for plates and laptops, and I always plan for staggered storage steps beneath to make utensils and servingware easy to reach.
Let me show you how those integrated storage steps and height changes can streamline workflow without sacrificing style.
Distinct Prep and Dining
Because I cook and entertain in the same space, I like a multi-level island that keeps serious prep work separate from casual dining without shutting anyone out.
I explain choices plainly and love small, quirky details. Consider:
- Elevated bar for guests and casual meals.
- Lower prep zone with sink and cutting board.
- Open sightlines so conversation flows while I work.
Varied Surface Heights
Moving from a split prep-and-dine island to thinking about surface heights, I like islands that read as multiple workstations without feeling disjointed.
I favor a lower prep zone with a durable countertop and raised seating ledge for casual dining.
Different heights create clear task boundaries, ergonomic benefits, and layered visual interest—mixing materials and subtle shifts keeps the composition cohesive and purposeful.
Integrated Storage Steps
When you step up to an island that staggers levels like a set of built-in steps, you get more than a visual cue separating dining from prep—you get smart, accessible storage that lives where you need it.
I design these tiers to hide clutter and clarify function:
- Lower drawers for pots and pans.
- Mid shelves for prep tools.
- Upper niche for servingware and barware.
Island With Built-In Storage and Pull-Outs
An island-with-storage becomes the kitchen’s hardworking centerpiece, and I love designing one that tucks everything into smart, accessible pull-outs so cooking stays fluid and clutter-free.
I specify deep drawers for pots, narrow vertical trays for baking sheets, hidden bins for recycling, and soft-close cutlery inserts.
Labeling, adjustable dividers, and a charging drawer keep surfaces clear and daily routines effortless.
Corner-Friendly Island for Challenging Layouts
If your kitchen corners feel like wasted real estate after fitting an island with built-in storage, I’ll show you how a corner-friendly island can reclaim that awkward zone without sacrificing flow.
I prefer clever shapes and tailored fittings. Consider:
- Diagonal cabinets to ease access.
- Rotating lazy Susans for deep corners.
- Pull-out angled drawers that keep tools visible and reachable.
Island Designed for Entertaining and Serving
How do you turn an island into the heart of a party? I plan zones: a polished prep sink, a tiered serving ledge, and under-counter refrigeration for chilled drinks.
I choose durable surfaces, integrated cutting boards, and hidden trash to keep flow. Lighting’s layered—pendants for ambiance, task spots for carving.
Seating faces guests so conversation stays central while service stays seamless.
Small Island on Casters for Flexible Use
While a built-in island shines at hosting, I often recommend a small island on casters when flexibility matters most. I use one for quick meal prep and occasional buffet setups, then roll it aside for open space.
Consider these practical touches:
- Locking wheels for stability
- Slim butcher block top for chopping
- Under-shelf storage for pans and linens
Island as a Homework and Home-Office Hub
I’ve turned our island into a homework and home-office hub by adding a built-in charging station so devices stay powered without cluttering the countertop.
I’ll show you clever homework storage solutions—drop pockets for papers, cubbies for supplies, and a slot for binders—that keep everything organized and within reach.
Tuck one side of the island into a quiet work nook with a comfortable stool and soft task lighting to separate focused work from kitchen traffic.
Built-In Charging Station
Think of the island as more than prep space—I’ve turned mine into a compact homework and home-office hub with a built-in charging station that keeps devices charged, cords tamed, and work flowing.
I added recessed outlets, USB-C ports, and a cable channel under the counter.
- Recessed outlets
- USB-C + USB-A
- Hidden cable channel
Homework Storage Solutions
Designing homework storage into the island made my kitchen feel like it finally works for our whole family; I set up dedicated cubbies, a rolling file drawer, and labeled bins so everything — papers, pencils, chargers, and reference books — has a spot.
I added pegboard hooks for scissors, a shallow tray for homework in progress, and clear magazine files to keep assignments visible yet tidy.
Quiet Work Nook
When I carved out a quiet work nook at the end of our island, the kitchen instantly became more than a meal prep zone — it turned into a focused, shared workspace that still feels part of the family hub.
I added thoughtful touches:
- task lighting and a slim filing drawer
- comfy stool and noise-dampening mat
- charging station plus cable tidy
Appliance-Stacked Island With Oven and Microwave
I like tucking an oven and microwave into the island because it keeps prep and cooking zones tightly coordinated without crowding the wall runs.
I position them stacked at ergonomic heights, add heat-resistant shelving for trays, and route vents discreetly.
A slim pull-out for baking sheets, clearances for swing doors, and tactile knobs make the island feel deliberate, useful, and unexpectedly cozy.
L-Shaped Island for Two-Cook Households
Because we both cook at once in my household, I planned an L-shaped island to give us clear, parallel working lanes that never collide.
I prioritized sightlines, separate prep zones, and shared storage.
Practical touches include:
- Dual sinks for simultaneous washing.
- Opposing prep counters with task lighting.
- Under-counter drawers for each cook’s tools.
It’s efficient, sociable, and delightfully organized.
I’ve shown how islands can transform every kitchen type — from skinny galley setups to roomy U-shapes — and proved the idea that a well-planned island visually and functionally anchors a space.
You can see how slim, mobile, stacked, or multi-use islands create clear zones, boost storage, and support cooking, working, or homework.
Mix and match those concepts to fit your footprint, and you’ll maximize every inch while making the kitchen feel purposeful and personal.


