I’ve packed tiny kitchens with Pinterest-worthy tricks that actually work: floating corner shelves for plants and cookbooks, magnetic spice jars on a backsplash strip, slim pull-out pantry drawers for oils and snacks, under-cabinet hanging baskets, and a rollaway cart that slips between appliances.
I DIY drawer dividers, use an over-sink cutting board with colander, tuck trash into slide-outs, and grow herbs in mason jars on the windowsill. Keep going and I’ll share how to pull each one off.
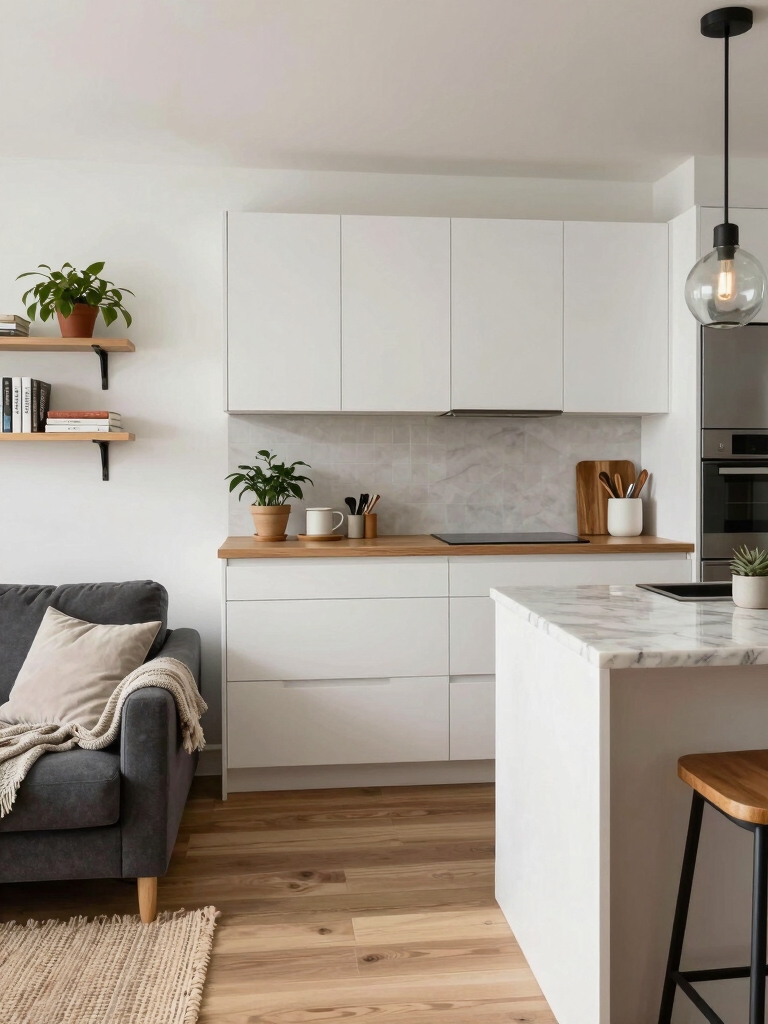
Floating Corner Shelves for Maximum Nook Use

When I want to make the most of a tiny kitchen nook, I reach for floating corner shelves—they’re sleek, simple, and shockingly effective.
I layer plants, cookbooks, and everyday dishes for both function and flair.
They free up counter space, create visual height, and let me style essentials within reach. Installation’s quick, and the result feels curated, cozy, and utterly practical.
These shelves are a great example of small kitchen shelving that marry form and function.
Magnetic Spice Jars Along the Backsplash

If you like the way floating corner shelves tidy a nook, you’ll appreciate how magnetic spice jars tidy the backsplash without taking up shelf or counter space.
I stuck clear jars to a slim metal strip, labeled lids, and suddenly spices are visible, accessible, and decorative.
It keeps clutter down, speeds cooking, and feels intentionally styled—small, smart, and totally Pinterest-ready.
Many compact Indian kitchens benefit from smart spice storage that maximizes limited space.
Pull-Out Pantry Drawers in Narrow Spaces

Because I hate wasting space, I made a slim pull-out pantry for the narrow gap beside my fridge and it’s been a game changer.
I stash oils, snacks, tins, and baking basics in neat rows. It slides smoothly, saves walking, and looks tidy—small but mighty.
- Easy access
- Custom width
- Tiered shelving
- Soft-close slides
- Visible inventory
I pulled inspiration from clever small kitchen cabinet ideas and added a few custom touches for efficiency, like staggered tiers and labeled bins for pull-out pantry drawers.
Under-Cabinet Hanging Baskets

I hung slim wire baskets beneath my upper cabinets and instantly freed up counter and cupboard space while keeping everyday items within reach.
They hold spices, dishcloths, and coffee mugs without crowding surfaces. Installation was quick with a couple of screws; the open design keeps things visible and airy.
It feels chic, practical, and oddly satisfying—small change, big visual impact. I love how these baskets contribute to clever small kitchen storage by hiding clutter while maximizing usable space.
Slim Rolling Cart Between Appliances

Those under-cabinet baskets cleared a lot of clutter, so I started looking at other narrow gaps begging for a smart solution — like the space between my stove and fridge.
I slid in a slim rolling cart and everything changed: easy access, extra spices, and hidden trash.
It’s compact, mobile, tidy, and surprisingly stylish.
- Slim profile
- Locking casters
- Adjustable shelves
- Vent-safe materials
- Easy wipe-clean
Tiny kitchens benefit from space-maximizing solutions that make every inch count.
Pegboard Wall for Pots and Utensils
I took down a blank stretch of wall and turned it into a pegboard stage where my pots, pans, and utensils can breathe and be seen—no more rifling through cabinets.
I stagger hooks and shelves for visual rhythm, hang frequently used pieces within easy reach, and mix wooden spoons with copper pans to make function feel like decor.
It’s tidy, accessible, and genuinely uplifting.
I drew inspiration from trending small space storage ideas to maximize utility without crowding the room.
Tension Rods for Lid and Tray Storage
I like using tension rods to turn wasted cabinet height into neat vertical slots for baking sheets, lids, and trays. They’re quick to install and you can move them in seconds to fit whatever you’re storing.
If you want adjustable, low-cost organization that makes everything easy to grab, this trick is worth trying. Learn more about small counter space solutions to maximize space.
Maximize Cabinet Vertical Space
Streamlining my cabinet interiors with tension rods has been a game-changer for lid and tray storage — they let me stand items upright, cut clutter, and grab what I need without wrestling through stacks.
- Slim pans stand neatly
- Baking sheets slide in easily
- Pot lids face forward
- Small cutting boards are accessible
- No more toppled stacks, just calm order
Quick, Adjustable Organization
After fitting tension rods to the cabinet, I found they do more than just stop stacks from toppling — they create a quick, adjustable system for lids, trays, and sheets.
I slide rods to form narrow slots, corralling pan lids and baking sheets upright.
It’s inexpensive, hidden, and flexible; whenever my collection changes, I tweak spacing in seconds for tidy, reachable storage.
Tiered Shelf Risers Inside Cabinets
Usually I reach for tiered shelf risers when I want to see everything at a glance inside a cabinet. They elevate plates, mugs, and spices so nothing’s hidden, and they feel effortlessly chic.
I swap heights, tidy quickly, and love the calm order they bring.
- stack plates neatly
- display spice jars
- separate baking supplies
- organize lids
- spotlight pretty mugs
Adhesive Hooks for Mug and Tool Storage
I stick adhesive hooks inside cabinet doors and under shelves to hang mugs and utensils, and it instantly frees up counter and shelf space while keeping the things I use most within easy reach.
I choose slim, sturdy hooks, arrange them by size, and rotate seasonal mugs.
Installation’s quick, damage is minimal, and the tidy result feels unexpectedly chic and practical.
Chalkboard Paint on Pantry Doors
I painted my pantry door with chalkboard paint and it instantly became our menu board for the week.
I also use it for quick grocery reminders so nothing gets forgotten between runs.
Plus the kids love having a safe spot to doodle while I cook, which keeps them busy and makes the kitchen feel livelier.
Instant Menu Board
Often I reach for chalk instead of a notepad when I’m planning meals, because painting the inside of pantry doors with chalkboard paint gives you an instant, usable menu board that looks intentional and stays out of the way.
I jot weekly menus, swap recipes, and wipe clean effortlessly.
- Weekly dinner plan
- Theme nights
- Recipe notes
- Prep reminders
- Leftover ideas
Grocery Reminder Surface
On the inside of my pantry door I’ve turned a bit of wasted space into a grocery reminder surface with chalkboard paint, and it’s made errands so much smoother.
I jot staples, meal ideas, and quick pantry counts there.
It’s simple, stylish, and visible every time I grab snacks.
Guests love the handwritten notes; it keeps shopping focused and waste down.
Kid-Friendly Doodling Space
Turning the inside of the pantry door into a chalkboard gives my kids a dedicated doodling zone that keeps markers off the walls and creativity in one easy-to-clean spot.
I love watching tiny masterpieces while cooking; it’s practical and playful.
- Easy DIY with chalkboard paint
- Magnetic strips for art
- Low-shelf chalk holder
- Wipe-clean routine
- Rotate seasonal themes
Fold-Down Breakfast Nook Table
I love how a fold-down breakfast nook table tucks away neatly when you don’t need it, then springs right into action for coffee, quick meals, or a laptop workspace.
I installed one in a narrow corner; it’s sturdy, stylish, and frees floor space.
It makes mornings calmer, guests feel welcome, and small kitchens function like they’re designed for real life.
DIY Drawer Dividers From Repurposed Materials
I’ll show you how to make simple, sturdy drawer dividers from things you probably already have around the house, so clutter finally stops ruling your kitchen drawers.
I used cardboard, scrap wood, elastic bands, old magazine covers and glue to craft tidy sections that fit any drawer. It’s cheap, quick, and oddly satisfying.
- Cardboard strips
- Scrap wood slats
- Elastic bands
- Magazine covers
- Strong glue
Over-Sink Cutting Board With Colander
I love sliding an over-sink cutting board across my sink because it instantly gives me more prep space without crowding the counter.
I can chop vegetables right over the sink and use the built-in colander to drain rinsed produce or let juices run away as I work. It’s a simple swap that keeps my workflow tidy and speeds up cleanup.
Maximizes Prep Space
Want to reclaim counter real estate? I love an over-sink cutting board with colander — it turns wasted sink space into efficient prep territory.
It’s stable, tidy, and speeds tasks without clutter.
- Fits various sink widths
- Slides over for chopping
- Pops a colander underneath
- Keeps juices off counters
- Stores flat when not used
Drains While Chopping
By sliding a cutting board over the sink with a built-in colander, I can chop and rinse in one smooth move—no dripping across the counter, no extra bowls.
It makes prep cleaner and faster, keeps herbs and veggies contained, and saves time heading to the sink.
I love the tidy, efficient flow it creates; cleanup is minimal and the workspace feels instantly more stylish.
Hidden Trash and Recycling Slide-Outs
I’ll kick things off by saying hidden trash and recycling slide-outs are one of my favorite small-kitchen hacks: they tuck waste out of sight, keep odors contained, and free up floor space without making the room feel cluttered.
I love how they look and work — sleek, simple, practical.
- Concealed bins
- Soft-close slides
- Dual compartments
- Easy liners
- Integrated odor filters
Mason Jar Herb Garden on a Window Ledge
I love using mason jars on my window ledge to keep fresh herbs within arm’s reach, but I always place them where morning sun hits—too little light and they sulk, too much afternoon blaze and they scorch.
To avoid soggy roots and messy drips, I add a layer of pebbles or broken pottery for drainage and water from the saucer so excess runs clear.
If you want, I can walk you through jar sizes and which herbs thrive in that sunny strip.
Sunny Spot Selection
When I pick a sunny ledge for my mason jar herb garden, I look for a spot that gets at least six hours of direct light and sits out of the way of drafts and cooking splatter.
I choose jars that suit the sill and rotate plants for even sun exposure.
- South or east-facing window
- Stable, level surface
- Close to prep area
- Away from vents
- Easy to reach
Drainage Without Mess
You’ve picked a sunny spot and the jars look great, but now you’ve got to keep things tidy — waterlogged soil and drips on the sill will undo all that charm.
I use gravel and a coffee filter to separate roots from excess water, then top with decorative stones. Every jar gets a saucer or a magnetic tray so spills stay contained and cleanup is effortless.