
I optimize utensil storage by turning clutter into clear zones and height-friendly setups that minimize motion. I keep daily tools within arm’s reach, group utensils by task, and place essentials at the front for instant grabs. I love magnetic bars, rails, and inside-cabinet dividers for quick access, plus a grab-and-go station that’s easy to maintain. Seasonal bins and label refreshes keep things fresh. If you keep going, you’ll uncover even more practical tweaks.
Why Utensil Clutter Slows You Down

When utensil clutter takes over, it slows me down—and it’ll slow you down too. I chase tiny wins: a clear drawer, a dedicated few within reach, and a quick return habit. Clutter makes me search, guess, and double-check. Utilizing drawer organization techniques can significantly enhance your efficiency in the kitchen.
Criteria for Easy-Reach Utensils: Zones and Heights

I’ll walk you through easy-reach zones and keep heights simple so you grab what you need without thinking twice.
We’ll map this around the Easy-Reach Zoning Guide, with height-optimized areas for every task, and keep Quick-Access Reach Principles in mind. Additionally, organizing your kitchen with smart organization tips can transform your cooking experience.
Let’s set up clear, practical zones you’ll actually use in your kitchen.
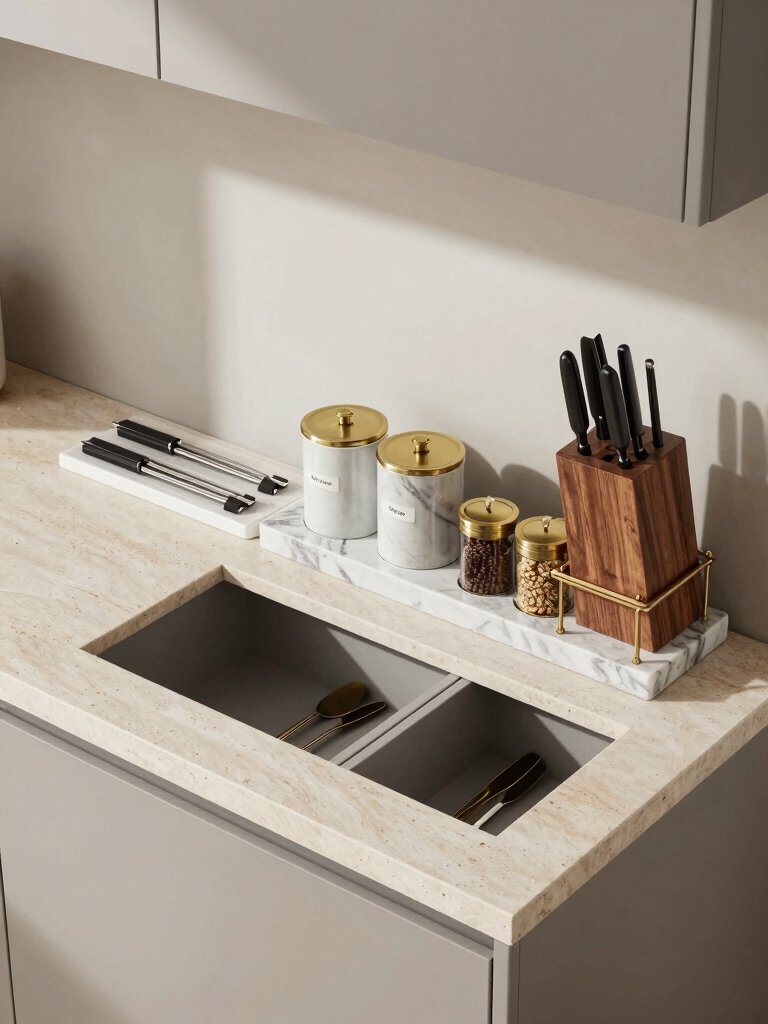
Easy-Reach Zoning Guide
Sorting utensils by how often I reach for them helps me cook smoothly, so I set up zones and heights that match my workflow.
I keep daily tools within arm’s reach, specialty items a step deeper, and bulky pieces lower for stability.
I label drawers and use shallow trays to reduce search time, keeping counter clutter minimal and tasks flowing.
Incorporating smart kitchen organization techniques can further enhance efficiency and streamline your cooking process.
Height-Optimized Utensil Zones
Placing easy-reach utensils within a few quick arm’s reach is essential for smooth cooking, so I define height-optimized zones that fit my workflow.
I group items by task: frequently used tools lower, specialty items higher. I consider cabinet depth and counter height, avoiding clutter.
This setup reduces motion, speeds prep, and keeps essentials visible without hunting. Purposeful placement, repeatable routine. Additionally, incorporating counter organization accessories can further enhance the efficiency of your kitchen space.
Quick-Access Reach Principles
Quick-access reach hinges on clear criteria: identify zones by how often you actually grab each tool and assign heights that minimize movements.
I organize my setup so frequently used items stay within a comfortable elbow’s reach, while rarely used tools drift higher or lower. This keeps workflows fluid, reduces trips, and makes prep feel natural, efficient, and predictable every time you cook. Additionally, utilizing smart organization tips can further enhance your kitchen’s functionality and space efficiency.
Plan a Daily-Use Drawer Layout That Works at a Glance

A daily-use drawer should feel instantly usable, so I start by grouping items into zones—daily staples, utensils, and prep tools—then arrange each zone so the essentials sit at the front, within easy reach.
I label boundaries, keep trays shallow, and favor clear containers. This setup minimizes hunting, speeds routines, and stays calm under pressure, even during busy mornings. Additionally, using kitchen drawer organization hacks can further streamline your setup for even quicker access.
Group Utensils by Cooking Task for Faster Prep

I group utensils by cooking task so you can grab what you need at a glance.
Think zones for chopping, mixing, and plating to streamline your prep flow. This approach keeps everything tight, labeled, and moving smoothly. Additionally, consider using smart utensil organization techniques to maximize your kitchen space and efficiency.
Group by Task Zones
When I organize my kitchen by task zones, I group utensils where I actually use them, so I can grab what I need without marching across the counter.
Place tools near stove, prep area, and baking station, matching each zone to its core tasks.
Keep compartments clear, label lightly, and rotate frequently used items forward for quick access and steady flow. Additionally, consider using smart organization tips that can help enhance your kitchen’s efficiency and make cooking a more enjoyable experience.
Streamline Prep Flow
Grouping utensils by cooking task speeds up prep because you can grab exactly what you need without thinking twice.
I arrange tools into task lines—chopping, mixing, measuring—so I move faster and waste less time.
When prep starts, I grab a set tailored to the day’s recipe, not a random drawer jumble.
Practical, focused organization keeps meals efficient and stress-free.
Accessory Systems: Magnetic Bars and Rails That Actually Stick

If you’ve ever chased a loose utensil across the counter, you’ll appreciate magnetic bars and rails that actually stick.
I install sturdy, low-profile magnetic strips where I reach most often, then group tools by task. No wobble, no slipping—just quick access.
I label sections, test strength, and rinse with soap. A tidy baseline, daily, saves minutes.
Pegboard Hacks to Reclaim Countertop Space
Pegboard hacks can reclaim precious countertop space without sacrificing accessibility.
I start with a single, sturdy wall panel near prep. I group utensils by task, using labeled bins and hooks at different heights for quick grabs.
I mount retractable cords for gadgets, and keep seldom-used tools behind the board. Clear labeling reduces clutter, speeds routines, and invites tidy repetition.
Inside-Cabinet Dividers for Upright, Visible Tools
Inside-cabinet dividers make upright, visible tools easy to grab and put away.
I arrange my most-used utensils in slim slots, with labels facing out for quick recognition. A small feet-on-pad rack keeps blades safe, while adjustable widths fit varying tools.
I line bases with cork or felt to mute clatter, and I audit weekly, removing duplicates and unused items.
Color-Coded Measuring Spoons and Gadgets by Use
Color-coded measuring spoons and gadgets help me grab the right tool fast, and I’ll show you how I set them up by use.
I group by function—dry ingredients, liquids, spices—then label shelves with simple color tags.
I keep a small, dedicated timer for each color, so timing stays precise.
This system reduces guesswork and speeds prep. Simple, repeatable.
The Two-Bin Rule for Scrapers, Brushes, and Misc Tools
I’m starting with a simple Two-Bin Rule for scrapers, brushes, and misc tools to keep things reachable and sorted.
One bin holds active-use items, the other stores backups, spare heads, and unlikely-to-need-them tools, so nothing gets lost.
If you grab a tool, you’ll know exactly where it belongs when you’re done, and you’ll save time next time you cook.
Two-Bin Scraper System
The Two-Bin Scraper System is a simple, reliable way to keep scrapers, brushes, and misc tools neatly organized and easy to grab.
I assign each bin a purpose—one for daily use, one for seasonal or infrequently needed items.
When I’m done, I return everything to its bin, wipe handles, and keep the setup accessible, quick, and predictable.
Tool Sorting Method
A simple extension of the Two-Bin Scraper System is the Tool Sorting Method, or the Two-Bin Rule for scrapers, brushes, and misc tools.
I keep tools in labeled bins: one for daily-use items, one for occasional or reserve pieces.
I return items after use, purge clutter quarterly, and adjust bins as projects shift.
Cleanliness, speed, and focus follow.
Vertical Storage Ideas for Lids, Foil, and Wraps
Vertical storage for lids, foil, and wraps keeps your kitchen efficient and clutter-free.
I place lids upright in a slim organizer, so matching sizes stay paired and easy to grab.
Foil and wrap rolls fit in a dedicated rack, edges aligned.
Label sections for quick scanning, and keep rarely used sizes lower.
Clean lines, simple access, fewer searches every day.
Quick-Clean Placement to Cut Maintenance Time
I’m sharing Quick-Clean Racks and a Snap-Access Layout to cut maintenance time.
This setup lets you grab what you need without rummaging, keeping utensils reachable and clean as you go.
I’ll show practical placements you can try, so you can move from prep to cleanup with fewer steps.
Quick-Clean Racks
Quick-Clean Racks are a game changer for kitchen upkeep: they put the mess behind you by letting you wipe, dry, and store in one smooth motion.
I position utensils in the rack for quick wipe-down, rinse, and drop-off. The result: fewer steps, faster maintenance, and cleaner counters.
Consistency matters, so I keep the setup intuitive and repeatable.
Snap-Access Layouts
Snap-Access layouts make maintenance faster by letting me place utensils where they’re used most, then snap them back in one motion.
I design for flow, not clutter, so every tool has a defined home.
- Front-leaning slots for quick grabs
- Color-coded zones for duty-specific items
- Modular panels that snap cleanly back into place
Seasonal Tool Rotation With Labeled Bins
Seasonal tool rotation with labeled bins keeps my kitchen gear accessible while reducing clutter.
I group items by season, swap beachware and holiday molds, and tag each bin with a simple date and note.
When I cook, I grab what’s relevant, rotate staples back, and refresh labels monthly.
This keeps workflow smooth and storage tidy, without guesswork.
Build a Grab-and-Go Utensil Station Today
Today I’m setting up a grab-and-go utensil station so everything you reach for during cooking is right at your fingertips.
I’ll keep it tidy and efficient with clear zones, a rinse cup, and everyday tools accessible.
- Choose a compact tray
- Group by function
- Label and maintain daily
Budget-Friendly Upgrades That Feel Pro
You don’t need a big budget to make your kitchen feel pro.
I’ll show small, practical upgrades that boost function without breaking the bank.
Replace dull organizers with modular trays, label shelves for quick sight lines, and swap mismatched lids for a cohesive look.
Add a magnetic strip for knives, a simple timer, and sturdy silicone mats—clean, efficient, and affordable.
Weekend Makeover Plan to Implement These Tricks
Kicking off a weekend makeover makes sense after picking up small upgrades that boost daily use.
I’ll map a simple plan you can follow:
- Prioritize every task and time block.
- Gather tools, labels, and containers for a cohesive system.
- Test, adjust, and document what works best for your space.
Conclusion
If you’ve stuck with clutter, consider this your reset button. Think of your kitchen as a well-tuned orchestra, and your utensils as the instruments—each in the right seat, ready to sing. Start small: grab a drawer, group by task, label what you’ll actually use, and pin a grab-and-go station. Before you know it, the chaos loosens its grip, and prep feels like a smooth, steady rhythm you can ride all week. You’ve got this.


