I’ve learned that the 16 must-have utensils belong in clearly defined zones, not a cluttered junk drawer. I start with core sets you’ll actually use, then place items where you grab them most—near prep zones, with drawer dividers that fit. Use vertical storage for small spaces and hidden spots under cabinets for rarely used tools. Regularly rotate and maintain your setup, and tailor it to your cooking style—keep going and you’ll uncover more practical tweaks.
Core Utensil Sets You’ll Actually Use

If you’re simplifying your kitchen, start with a core set of utensils you’ll actually reach for every day.
I choose reliable basics I know I’ll grab first: a solid spatula, a versatile ladle, a sharp knife, tongs, a peeler, measuring spoons, and a whisk.
Keep them within arm’s reach and periodically reassess what truly stays useful in your routines. Smart kitchen organization can greatly enhance your cooking efficiency and make meal prep more enjoyable.
Define Your Ideal Utensil Zone

A well-organized kitchen starts with an ideal utensil zone where every tool has a home and a clear path to use.
I define mine by accessibility, workflow, and symmetry, so I grab what I need without thought.
Here’s how:
- Identify daily tools
- Group by task
- Choose accessible risers
- Label boundaries
Additionally, consider implementing essential kitchen organization tips that can help streamline your space even further.
Core Kitchen Utensil Sets You’ll Actually Use

For a kitchen that actually works, start with a core set of utensils you’ll reach for every day.
I prioritize reliable basics: a sturdy spatula, tongs, a whisk, ladle, peeler, can opener, and a dependable set of knives.
Choose stainless steel or silicone, dishwasher-safe where possible, and keep a single, organized container.
Incorporating space-saving solutions can further enhance your kitchen’s functionality and efficiency.
You’ll cook faster, clean easier, and stay clutter-free.
Drawer Dividers That Actually Fit Your Space

drawer dividers that actually fit your space — start by measuring twice and choosing adjustable or modular options that expand to your drawer’s exact width and depth.
I’m sharing concrete picks you can trust, so your utensils stay organized from day one.
- Adjustable dividers for flexible widths
- Modular grids that expand as needed
- Sturdy materials that resist wear
- Snap-in inserts for easy reconfigurations.
Consider incorporating smart cabinet organization tips to maximize efficiency and functionality in your kitchen.
Vertical Storage Tricks for Small Kitchens

Vertical storage can free up precious counter and drawer space, especially in tight kitchens.
I recommend wall-mounted rails for frequently used utensils, so you stay efficient without clutter.
Use magnetic strips for metals, pegboards for odd shapes, and pot racks above islands.
Keep seasonal tools tucked in slim organizers.
Incorporating kitchen gadget organization will not only enhance your efficiency but also create a more visually appealing space.
I’ll guide you through simple, attainable setups you’ll actually maintain.
Labeling Systems That Save Time
Labeling systems save time by turning guesswork into instant recognition.
I use simple labels I can see at a glance, not small print. You’ll notice fewer rummage-and-reach moments and quicker returns to tasks.
- Clear, bold text on each container
- Consistent font and color coding
- Shared terminology across drawers
- Regular label updates after changes
In addition, implementing counter organization can further enhance the efficiency of your kitchen space.
Magnetic Strips and Wall Rails
Magnetic strips and wall rails supplement the labeling system by giving fast, visible access to frequently used tools.
I rely on them to keep knives, whisks, and tongs within easy reach without crowding drawers.
Install low, within arm’s reach and label clearly with icons.
They simplify cleanup, prevent tools from slipping, and maintain a tidy, efficient workspace I can trust daily.
Additionally, using kitchen drawer organization strategies can enhance your overall kitchen efficiency.
Utensil Caddies by Use Case
I’m looking at utensil caddies by use case to help you pick what fits your workflow, not just your counter space.
From purposeful use cases to a range of sizes and materials, we’ll map options that match how you actually cook. Essential Kitchen Hacks can also enhance your organization skills in the kitchen.
Let’s start with practical choices that keep your tools organized and your prep smooth.
Purposeful Use Cases
Organizing utensil caddies by use case helps you pick the right setup fast: everyday cooking tools stay within easy reach, specialty pieces live where you use them most, and empty spaces aren’t wasted.
I’ll share practical cases you can apply now:
- Everyday chopping
- Baking spread
- Grill and outdoor
- Prep station essentials
Size And Material Variety
Size and material variety matter because different utensils demand different fits and weights.
I choose caddies by use case, matching sizes to cups, slots, and dividers. Stainless for heavy tools, silicone for soft edges, bamboo for light utensils.
I prioritize modular, easy-to-clean designs, with clear labeling and access. This keeps tools reachable, reduces clutter, and streamlines daily cooking tasks.
Budget-Friendly Picks That Still Look Stylish
When you’re on a budget, you can still achieve a stylish kitchen with smart picks that balance price and looks.
I’ll share practical, affordable choices that elevate style without clutter.
- Stainless-look silicone utensils
- Matte-finish plastic organizers
- Bamboo-handled tools
- Reusable glass jars for storage
Durable Materials for Everyday Utensils
Durable utensils are the backbone of any kitchen routine, and choosing the right materials keeps them performing for years.
I prioritize heat resistance, staining resistance, and easy cleanup, so you won’t fight wear after daily use.
Materials like stainless steel, silicone, and sturdy hardwoods offer reliable longevity.
I’ll help you match choices to tasks, saving time and reducing replacements.
Special-Function Holders: Tongs, Whisks, Peelers, and More
Specialized tool docking helps me keep essentials within arm’s reach, so tongs, whisks, and peelers have their own ready-to-grab spots.
I’m focusing on quick-access harboring that makes every utensil easy to find and return.
Let’s explore smart placements that streamline prep and minimize clutter for busy kitchens.
Specialized Tool Docking
Specialized tool docking keeps your kitchen workflow smooth by giving tongs, whisks, peelers, and other tools a dedicated home.
I guide you to practical setups that keep counters clear and tools reachable.
- Magnetic bars for metal gadgets
- Vertical pegs for grab-and-go items
- Slotted organizers for odd shapes
- Clips and hooks for quick swaps
Quick-Access Harboring
Quick-access holders keep essential tools within arm’s reach, so I design practical setups for tongs, whisks, peelers, and other frequent performers in the kitchen.
I group tools by function, mount them near prep zones, and use labeled containers for quick spotting.
No rummaging, no clutter—just clear, deliberate placements that speed tasks and reduce countertop chaos.
Simple, reliable, repeatable organization.
Reusable Labeling Ideas for Easy Reassignment
Labeling is key, and reusable tags make reassignment a breeze.
I’ll share simple, practical ideas you can use today to keep jars, drawers, and bins flexible. Then you can reallocate tools without reprinting labels.
- Use laminated, reusable labels with dry-erase markers
- Color-code by category and switch only the color tag
- Create magnetic labels for metal containers
- Attach labels to lids and tops for quick visibility
Rotate and Maintain Your Organized Kitchen
We’ve set up flexible labeling, so now it’s time to keep that system humming by rotating and maintaining what you’ve organized.
I regularly review misplaced tools, return them to their zones, and adjust labels when routines shift.
Schedule a quick monthly check, wipe surfaces, and refresh drawers.
Consistency beats chaos, so commit to tiny, repeatable tweaks that preserve clarity and efficiency.
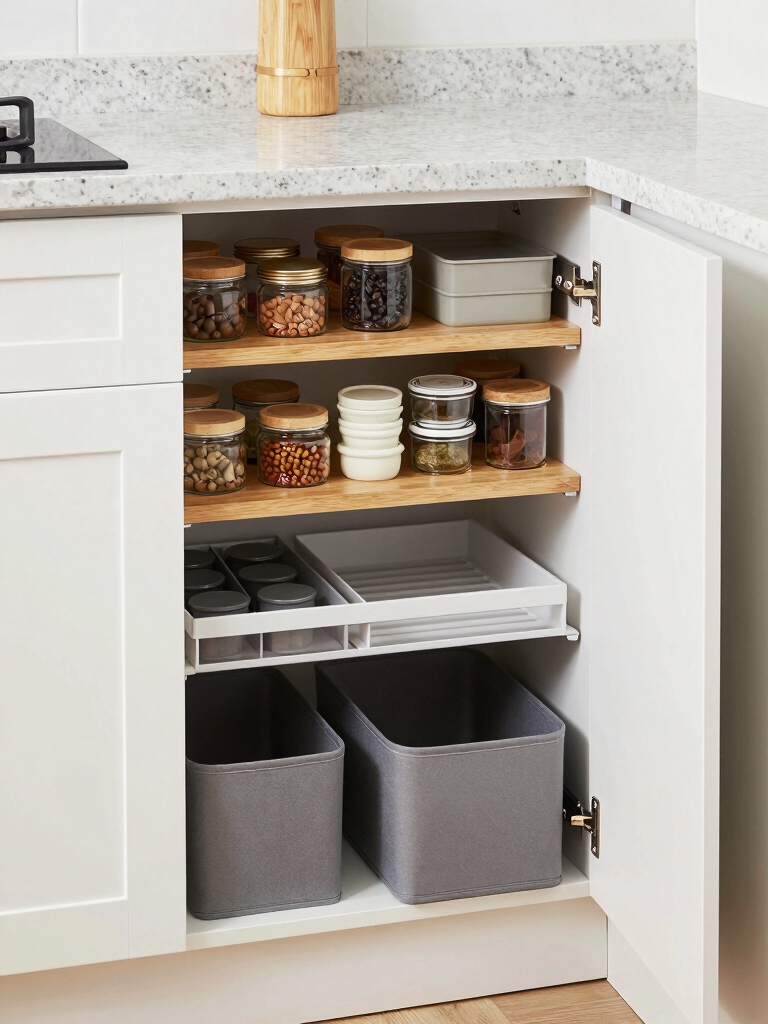
Hidden Storage: Under-Cabinet and Corner Solutions
I’ll show you how Under-Cabinet Trays Mastery, Corner-Cpace Maximizers, and Hidden Pull-Out Solutions can transform tight spaces.
Together, we’ll explore smart tray setups, angled corner organizers, and smooth pull-outs that keep tools accessible yet tucked away.
Let’s map a practical plan you can implement this weekend.
Under-Cabinet Trays Mastery
Under-cabinet trays are a simple, smart way to reclaim drawer space, and I’ll show you how to master hidden storage without adding clutter.
I’ve tested compact organizers and found these steps effective in practice:
1) Measure available depth precisely
2) Choose shallow, lipless trays
3) Label zones for utensils
4) Mount with minimal hardware for stability
Corner-Cpace Maximizers
Corner-Space Maximizers reveal hidden storage where it often goes overlooked: corners.
I show you practical under-cabinet and corner options that keep utensils accessible without crowding counters.
Think magnetic strips, slim pullouts, and tiered racks tailored to tight gaps.
You’ll install once, (re)discover space, and keep your workflow smooth.
No fuss, just clear, precise, efficient organization you can trust.
Hidden Pull-Out Solutions
Hidden pull-out solutions taper clutter without sacrificing access.
I prefer under-cabinet and corner pulls because they keep essentials visible, within reach, and neatly tucked away. You’ll notice smoother prep flow and fewer rummages.
Here are four practical options:
- Under-cabinet knife/utensil tray
- Pull-out spice rack
- Corner wedge drawer
- Slim lid organizer
Quick-Install Setups for Renters
If you’re renting, quick-install setups let you organize kitchen utensils without drilling extra holes or making permanent changes.
I pick magnetic strips, adhesive mounts, and suction-friendly racks that grip walls and cabinets without screws.
I label zones, keep essentials reachable, and switch placements as needs shift.
No clutter, just efficient access. You’ll assemble fast, reuse tools, and maintain a tidy, renter-friendly kitchen.
Your Personalization Checklist: Tailor to Your Cooking Style
To tailor your kitchen to your cooking style, start with a practical personalization checklist that fits how you actually cook.
- List must-haves you use weekly
- Frequency-based tool placement
- Custom categories for meals you repeat
- Quick-access zones for prep and cleanup
I’ll help you customize, declutter, and streamline with clear, actionable steps you can implement today.
Conclusion
Imagine yawning at your messy drawer, then bright, orderly shelves whisper “you’ve got this.” Juxtapose chaos with clarity: a drawer that contents forget, and a zone that actually works. I’ve shown you core sets, smart dividers, and quick installs—tools that suit real kitchens, not fantasies. Stay practical, maintain gently, and tailor to you. When function meets habit, your space forgives the clutter, and you reclaim time you’ll actually use. Welcome to a simpler, steadier kitchen.