I’m spotting 16 open-kitchen island designs that steal the spotlight by balancing powerful work zones with social seating, smart storage, and layered lighting. I’ll guide you through layouts that keep prep, cooking, and cleanup flowing, while offering inviting spots for guests. Think practical zoning, durable finishes, and punchy color accents that stay cohesive. If you keep scrolling, you’ll uncover setup tips that turn any space into a high-performing, welcoming hub.
What Makes an Open-Kitchen Island Work

An open-kitchen island works when it serves as a quiet hub rather than a noisy divider.
I keep it functional: clear workflows, accessible storage, and seating that invites conversations without crowding.
I choose finishes that hide spills, lighting that balances task and ambiance, and power where you need it.
You’ll notice the space breathes when every element earns its place. Additionally, open concept layouts encourage seamless transitions between cooking and entertaining, enhancing the overall experience in your home.
Core Layout Patterns for Island-Centered Kitchens

There are three core layout patterns that define island-centered kitchens, and I’ll start with the one I reach for most: the working triangle plus island workflow.
I mix prep, cooking, and cleanup around a central island, keeping zones close but distinct. This setup balances speed and conversation, minimizes moves, and lets guests gather without crowding the work area. Additionally, many homeowners appreciate the versatility of kitchen island setups, which can accommodate various functions and styles.
Practical, clear, and efficient.
Assessing Your Space: Measuring for Island Size and Shape

I start by measuring your space precisely, so we understand exactly what fits and looks right.
Then we’ll pick an island shape that suits your workflow, keeping clearance and traffic smooth.
Let’s keep the path clear and the work zones logical as we size and plan. Additionally, considering your kitchen square footage is crucial for determining the ideal island dimensions.
Measure Your Space Precisely
To measure your space accurately, start with a clear plan and take your time.
I map walls, doors, outlets, and traffic flow, noting clearances on every side. I use a tape measure, then confirm with a quick mock-up using string or painter’s tape.
Precision saves mistakes—leave room to roll chairs, pull drawers, and move around the island confidently. Incorporating smart storage solutions can also help maximize space in your open kitchen design.
Choose Island Shape Wisely
Choosing the right island shape starts with the space you measured and how you move through it; if the room isn’t perfectly rectangular, I look for shapes that fit the flow—like a rounded or L-shaped island that mirrors corners and doorways.
I prefer practical silhouettes, clear sightlines, and easy access, ensuring circulation stays smooth without crowding counters or seating. Additionally, incorporating L-shaped kitchen designs can maximize functionality while maintaining an open feel in the space.
Clearance and Workflow Rules
Clearance isn’t an afterthought—it’s how I map the flow from prep to plating.
When measuring for island size and shape, I prioritize clear circulation, minimum touchdown space, and practical clearance around appliances.
I sketch zones for prep, cook, and cleanup, then test paths to avoid bottlenecks.
Too-close edges steal efficiency; roomy gaps preserve safety and smooth, confident workflow. Additionally, U shape kitchens are known for maximizing efficiency by providing distinct zones that enhance workflow.
Zoning an Open Plan: Cooking, Dining, and Living Areas
I’ll walk you through how to tune flow between the cooking, dining, and living zones so movement feels natural, not forced.
We’ll look at clear sightlines and easy access to essentials, so the space stays connected yet distinct.
And I’ll help you balance acoustics and light so each area feels comfortable without shouting over the others. Additionally, incorporating open kitchen designs can enhance the overall aesthetic and functionality of your home.
Flow Between Zones
Designing an open-plan kitchen, dining, and living area works best when the flow between zones feels natural rather than forced; small, deliberate disruptions—like a change in flooring or a low divider—can guide movement without trapping you in a single space.
I prefer clear sightlines, complemented by purposeful furniture placement that zones activities without interrupting daily life.
Incorporating innovative kitchen designs can further enhance the functionality and aesthetic appeal of your space.
Practical, approachable, and flexible.
Sightlines and Access
In an open-plan kitchen, dining, and living area, sightlines aren’t just about looking—it’s about knowing where everything belongs.
I keep paths clear and zones distinct, so movement stays intuitive.
- Align islands with prep zones
- Line sightlines to entry points
- Use color and materials for contrast
Acoustic and Light Balance
Acoustic balance and lighting aren’t afterthoughts in an open-plan kitchen; they’re what make the space usable and comfortable.
I tune sound by soft textures and strategic cabinetry, preventing echo and chatter from drowning meals.
For light, I balance ceiling, task, and ambient sources, avoiding glare.
The result: zones that feel connected yet clearly defined, inviting effortless cooking, dining, and living.
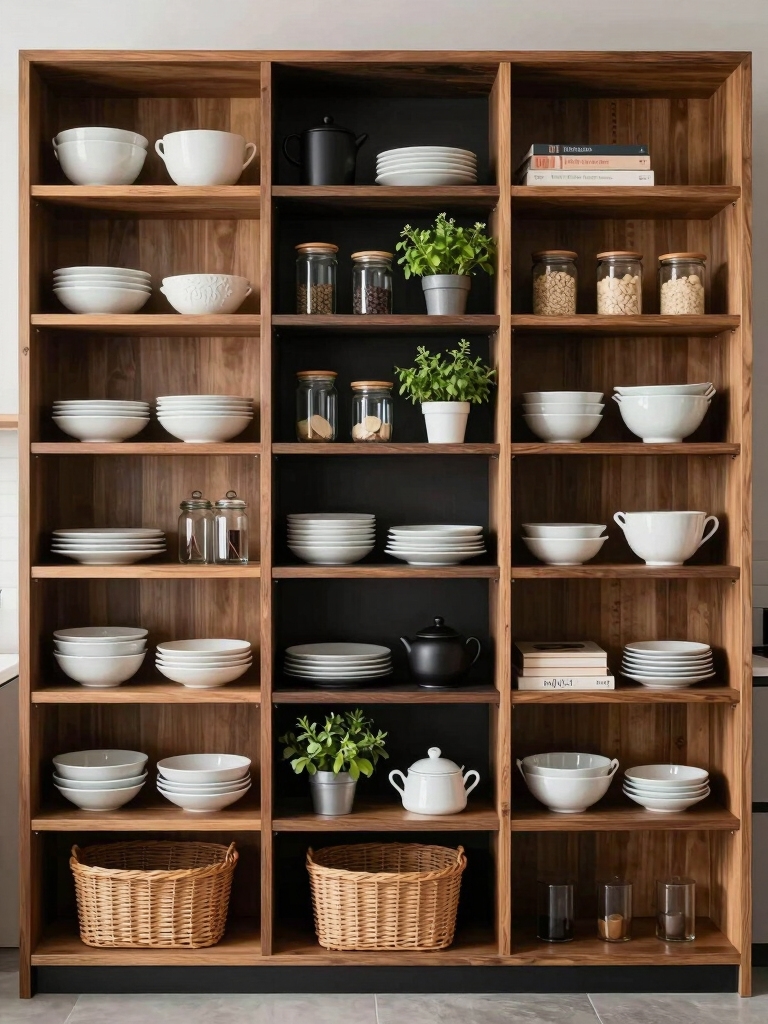
Storage-Smart Island Features That Save Space

If you’re optimizing a kitchen island, smart storage can transform helper space into real workhorse functionality.
I’ll share practical tweaks you can actually use:
- Pull-out organizers for utensils and lids
- Hidden drawers under the overhang for cookware
- Vertical slots and hooks to free counter space
These features keep surfaces clear and meals moving smoothly.
Seating Strategies for Casual Meals
Seating at a kitchen island isn’t just about looks—it’s about making casual meals feel effortless.
I favor seating that adapts to everyone’s pace: a mix of tall stools for quick bites and a couple of counter-height nooks for informal chats.
Keep clear legroom, spill-prone surfaces, and easy-clean fabrics.
Prioritize comfort, accessibility, and a layout that invites shared, relaxed meals.
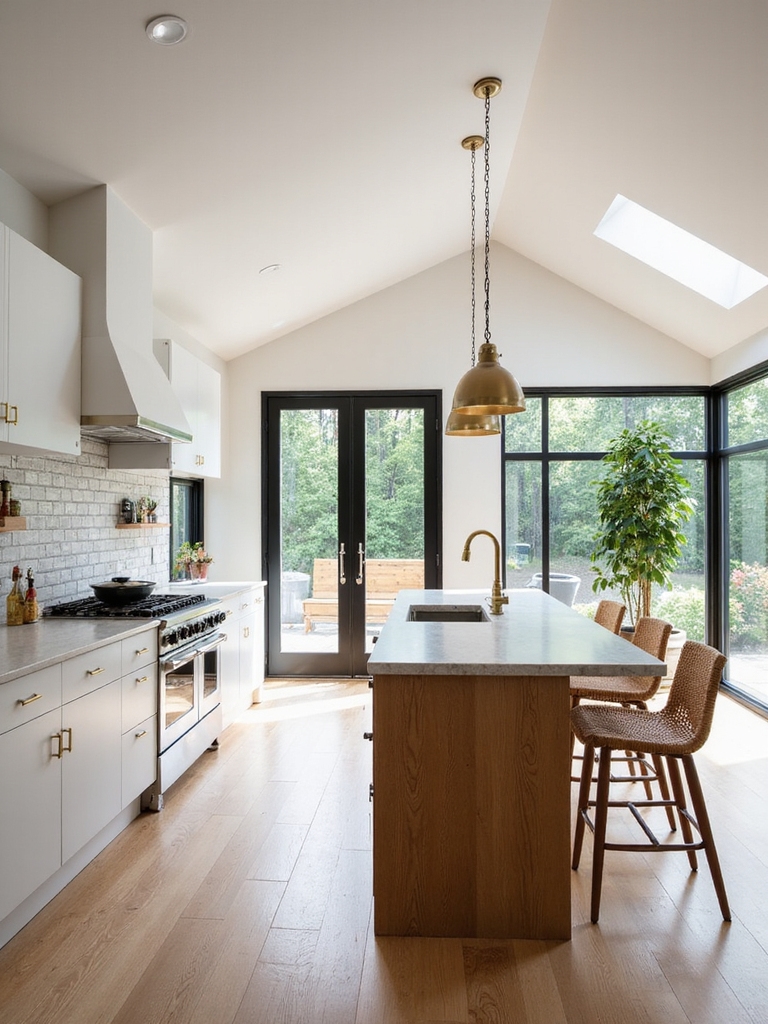
Lighting for Open-Kitchen Islands: Layers and Ambience
Lighting for open-kitchen islands isn’t just about brightness—it’s how you shape the mood for meals that feel effortless.
I tune layers to guide action and atmosphere.
- Layer task, ambient, and accent lighting for balance
- Use dimmers to adjust mood without glare
- Highlight prep zones subtly with warm tones
Practical, personal, and precise, I tailor light to flow with your routine.
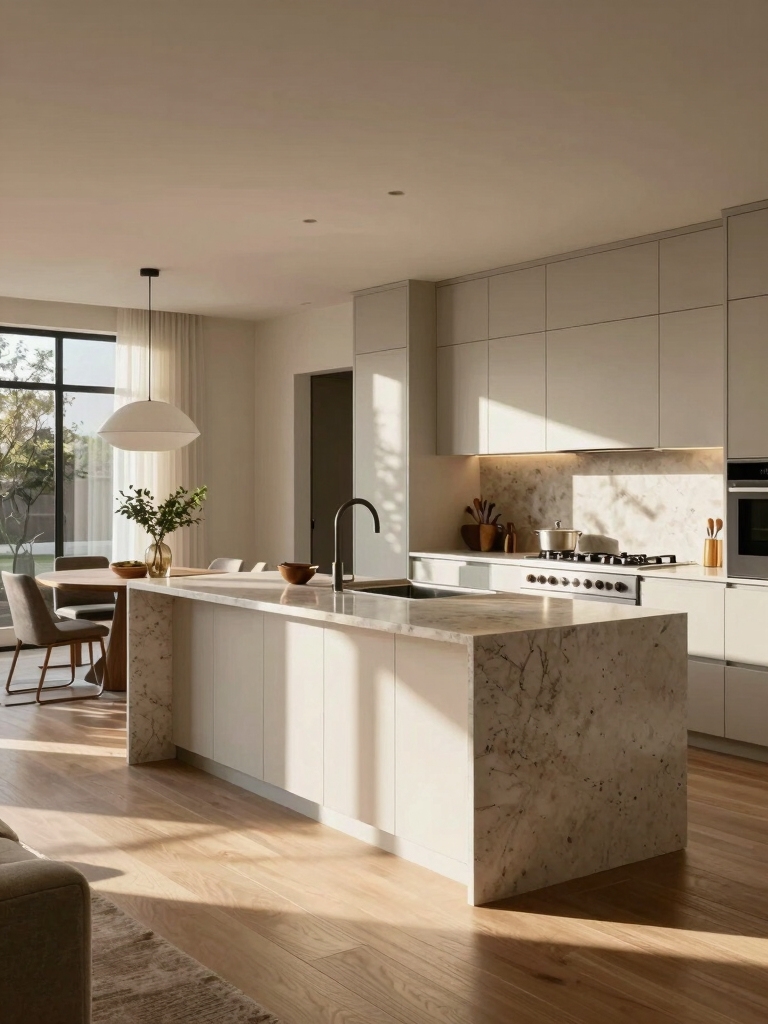
Materials and Finishes That Brighten and Ventilate
Materials and finishes matter just as much as layout, because they can brighten a space and keep it breezy.
I pick light, reflective surfaces and open-grain woods for warmth without heaviness, and I favor matte tiles that don’t scuff.
Vapor-permeable backsplashes help airflow, while light curtains and clear cabinets reduce visual clutter, letting the island feel airy and approachable.
Color and Texture for Open-Kitchen Islands
I’ll show you how color contrast and texture can define an open-kitchen island, making it feel both distinct and cohesive with the room.
I favor simple material layers—think a durable top, a softer vertical finish, and a subtle color difference that reads from across the room.
Let’s explore practical pairings that balance visual interest with function.
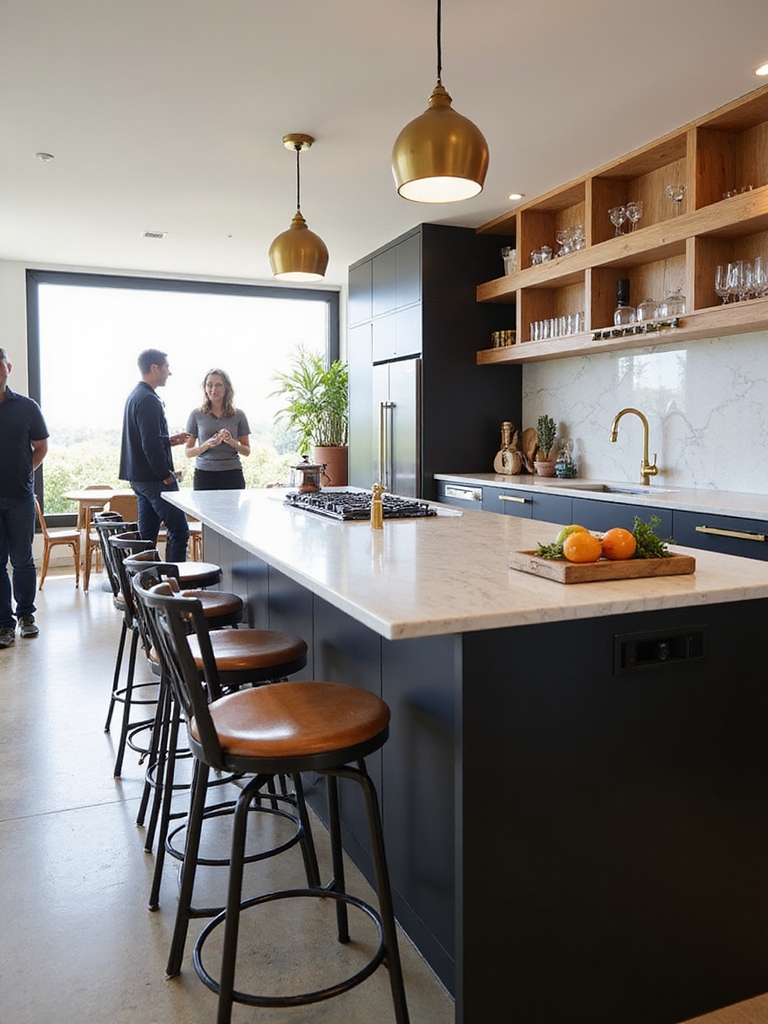
Color Contrast and Texture
Color contrast and texture are two of the easiest ways to give an open-kitchen island personality without shouting.
I blend dark charcoal with warm wood and matte white accents to ground the space.
- Pair bold base with lighter countertop
- Mix smooth surfaces with tactile textures
- Use color as a unifying accent across elements
Finishes and Material Layers
When planning finishes and material layers for an open-kitchen island, I start by pairing textures you can actually touch with colors that calm or energize the space.
I mix matte and gloss for depth, then layer warm wood with cool stone accents.
Keep edges simple, contrasting subtly, and test samples together to guarantee the final feel remains cohesive, durable, and inviting.
Appliance Placement to Maximize Flow
On a kitchen with an island, smart appliance placement isn’t just about looks—it’s about flow.
I place zones so prep, cook, and cleanup glide together. Keep the fridge, sink, and prep area within one arm’s reach.
I also map traffic paths to avoid bottlenecks.
- Zone the fridge near prep
- Align sink and cooktop
- Position dishwasher for easy unloading
Ventilation and Odor Control for Open Kitchens
Ventilation and odor control in open kitchens matter more than you might think, and good design makes it feel seamless rather than stuffy.
I prioritize a capable range hood sized for your cooking style, with quiet performance and proper ducting.
Pair downdraft options only where needed, and install good cross-ventilation.
Clean filters, smart zoning, and regular maintenance keep air fresh and inviting.
Acoustic Design for Open Spaces With an Island
I’ll start by balancing sound with smart zoning, so the kitchen stays usable even when the island is busy.
Let’s look at sound zoning strategies, island acoustic shielding, and room noise management to keep conversations clear and appliances quieter.
I’ll show practical tweaks you can apply right away to make open spaces feel calmer and more focused.
Sound Zoning Strategies
When you’re designing an open kitchen with an island, sound zoning isn’t a luxury—it’s essential.
I map activities to zones, reducing cross-talk and noise bleed. Practically, I use:
1) targeted acoustic panels;
2) varied ceiling heights;
3) strategic appliance placement.
The result is calmer conversations, clearer lists, and a kitchen that feels controlled, not chaotic.
Island Acoustic Shielding
Island acoustic shielding isn’t a luxury here—it’s how I keep conversations and commands from overlapping across the room.
I tune cabinet height, choose taller backsplashes, and position seating to create small, focused zones.
I use soft, dense materials under countertops and add panels where voices bounce.
Practical, quiet spaces empower meals, chats, and workflows without shouting over clatter.
Room Noise Management
Open spaces can feel noisy fast, so I design with rhythm and control in mind: we blend surface textures, paneling, and ceilings to absorb chatter and bounce less sound around.
- Prioritize soft, dense materials on key surfaces
- Layer ceilings with acoustic panels and timber diffusers
- Zone the space to create intimate, quiet microareas
Budget Tiers for High-Impact Open-Kitchen Feels
Budget isn’t just a number—it’s a plan you can actually pull off.
I’ll map simple tiers so you can chase high-impact vibes without chaos: entry buys time-saving basics, mid-tier upgrades warmth and texture, and premium sets bold centerpiece statements.
Prioritize enduring materials, smart lighting, and a cohesive color story.
You’ll achieve an open-kitchen feel that’s affordable, deliberate, and uniquely yours.
Real-Life Open-Kitchen Island Gallery: 16 Standout Designs
From real kitchens, 16 standout open-kitchen island designs prove what works in practice: smart layouts, durable materials, and thoughtful details that elevate daily cooking and entertaining.
I tour these spaces and share what links function to beauty.
- Flexible zones
- Surfaces built to last
- Integrated storage that vanishes clutter
6 Common Mistakes and How to Avoid Them
Common mistakes creep in when you’re choreographing an open kitchen island, but they’re easy to avoid with a bit of planning.
I’ve learned to map workflow first, then size the space around it. I keep clear zones, avoid clutter, and choose appliances that suit daily rhythm.
Don’t over-furnish or block traffic—simplicity saves time, focus, and kitchen harmony.
Quick-Start Checklist to Plan Your Open-Kitchen Island Makeover
Kicking off an open-kitchen island makeover is all about a simple, practical plan.
I’ll walk you through a quick-start checklist so you can act quickly and confidently. Here’s what to do:
- Define your goals and budget
- Measure space and traffic flow
- Prioritize storage and seating needs
Follow these steps, and you’ll streamline every decision and stay on track.
Conclusion
As you plan, imagine your space as a blank stage waiting for a single, bold act: the island that ties cooking, dining, and lounging together. I’ve shared patterns, measurements, and smart tricks, so your makeover feels doable, not intimidating. Start small, measure twice, and pick features that spark joy. Think of your kitchen as a breeze through an open hall, where every detail is a note in a single, harmonious melody. Your island is the conductor.