I’d start by emptying and cleaning every cabinet, then map zones (prep, cook, bake) so things live where you use them. Keep daily items at eye level, nest Tupperware, store lids upright, and use clear bins, risers, and pull-outs for deep or awkward shelves.
Make a dedicated baking station and rotate seasonal gear higher or tucked away. Do five‑minute tidies and a monthly sweep to stay sane — keep going and I’ll share exact layouts and product picks.
Assess Your Current Cabinet Layout

Before rearranging anything, I take a quick inventory of every cabinet so I know what I’m working with: what’s used daily, what’s seasonal, and what’s just taking up space.
I note awkward shelves, deep corners, and frequently reached-for items. Then I map zones—prep, cooking, baking—so everything lives near its task.
Small tweaks in placement save time and reduce countertop clutter. I also prioritize smart storage solutions to make the most of awkward spaces and streamline access.
Clear Everything Out and Clean Shelves

Now that I know where everything should go, I clear each cabinet completely so I can see the full canvas. I wipe shelves, vacuum crumbs, and check for sticky spots or damage.
Removing everything lets me assess space, test fittings, and decide what storage accessories will work.
Clean, empty shelves make arranging purposeful and visually calm—your future self will thank you. Use simple organization hacks to maximize space and keep frequently used items accessible.
Group Items by Frequency of Use

I usually organize cabinets by how often I reach for things: daily items like mugs, cutting boards, and seasoning go front and center, while rarely used gadgets and special-occasion servingware ride higher or farther back.
I keep frequently used cookware at arm’s reach, group similar items together, and label shelves subtly so grabbing essentials feels effortless and looks intentional.
Maximizing every inch of pantry cabinets makes small kitchens feel larger and more functional, especially when you use smart storage solutions like shelf risers and pull-out drawers for pantry cabinets.
Designate Zones for Cooking Tasks
I like to set up clear zones so cooking flows—prep tools stay in the drawers near my countertop, pots live on the shelves closest to the stove, and spices are grouped by flavor so I can grab blends fast.
This simple layout cuts down on steps and keeps my workflow smooth. Try arranging one task zone at a time and you’ll notice how much quicker meals come together.
Many clever small kitchen cabinet ideas focus on maximizing vertical space with adjustable shelving and pull-out organizers for small kitchens.
Prep Tools Within Reach
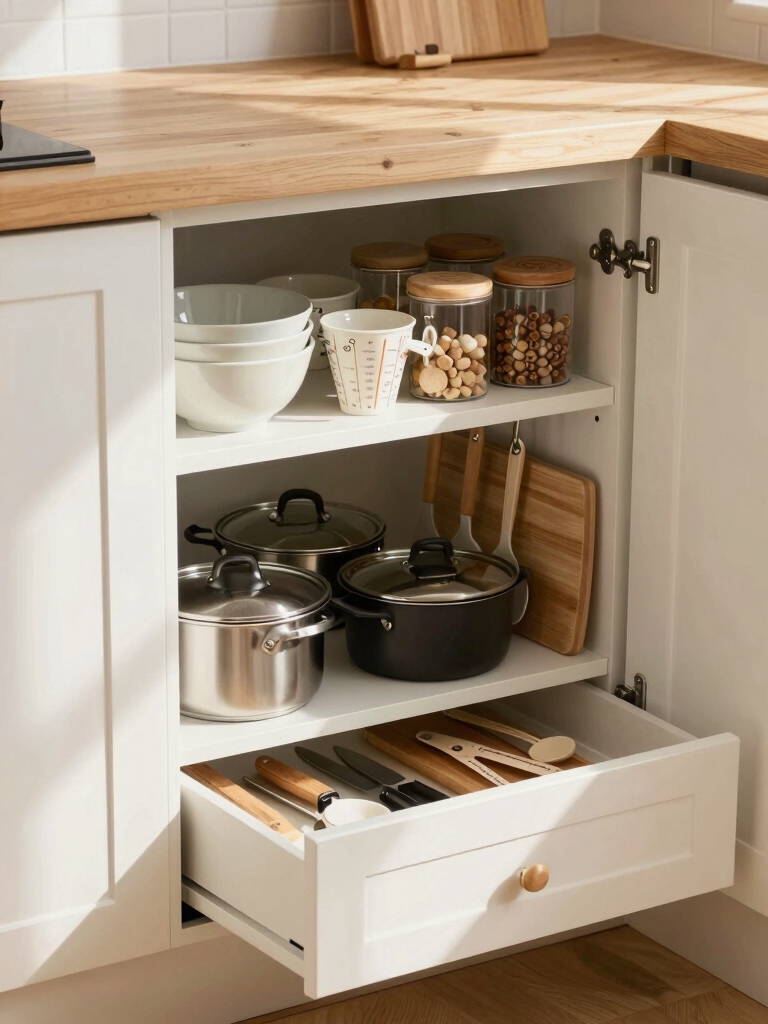
Let’s carve out clear zones so the tools you need for prepping are always within arm’s reach. I keep cutting boards, knives, measuring cups, and mixing bowls in one lower cabinet near my main prep counter.
Drawer organizers separate utensils; lazy Susans hold oils and frequently used gadgets. This way prepping flows, clutter stays out of sight, and I save time every meal.
Many layout experts recommend using space-saving layouts to maximize efficiency in compact kitchens.
Pots Near Stove
Since I keep prep tools by my main counter, it makes sense to store pots and pans close to the stove so cooking stays smooth and low-stress.
I keep lids upright on a rack, stack pans by size, and use a pull-out drawer for heavy Dutch ovens.
That shortens steps, protects finishes, and keeps the cooking zone efficient and visually calm.
Small kitchens benefit from clever storage like space-saving cabinets that maximize every inch.
Spices by Flavor Profiles
Think of your spice cabinet as a mini spice market organized by flavor—citrusy, smoky, herby, warm—and you’ll make meal-building much quicker.
I group jars into clear zones for prep: bright citrus and vinegars, smoky chilies and paprika, fresh herbs, and cozy warming spices.
Labels face out, small trays contain grinders, and I keep favorites within arm’s reach of the stove.
Small, dedicated spice racks and pull-out drawers make the most of compact Indian kitchen layouts and keep everything accessible for quick cooking space-saving solutions.
Use Clear Containers and Uniform Bins

I often reach for clear containers and matching bins first because they make everything look intentional and make finding ingredients fast.
I line similar cans, grains, and snacks in uniform bins, label lids for quick scans, and group by use—baking, breakfast, snacks.
The clean, consistent look reduces visual clutter and saves time when I’m cooking or restocking.
Install Shelf Risers for Vertical Space
I usually add shelf risers to my cabinets the moment I need more vertical real estate—they’re an instant way to double usable space without tearing anything out.
I pick sturdy, low-profile risers that match shelf depth so plates, mugs, and spice jars stack neatly.
They keep things visible, reduce wasted height, and create tidy zones—simple, affordable upgrades that feel custom and last.
Add Pull-Out Drawers and Lazy Susans
Swap cramped reach-ins for pull-out drawers and install a Lazy Susan, and you’ll wonder how you lived without them.
I swapped fixed shelves for smooth drawers to access pans and Tupperware, and a corner Lazy Susan reclaimed wasted space.
Together they make grabbing, organizing, and returning items effortless. I recommend soft-close slides and adjustable trays so everything fits neatly and stays visible.
Utilize Door-Back Storage Solutions
I like to use the inside of cabinet doors to squeeze in extra storage and make the most of vertical space.
I’ll attach slim racks or magnetic strips to hold small essentials like spice jars, measuring spoons, and cutting boards.
It keeps countertops clear and makes those tiny, easy-to-lose items visible and accessible.
Maximize Vertical Space
Although it’s easy to forget the backs of cabinet doors, I’ve found they’re some of the most valuable real estate in the kitchen — and I use them for everything from spice racks and cutting-board holders to slim trash-bag dispensers and hanging bins for scrub brushes.
I mount adjustable rails and slim shelves to free shelf space, keep counters clear, and tailor storage to changing needs.
Store Small Essentials
Once you start using the backs of cabinet doors for larger items, you’ll quickly see they’re perfect for corralling the small stuff that so often gets lost.
I add slim racks, spice pockets, and magnetic strips to hold measuring spoons, clips, and lids.
It frees drawers, keeps essentials visible, and feels intentionally designed—small changes that make daily routines smoother and neater.
Label Shelves and Containers Clearly
Usually I grab a label maker before I start rearranging, because clear labels instantly make the whole kitchen feel calmer and smarter.
I label shelves for categories—baking, snacks, breakfast—and containers for contents and dates.
Consistent fonts and simple waterproof labels elevate the look and cut decision time.
Guests and family know where things go, and I stop hunting for that elusive spice.
Store Heavy Items on Lower Shelves
In my kitchen I keep heavy pots, cast-iron skillets, and bulk supplies on the lower shelves so I don’t strain reaching or risk something toppling down.
It’s safer, looks cleaner, and protects delicate items above. I organize by weight and frequency so grabbing feels effortless.
- Stacks by weight
- Slide-out trays
- Clear zones for bulk
Keep Daily Essentials at Eye Level
I keep everyday items like spices, coffee, and my go-to plates at eye level so grabbing them feels effortless.
I group things by how often I use them—morning items together, dinner essentials together—so routines flow faster.
Clear sightlines are key, so I avoid clutter and face labels forward for instant visibility.
Everyday Items Within Reach
Regularly I keep the things I use every day at eye level so I don’t waste time bending or rummaging when mornings are rushed.
That means reaching for familiar mugs, go-to spices, and my daily prep tools without thinking — tidy, visible, and within arm’s reach.
- Favorite coffee mug
- Salt, pepper, olive oil
- Measuring spoons and peeler
Group by Daily Use
Often I keep daily essentials grouped at eye level so I can grab what I need without thinking, and you can do the same to streamline your mornings. I arrange coffee, mugs, cereal, and frequently used spices together.
Clear zones cut decision fatigue: breakfast items in one spot, snackables in another. It’s smarter, faster, and makes your kitchen feel intentionally designed.
Keep Clear Sightlines
Usually I keep the most-used items at eye level so I can see them the moment I open a cabinet. It saves time, reduces visual clutter, and makes the kitchen feel intentional.
I arrange frequently used plates, mugs, and oils where my eyes land first and reserve higher or lower shelves for seldom-used pieces.
- Plates and mugs
- Cooking oils and salt
- Everyday glassware
Create a Dedicated Baking Station
Because baking needs quick access to tools and ingredients, I like to set up a dedicated baking station where everything I reach for is purposefully placed.
I keep measuring cups, spoons, mixing bowls, spatulas, and vanilla in one lower cabinet or drawer, and stash baking sheets and cooling racks nearby.
A small shelf for frequently used flours and sugars keeps workflow smooth and pretty.
Tame Tupperware and Lid Chaos
I wrestle with Tupperware and lids like everyone else, so I’ve found a few simple habits that keep them from taking over my cabinets. I sort by size, nest containers, and keep lids visible.
A slim bin holds lids upright; stackables live by frequency. Quick rules save time and make my cabinet look intentional, not chaotic.
- Label sets
- Nest by size
- Vertical lid bin
Maintain a Seasonal Rotation System
Once I’ve tamed Tupperware chaos, I turn my attention to the bigger seasonal shuffle in cabinets so things actually match what I need each month.
I rotate items—holiday serveware, grilling tools, slow-cooker accessories—into easy-reach spots for the season and tuck off-season pieces higher or deeper.
A labeled bin and a simple checklist make swaps quick, keeping my kitchen practical and pretty year-round.
Schedule Regular Quick Decluttering Sessions
I keep cabinet clutter under control with small, regular habits: a five-minute daily tidy for stray dishes and stray packaging, a quick weekly check for expired pantry items, and a monthly deep sweep to reassess what I actually use.
These tiny, scheduled sessions stop buildup before it becomes a project. Try slotting them into your routine and you’ll notice how much easier cabinet organization stays.
Five-Minute Daily Tidy
Usually I spend five minutes each evening doing a quick sweep through the cabinets, and that tiny habit keeps clutter from piling up.
I tidy surfaces, realign containers, and stash stray lids so mornings feel calm. Try this short routine:
- Remove obvious trash or junk.
- Re-stack mismatched containers.
- Return items to their designated spots.
It’s fast, satisfying, and design-smart.
Weekly Expiration Check
After that five-minute tidy, I spend another short block each week scanning expiration dates and pulling anything past its prime.
I keep a small bin for tosses and a labeled “use first” shelf for near-expiry items. This weekly habit prevents clutter, saves money, and keeps shelves visually calm. It’s fast, feels intentional, and protects the aesthetic I’ve worked to create.
Monthly Deep Sweep
Every month I carve out a short block of time for a deeper sweep through the cabinets, tackling things the weekly check doesn’t catch.
I pull items, wipe shelves, and decide what really earns space. Small choices prevent big chaos.
- Remove expired or duplicate items.
- Rehome rarely used gadgets.
- Reorganize by frequency of use.
By taking these simple steps, I’ve turned chaotic cabinets into a calm, functional space my future self will high-five.
Start small, keep like with like, and let clear containers and smart zones do the heavy lifting.
Rotate seasonally, tame Tupperware, and schedule quick touch-ups so clutter never sneaks back.
Think of your kitchen as a living closet—you’ll be surprised how a few thoughtful choices make daily life feel effortless and stylish.