

If you’re dreaming of a small outdoor kitchen, I’ll show you easy, budget-friendly ideas you can tackle today. I start with a smart layout that keeps the sink, prep area, and grill close for smooth flow, then add a DIY prep station with a compact fridge and smart storage hacks. I keep weatherproof materials simple, add a wall herb garden, and plan quick fixes that pay off. Stick with me and you’ll uncover more practical tweaks to try.
Why a Small Outdoor Kitchen Transforms Your Space
A small outdoor kitchen can dramatically change how you use your yard, making cooking, dining, and entertaining feel effortless rather than staged.
I’ve seen how compact layouts cut trips back indoors, simplify cleanup, and boost confidence with practical tools at hand.
You’ll plan smarter, cook more often, and enjoy conversations that flow near your grill, sink, and prep zone. Plus, with affordable outdoor kitchen ideas, you can create a functional space without breaking the bank.
Plan Your Outdoor Kitchen: Quick Layout Rules of Thumb
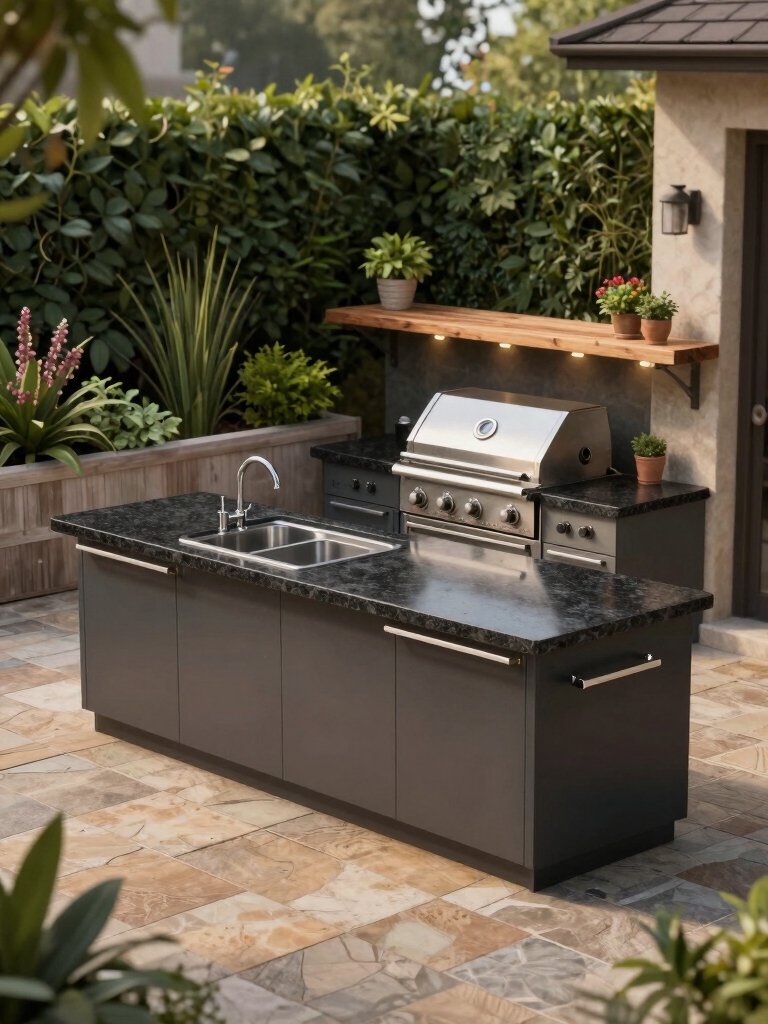
I’ll walk you through the essentials of a solid layout, starting with the Layout Triangle to keep the grill, sink, and prep area efficient.
I’ll also bring Zone Proximity guidelines into focus, so work zones stay close enough to flow smoothly without getting crowded.
Finally, I’ll touch on Flow Space Measures to guarantee comfortable movement and clear traffic paths as you plan each zone. Additionally, consider incorporating stunning outdoor kitchen designs that enhance both functionality and aesthetics for an inviting space.
Layout Triangle Rules
The layout triangle is your quick guide to a smooth outdoor kitchen workflow: keep the sink, grill, and prep/food station within easy reach of each other, with clear paths for movement.
- Imagine the flow, not a trap.
- Prioritize cleanup zones near prep.
- Maintain safe distances for heat and water.
- Keep flexible space for extra helpers.
Additionally, consider incorporating mess-free outdoor kitchen ideas to ensure that your outdoor cooking space remains tidy and functional.
Zone Proximity Guidelines
Zone proximity isn’t about rigid rules; it’s about making the work flow feel natural.
I size zones so I can reach prep, grill, and sink without crossing paths, keeping doors clear and tools nearby.
I allow counter space for staging, use a dedicated trash area, and place utilities where you’ll actually use them.
Practical, precise, ready for action. Additionally, consider incorporating stylish outdoor kitchen ideas that enhance both functionality and aesthetics.
Flow Space Measures
Flow space measures matter for keeping work moving smoothly.
I map clear zones so prep, cook, and cleanup don’t collide, and I leave room for doors, drawers, and stools.
Here are quick layout checks:
- Keep 3–4 ft between counters
- Permit 36–42 in clearance at main path
- Allocate 24–30 in under-counter space
- Reserve 6–8 ft for traffic flow
Incorporating a pizza oven feature can enhance both functionality and the overall enjoyment of your outdoor kitchen experience.
Budget-Smart Prep Station: DIY Fridge, Prep Zone, and Countertop
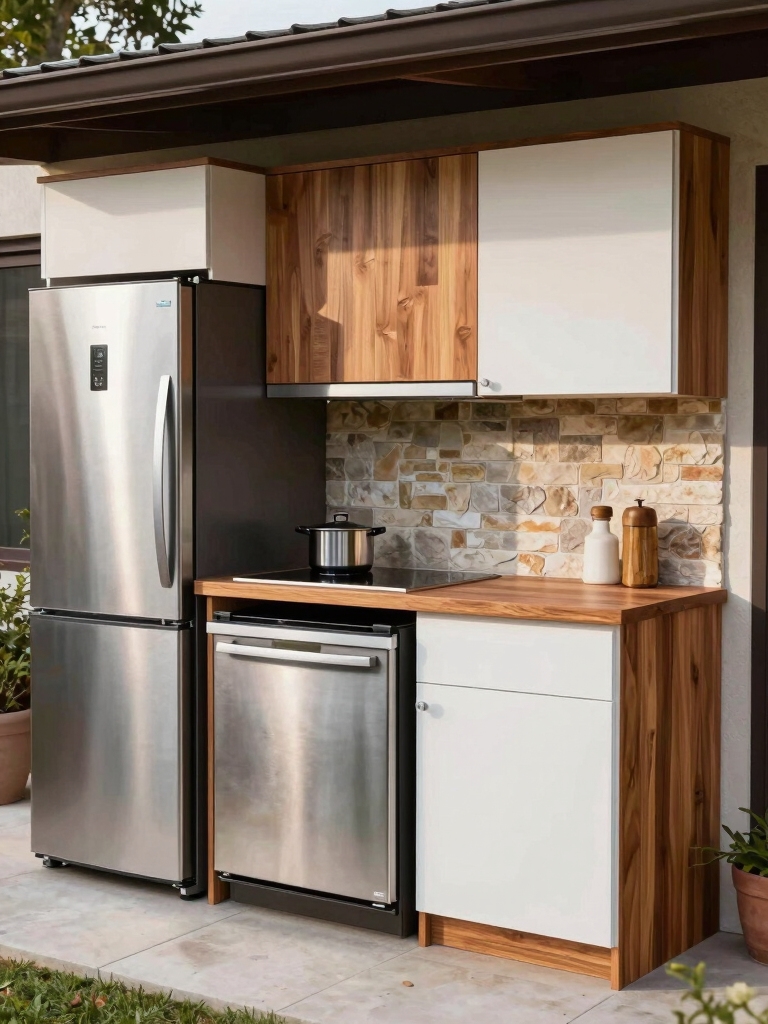
Setting up a budget-smart prep station means you get fresh fridge access, a dedicated prep zone, and a sturdy countertop without breaking the bank, so you can work efficiently and safely outdoors. I’ll show a DIY fridge setup, compact prep layout, and durable surface choices. Choose energy-efficient cooler, pegboard for tools, and splash-safe counter material to resist weather and spills. Additionally, incorporating features like outdoor kitchen setups can elevate your grilling experience and functionality.
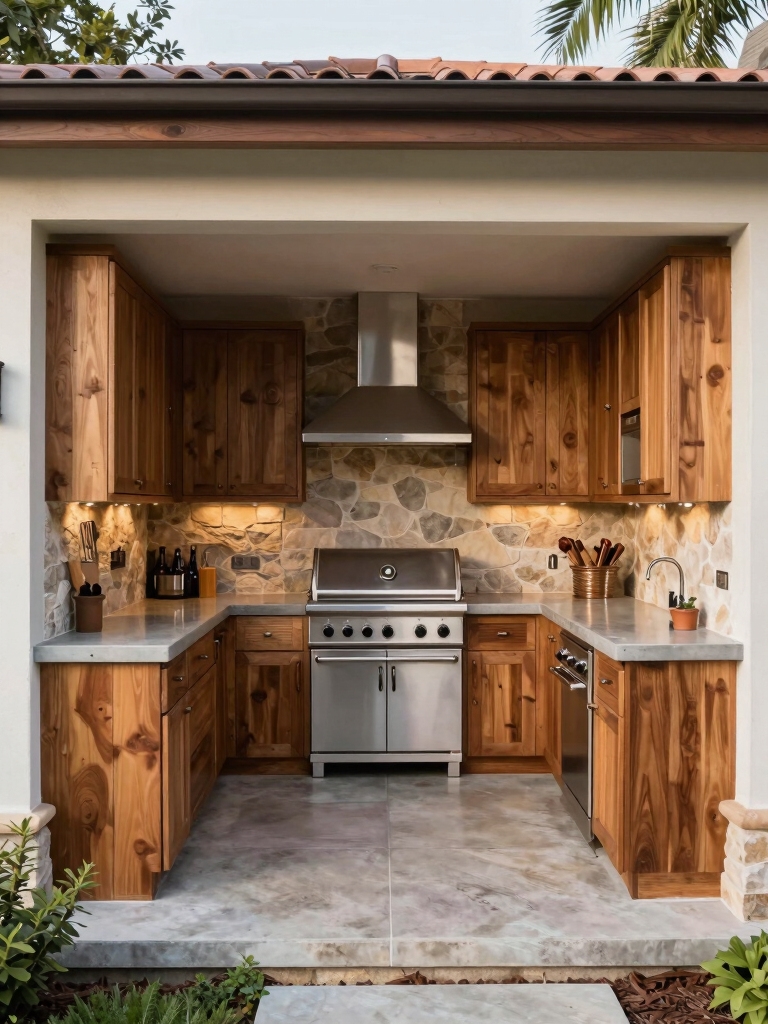
The Compact Grill Nook for Small Spaces
A compact grill nook can fit comfortably in small outdoor spaces without sacrificing performance.
I design around compact layouts, smart ventilation, and easy-clean surfaces so you actually use it. You’ll enjoy efficient grilling with clear sightlines and reachable height. Additionally, incorporating outdoor BBQ kitchen builds ensures that your grilling experience is enhanced, making it perfect for summer gatherings.
- Space-efficient heat zones
- Quick-clean grates
- Weather-ready control panel
- Flexible mounting options
Clever Storage Hacks for Outdoor Kitchens
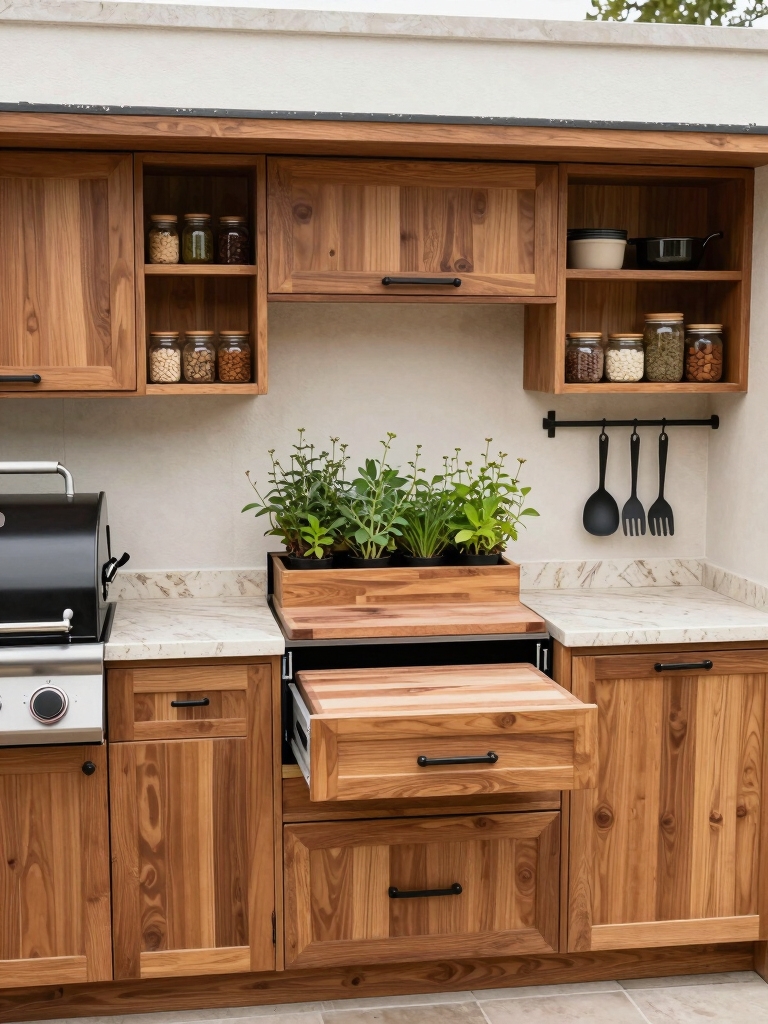
Clever storage hacks for outdoor kitchens start with smart, reachable solutions that stay out of the way when you’re cooking.
I use weatherproof bins, wall-mounted rails, and magnetic spice strips to keep essentials visible yet tucked away.
Use collapsible prep boards, hooks for tools, and under-counter drawers for bulk items.
Label zones clearly, so cleanup and restocking feel quick and intuitive. Additionally, incorporating outdoor kitchen design layout formulas can maximize your space efficiency, ensuring that every item has its place.
Weather-Ready Surfaces That Won’t Break the Bank
I’ll walk you through budget-friendly surface options and how they stand up to the elements.
We’ll look at weather-resistant finishes, plus practical tips to keep costs down without sacrificing durability.
I’ll share simple maintenance steps you can do now to keep those surfaces looking good season after season.
Budget-Friendly Materials
When you’re outfitting an outdoor kitchen on a budget, durable surfaces that stand up to sun, rain, and heat matter most, not just how they look.
I’ll share practical, affordable options that resist weather without fuss.
- Concrete pavers
- Tumbled limestone
- Treated plywood countertops
- Composite decking tiles
Weather-Resistant Finishes
Weather-ready finishes don’t have to break the bank, and the right ones protect your outdoor kitchen from sun, rain, and heat while still looking good.
I favor sealants and paints rated for exterior use, plus UV-resistant coatings on wood and metal. Clean, prep, and apply in dry conditions.
Choose breathable sealers for stone, and recoat when sheen fades or wear shows.
Maintenance Practical Tips
Maintaining weather-ready surfaces doesn’t have to be costly or laborious.
I’ll share simple tips that keep fibers, metals, and stone resilient without breaking the bank, so you can cook confidently outdoors.
- Seal annually with a budget-friendly option for stains and moisture
- Clean after use to prevent buildup, not harsh scrubbing
- Quick checks for chips or rust, fix promptly
- Protect surfaces with mats and covers when idle
Big Flavor, Small Footprint: Mini Bar, Sink, and Water Access
A compact outdoor bar and sink setup can transform any patio into a functional, flavorful entertaining space.
I pair a small cooler with a rugged sink, keeping cups, towels, and citrus within reach.
Use a shallow tray for wet items, install a simple drain, and maintain a gravity-fed water option for easy cleanup.
Think prep zones, not clutter.
Powering Your Outdoor Kitchen: Simple Electrical and Gas Etiquette
I’ll map out the essentials of Electrical Safety Basics, Gas Line Clearances, and Outdoor Circuit Planning so you can plan confidently without guesswork.
I’ll keep the guide practical and precise, sharing clear steps and common pitfalls I’ve seen on DIY projects.
If you’ve got a question about wiring, gas lines, or weatherproofing, I’m here to help you sort it out safely.
Electrical Safety Basics
Electrical safety is non-negotiable when you’re powering an outdoor kitchen, so I’ll walk you through practical steps you can take right away to keep everything safe and reliable.
- Check outlets for weatherproof covers and GFCIs to trip fast.
- Use outdoor-rated cords, avoiding daisy-chaining and voltage drop.
- Inspect plugs and seals after rain; replace damaged components promptly.
- Schedule annual professional inspections for known risks.
Gas Line Clearances
Gas line clearances are nonnegotiable when you’re wiring an outdoor kitchen, so I’ll lay out the practical spacing you need to prevent leaks and fire hazards.
I keep gas lines away from corners, heat sources, and combustible siding, plus provide proper ventilation.
Use approved shutoff valves, rigid piping where possible, and maintain clean joints.
Test for leaks after installation, then label the system.
Outdoor Circuit Planning
Outdoor circuit planning ties directly into safe, reliable power for your grill, fridge, lighting, and outlets while keeping gas and electrical work clearly neighbor-friendly.
I walk you through zoning, protected circuits, and local code checks so setup feels controlled, not rushed.
1) Assess outlet placement, weather-rated boxes, and GFCI protection.
2) Run dedicated circuits for appliances, avoiding shared neutrals.
3) Plan gas/electric clearances with permits and inspections.
4) Label, document, and test everything before use.
Lighting to Extend Outdoor Cooking Hours
If you want to keep cooking after the sun goes down, smart lighting is a must.
I’d start with task lighting over prep zones and a dimmable main fixture for ambiance.
Use weatherproof strips along counters, plus a portable glow near the grill.
Favor warm tones, keep cords hidden, and test timing with a simple switch layout for safe, practical use.
Seating and Social Flow for Close, Cozy Gatherings
I’m thinking through cozy seating layouts that invite conversation and keep sightlines open, so you always feel part of the center of the action.
I’ll map flow-driven social zones that guide traffic without interrupting chats, and I’ll emphasize conversation-centric arrangements that place people within easy reach of the grill, prep area, and drinks.
Let’s pin down practical setups that feel intimate yet functional, so your outdoor kitchen naturally hosts close, memorable gatherings.
Cozy Seating Layouts
When designing cozy seating in an outdoor kitchen, I focus on creating a tight, inviting social flow that keeps conversations moving and everyone feeling included.
1) Circle layouts that keep eye contact easy and quick laughter shared
2) Benches with hidden storage to reduce clutter and invite lounging
3) Convertible tables that switch from prep to pulse of chat
4) Weather-friendly cushions that invite longer, relaxed chats
Flow-Driven Social Zones
Flow-driven social zones hinge on keeping people close enough for easy chatter without feeling crowded.
I arrange seating to create a natural loop: a cook-friendly counter, a short dining area, and a lounge nook.
I keep sightlines open, props minimal, and changes smooth. Foot traffic flows around, not through, the center, preserving intimate conversations and spontaneous groups.
Conversation-Centric Arrangements
Conversation-Centric Arrangements prioritize close, intimate chats without making guests feel crowded.
I design seating that invites dialogue, not distance, and arrange flow to keep conversations moving naturally.
- Use a fedge of cushions to create cozy nooks that are easy to reconfigure.
- Position chairs at arm’s reach, avoiding sharp angles and barriers.
- Build a central focal point that sparks storytelling.
- Choose warm textures and scents that invite lingering by the fire.
Weatherproofing and Maintenance Myths Debunked
Weatherproofing and maintenance myths can derail a DIY outdoor kitchen project, so I’ll cut through the hype and share practical truths you can trust.
I’ll separate real upkeep from fear: choose durable materials, seal correctly, and inspect joints seasonally.
Treat moisture like a guest—manage it, don’t banish it.
Regular cleaning, prompt repairs, and simple drainage routines keep longevity high and surprises low.
Herb Garden on a Wall: Vertical Planters for Fresh Flavor
Vertical planters let you harvest fresh herbs right at counter height, so you’ll reach for basil, thyme, or mint without stepping away from the grill.
I share a simple setup: compact frames, a drip tray, and sun-smart placement.
- Choose a weatherproof rack
- Install a small irrigation line
- Label each herb
- Refill soil seasonally
Quick-Fix Upgrades That Pay Off on a Budget
If your herb-wall setup is humming but you want more payoff without breaking the bank, these quick-fix upgrades are worth it.
I’ll focus on small, actionable changes: swap dull hardware for stainless handles, seal gaps to cut drafts, add a compact prep shelf, install a weatherproof outlet strip, and tidy hoses with quick-releases.
Practical, budget-smart improvements that feel transformative, not intimidating.
A Two-Week DIY Timeline You Can Follow
I’ve mapped out a practical, two-week plan you can follow step by step, so you don’t have to guess what to tackle first.
I’ll guide you with a focused cadence, keeping tasks logical, materials within reach, and progress visible.
- Gather essentials, measure space, and prioritize core features.
- Build framework, install finishing touches, and test flow.
- Tidy up, label components, and document lessons.
- Enjoy your streamlined outdoor kitchen.
Conclusion
I’ve shown you 14 small ideas, but the real kitchen is the story you build outside your door. Think of your space as a quiet sunlit seed: with a simple plan, a stubborn little fridge, and a wall of herbs, it grows into daily meals and memories. Each compact choice is a rung on a ladder you climb with your hands, not a checklist you finish. Let your imagination root, flourish, and season your days.


