I’ve pulled jaw‑dropping before-and-after kitchen remodels that prove a cramped galley can become an airy, chef‑ready space without losing charm. I show how removing a dead‑end wall, re-centering appliances, and adding compact islands or appliance nooks clears counters and speeds prep.
You’ll see pale finishes, open shelving, layered lighting, clever pantry pull-outs, and budget cabinet refreshes that feel high‑end. Flip through to spot practical tweaks and design choices you can steal for your own kitchen.
From Dead-End Galley to Airy Chef’s Kitchen

When we walked into that cramped galley, I knew we could open it up without losing its cozy feel; by removing the dead-end wall, rerouting the utilities, and adding a wide pass-through, we transformed it into an airy chef’s kitchen that welcomes people to gather, cook, and linger.
I chose durable counters, streamlined storage, brighter lighting, and a smart layout so cooking feels effortless and social.
A key move was creating an open-plan feel by combining the galley with the adjacent living space to improve flow and sightlines.
Dark, Closed-Off Space Transformed With Light and Open Shelving

I walked into a tight, dim room and immediately saw how much light we could bring in by opening sightlines and swapping bulky cabinets for open shelving; by stripping the heavy upper units and installing slim, floating shelves, we let sunlight bounce around the space and made everyday items feel like part of the décor.
I chose pale finishes, a narrow mirror, and minimal accessories to keep it airy.
I also replaced the upper cabinets with open shelves to create an airy, open feel and improve light distribution.
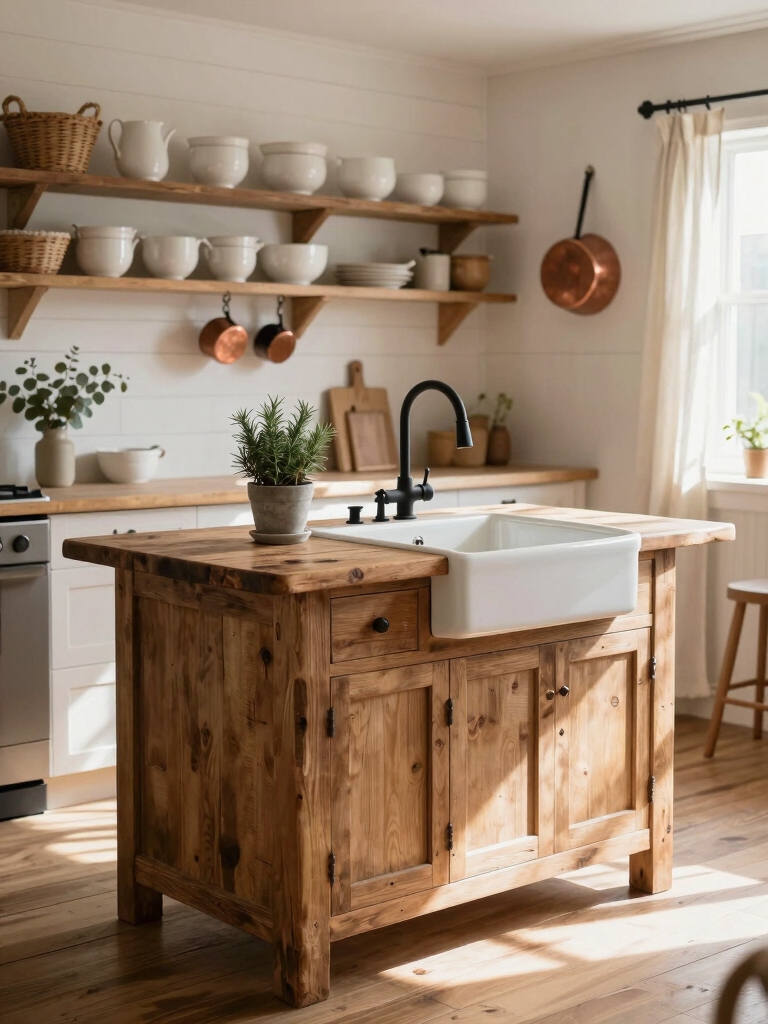
Appliance-Heavy Layout Simplified for Flow and Function

I noticed the old layout had appliances scattered everywhere, so I re-centered them into clear zones for cooking, prep, and cleanup.
That let me streamline traffic paths so people move through the kitchen without bumping into each other.
I also consolidated storage near each zone to keep everything functional and within reach.
I introduced a compact island design to create a focal point and improve workflow while maintaining small island functionality and style.
Clear Appliance Zones
Let’s break down the mess of appliances into clear zones so your kitchen actually works the way you do: I grouped cooking, prep, refrigeration, and cleanup into distinct areas that cut cross-traffic and make routines smoother.
I placed ovens and range near cookware, fridge by pantry, sink and dishwasher close for fast cleanup, and kept small appliances on one dedicated counter for easy access.
Top architects also recommend arranging islands to support these zones and improve workflow by maintaining the work triangle between sink, range, and refrigerator.
Streamlined Traffic Paths
Because kitchens are where people move constantly, I redesigned traffic paths so appliances don’t get in the way of how you actually work.
I shifted bulky units to perimeter zones, created clear sightlines, and widened walkways for two cooks.
That cut cross-traffic, kept prep and serving flow uninterrupted, and made the room feel calmer and more efficient without sacrificing appliance reach or function.
Timeless blue island tones also anchor the sightlines and pair with literally everything to keep the palette cohesive.
Consolidated Storage Solutions
With the traffic paths cleared, I turned my attention to consolidating storage so the appliance-heavy layout would stop fighting the flow.
I grouped small appliances into a dedicated appliance garage, added deep drawers for pans, and created a tall pull-out for baking sheets and trays.
Now countertops stay clear, prep zones work smoothly, and everything has a sensible, reachable home that respects movement.
Clever Kitchen Island Storage Tricks you’ll love help maximize usable space and accessibility.
Tiny Kitchen Gained Counterspace With Clever Nooks

I love how this tiny kitchen gained real working room by stacking vertical storage and smart shelves that clear the counters.
We added fold‑away prep surfaces that tuck out of sight when not in use and built‑in appliance nooks that keep gadgets handy but off the countertop.
I’ll walk you through how each of these simple moves made the space far more usable without feeling crowded.
Small kitchens can benefit enormously from small kitchen island designs that maximize space and provide extra storage and work surface without overwhelming the room.
Vertical Storage Hacks
When I walked into this tiny kitchen, the wasted vertical inches grabbed my attention, so I started imagining clever nooks that would free up counterspace without gutting the room.
I added open shelves, slim wall racks, and a magnetic knife strip. Vertical pegboards organize gadgets, while tucked spice rails keep bottles off counters. It’s amazing how going up cleared my workspace.
Fold‑Away Prep Surfaces
After staring at the tiny stretch of counter for a week, I started thinking vertically and laterally—how could surfaces appear only when I needed them and otherwise vanish?
I installed a hinged drop-leaf that folds down into a slim shelf, a slide-out butcher block from a cabinet, and a magnetic folding board that clips to the backsplash. Each one expands prep space instantly and tucks away cleanly.
Built‑In Appliance Nooks
I carved out compact nooks for the toaster, coffee maker, and blender so they live where I need them without hogging counter space.
I built recessed shelves and a slide‑out cubby under upper cabinets, keeping cords hidden and surfaces clear.
Each appliance has easy access and defined storage, so prepping feels effortless and the kitchen reads calm, tidy, and intentionally designed.
Budget-Friendly Cabinet Refresh That Feels High-End

I’ll show you how a few smart, affordable changes can make your cabinets look custom without blowing your budget.
I painted doors in a timeless neutral, swapped dated hardware for matte brass, added simple crown molding, and lined interiors for a luxe feel.
Small tweaks—better hinges, undercabinet lighting, and open shelving accents—created a cohesive, high-end vibe without major construction.
Awkward Island Replaced With a Multipurpose Workstation
Once the cabinets felt polished and cohesive, I turned my attention to the island that had been a bulky, awkward obstacle in the kitchen’s flow.
I removed it and installed a streamlined multipurpose workstation with prep space, storage drawers, a pull-out cutting board, and charging stations.
It’s now a functional hub for cooking, homework, and casual dining that keeps traffic moving.
Vintage Charm Restored While Adding Modern Performance
I loved keeping the original moldings and built-ins to preserve the home’s architectural character while planning the updates.
I made sure modern appliances fit into those spaces so they look like they belong rather than standing out.
I also had vintage finishes carefully restored so the kitchen feels authentic but works flawlessly.
Preserve Original Architectural Details
When I tackle a kitchen remodel, I make preserving original architectural details a priority because those vintage elements give a room character you can’t replicate with new materials.
I highlight moldings, built-ins, and original flooring, repairing rather than replacing when possible.
Keeping these anchors respects history, anchors the design, and lets me layer fresh finishes and functionality without erasing the home’s soul.
Integrate Modern Appliances Seamlessly
Although I love vintage character, I don’t sacrifice performance—so I blend modern appliances into the kitchen in ways that feel intentional and unobtrusive.
I hide bulky units behind custom panels, choose matte finishes that echo period tones, and place tech where it supports form and flow.
The result keeps the room’s soul while giving you reliable, efficient cooking and everyday convenience.
Restore Vintage Finishes Carefully
Often I start by stripping back layers to see what’s really there, then decide which original finishes are worth saving and which need gentle recreation.
I keep hardware, moldings, and patina when sound, stabilizing surfaces with conservation-grade sealers.
Where needed, I subtly replicate profiles and colors, then add durable topcoats so vintage charm endures alongside modern performance and easy maintenance.
One-Wall Kitchen Reimagined With Vertical Storage
I’ve always loved the clean efficiency of a one-wall kitchen, and reimagining it with vertical storage lets me keep that streamlined look while tripling practical space.
I mounted open shelves, tall cabinets, and magnetic rails to free counters and display essentials.
Hooks, pull-down racks, and tiered organizers keep things reachable without clutter, so cooking feels calm, organized, and surprisingly spacious.
Closed Breakfast Nook Turned Into a Seamless Eat-In Area
After reworking the one-wall kitchen for better vertical storage, I turned my attention to the closed breakfast nook and opened it up into a seamless eat-in area.
I kept it simple and cozy, focusing on flow and light:
- Removed partition for openness
- Added a banquette for seating
- Chose a compact round table
- Layered pendant lighting for warmth
Cramped Corner Turned Into a Smart Pantry Solution
When I spotted the cramped corner that had been collecting mismatched cans and forgotten appliances, I saw an opportunity to create a smart pantry that actually makes cooking easier.
I installed pull-out shelves, labeled clear bins, and a slim charging station for small gadgets. Now everything’s visible, accessible, and inventory-ready—no more mystery jars, just a calm, efficient corner that saves time.
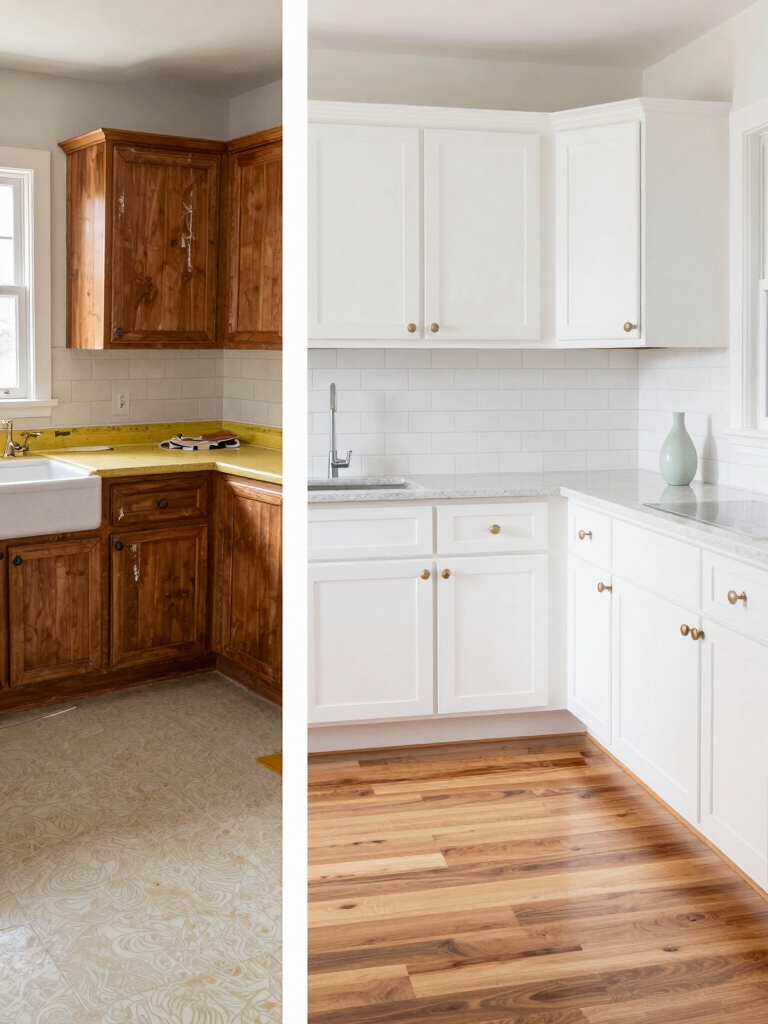
Worn Flooring Upgraded to a Durable, Statement Surface
I swapped out the tired, scratched floor for a durable, low‑maintenance surface that can handle heavy kitchen traffic without constant upkeep.
I chose bold patterned tiles to give the room instant personality while keeping the palette grounded so it doesn’t overwhelm.
I’ll also show how we handled seamless connections to adjoining rooms so the new floor reads as one confident design.
Durable, Low-Maintenance Flooring
I often start a remodel by tackling the floors, and in this kitchen we replaced worn, tired planks with a durable, low-maintenance surface that now anchors the whole room.
I chose materials and finishes for longevity and easy cleanup.
- Scratch-resistant finish
- Waterproof core
- Warm, neutral tone
- Simple, tight grout lines
You’ll love how practical it feels.
Bold Patterned Statement Tiles
We kicked this refresh up a notch by swapping tired planks for bold patterned tiles that make the floor a focal point without sacrificing durability.
I picked a geometric encaustic look to bring personality and hide wear, while choosing porcelain for easy care.
The pattern ties the cabinets and countertops together, and guests always comment on how the floor feels intentional and surprisingly resilient.
Seamless Transition Details
Because the old floor met the kitchen threshold like an afterthought, I focused on creating a seamless passage that feels intentional and built to last.
I replaced worn planks with a durable, eye-catching surface and paid attention to edges and flow.
My tips:
- Match tones
- Choose durable material
- Use flush connections
- Seal for longevity
Poor Lighting Rewired Into Layered, Task-Friendly Illumination
Usually clients don’t realize how much poor lighting hides until we flip new switches; I saw that change firsthand in this remodel.
I rewired the space for layered lighting—ambient dimmers, bright task strips over counters, and accent pendants above the island.
The result? Safer prep zones, reduced glare, and a warmer overall mood that makes the kitchen feel intentional and much more usable.
Mismatched Finishes Harmonized With a Simple Palette
When I walked into the kitchen, the mix of chrome, brass, and aged nickel felt chaotic, so I stripped the palette down and chose a few complementary tones to carry through the space.
I balanced metal finishes by limiting contrasts and repeating color cues:
- Matte black for hardware
- Warm brass accents
- Soft white cabinetry
- Natural wood warmth
The result feels calm and intentional.
Lackluster Backsplash Replaced With a Washable Design Focal Point
After settling the metals and streamlining the palette, I turned my attention to the backsplash, which had been a bland, hard-to-clean afterthought.
I swapped it for a washable, textured tile that reads like art but wipes down in seconds. The new pattern anchors the range wall, reflects light subtly, and adds personality without clutter—practical beauty that makes daily cleanup effortless and fun.
Open Plan Cohesion Achieved by Unifying Materials and Lines
Because open plans can feel disjointed, I tied the kitchen, dining, and living areas together by repeating the same materials and clean lines—think the same wood tone on the island and console, matching metal finishes on light fixtures and cabinet pulls, and continuous baseboard profiles.
- Anchor color palette
- Repeat wood grain
- Match metal accents
- Align furniture lines
The result feels calm, connected, and intentional.
I’ve walked you through kitchens that went from claustrophobic to welcoming, from mismatched chaos to calm cohesion, and I hope you’re buzzing with ideas.
These before-and-afters show small changes—lighting, layout, paint—that work like a magician’s sleight of hand, making space feel bigger and life easier.
If one of these transformations sparks you, start small, stay practical, and enjoy the process; your dream kitchen is closer than you think.