I’ll help you design an island that fits your kitchen’s footprint and flow. I start by mapping clearances, work zones, and utilities so seating and prep don’t clash. For narrow or studio kitchens I suggest slim, mobile or fold-down islands with vertical storage; for L-shaped or open plans I recommend multi‑zone islands with varied heights, integrated appliances, and recessed outlets.
I’ll also cover lighting, surfaces, and phased budgeting so you can plan confidently and learn practical layouts and solutions.
Assessing Your Kitchen Footprint Before Choosing an Island

Before you pick a style or size for your island, I’ll walk you through measuring and mapping your kitchen so the island actually fits and functions — not just looks good.
I’ll help you note traffic paths, appliance clearances, and cabinet depths. Measure walkways (ideally 36–48 inches), mark work zones, and verify utilities.
That groundwork prevents costly reshuffles and keeps daily flow effortless. Kitchen layouts vary by square footage, so choose an island design that suits your specific space.
Space-Saving Islands for Narrow and Galley Kitchens

I often recommend slim, multifunctional islands when a kitchen is narrow or laid out in a galley, because they give you extra prep surface and storage without blocking the flow.
I’ll help you choose a model that keeps movement easy and maximizes utility.
- Narrow butcher block top
- Pull-out cutting board
- Under-counter drawers
- Fold-down breakfast ledge
- Open shelving for frequently used items
A compact island can include space-saving features like built-in storage and integrated seating to fit tight footprints.
Compact Islands for Studio and Small Apartment Layouts

For a studio or small apartment, a compact island can be the difference between a cramped kitchenette and a genuinely useful kitchen — I’ll show you how to get the most function from a tiny footprint.
I recommend narrow, mobile islands with built-in storage and butcher-block tops. They serve as prep zones, dining spots, and extra storage without blocking flow.
Choose casters and slim profiles. Many clever ideas for making the most of a tiny kitchen island involve using vertical storage and multipurpose surfaces to maximize usability in a small space, like adding hanging racks or fold-down leaves for extra work area with space-saving solutions.
Open-Plan Island Ideas for Seamless Living Areas

When I plan an open kitchen, I use the island and nearby furniture to define zones so cooking, dining, and relaxing feel intentional.
I also keep sightlines clear and leave generous walkways so traffic flows naturally between areas.
That way the island anchors the space without blocking conversation or movement.
Open kitchen and living room layouts often benefit from an island that facilitates seamless transitions between zones while maintaining an open sightline.
Zone Definition With Furniture
A well-placed island can act as a natural room divider, so I use furniture and finishes to subtly define zones without closing off sightlines or conversation.
I often arrange pieces to signal purpose while keeping flow intact:
- Counter-height stools for casual dining
- Low-backed sofa to anchor the living area
- Console table as a shift
- Area rugs to map activity
- Open shelving for visual separation
Islands with built-in seating and prep space make entertaining easier by keeping hosts engaged with guests while cooking, especially when planned as part of an open kitchen with island.
Sightline and Traffic Flow
Because sightlines steer how a space feels and moves, I place islands to keep views open and traffic predictable so people don’t bump into cooking zones or each other.
I orient seating and walkways to allow clear circulation, maintain at least 42–48 inches between island and counters, and use low-profile backs or glass partitions when needed.
These choices make open-plan living feel connected and effortless.
Top architects also follow island kitchen design rules that emphasize proportion, workflow, and multifunctional surfaces to optimize both form and function, especially when incorporating island zoning into different layouts.
L-Shaped and Peninsula Alternatives to Traditional Islands

I often recommend L-shaped islands when clients want extra counter space and a defined work triangle without crowding the room.
A peninsula can be a smart space-saver that adds seating and storage while keeping walkways open.
Both layouts help optimize traffic flow so your kitchen feels organized and easy to move through.
Kitchen Layouts with island templates can be copied easily to fit many floor plans.
L-Shaped Island Benefits
If you’re looking to squeeze more function and flow into your kitchen, I often recommend an L-shaped island or peninsula as a smart alternative to a traditional freestanding island. I love how it defines zones and boosts usability.
It offers:
- extra prep surface
- casual seating
- storage optimization
- clear traffic paths
- easy appliance integration
It’s practical and welcoming.
Peninsula Space Savers
Building on the L-shaped island idea, a peninsula gives you many of the same benefits while saving floor space and simplifying traffic flow.
I recommend a narrow counter extension with storage beneath and seating that tucks away. It creates work zones, doubles as a prep surface, and fits compact kitchens.
Choose durable materials and thoughtful lighting to keep the area functional and inviting.
Traffic Flow Optimization
While rethinking a traditional island, I’ve found L-shaped islands and peninsulas do more than save space—they improve how people move through the kitchen.
I choose layouts that minimize crossings and keep work zones clear. Consider practical tactics:
- Clear 36–48 inch walkways
- Stagger prep and traffic paths
- Anchor seating away from workflows
- Use open sightlines
- Place sink, stove, fridge in efficient triangle
Multi-Use Islands With Dining and Work Zones
Designing a multi-use island means thinking beyond seating and storage—I like to plan distinct dining and work zones so the island serves meals, homework, and prep without feeling cluttered.
I create clear edges with varied countertop heights and durable surfaces, add convenient outlets and task lighting, and keep everyday items corralled nearby.
That way family life flows, chores stay efficient, and the island feels purposeful.
Islands With Integrated Storage and Appliance Solutions
An island-integrated approach turns the center of your kitchen into a compact powerhouse:
I plan cabinet pull-outs, appliance garages, and built-in refrigeration so everything you need is right where you work. I focus on smart access and tidy surfaces:
- Deep drawers for pots and pans
- Vertical tray organizers
- Hidden microwave or mixer garage
- Under-counter fridge drawers
- Waste and recycling pull-outs
Designing Islands for Efficient Work Triangles
When I plan an island, I follow simple triangle distance guidelines so the sink, stove, and fridge sit within easy reach without crowding the counters.
I prioritize appliance placement based on how you cook — keeping prep, cooking, and cleanup zones clear — and I’ll move items to the island only when they improve workflow.
I also watch traffic flow so passersby don’t interrupt the work triangle and everyone can move safely through the space.
Triangle Distance Guidelines
Because a well-placed island can make or break kitchen flow, I’ll focus on the simple distance rules that help your cooktop, sink, and fridge work together without getting in each other’s way.
I recommend these quick guidelines for islands to keep movement smooth and safe:
- Keep triangle legs between 4–9 feet.
- Total triangle perimeter 13–26 feet.
- Avoid traffic through triangle.
- Allow 36–48 inches around island.
- Maintain clear sightlines.
Appliance Placement Priorities
Now that we’ve covered the spacing that keeps movement smooth, I’ll prioritize which appliances belong on the island so your work triangle actually works for you.
I usually place the sink or prep refrigerator on the island for easy access, keep the cooktop nearby but not isolated, and reserve dishwashers or trash pull-outs for one side to streamline cleanup without blocking prep zones.
Traffic Flow Considerations
I often start by picturing how you move through the kitchen—walking from fridge to sink to cooktop—so I can size and place the island to support those paths instead of blocking them. I consider clearances, sightlines, and chores, then adjust layout.
- Keep 42–48 inches between island and counters
- Preserve direct fridge-to-sink route
- Allow cooktop landing space
- Plan traffic around prep zone
- Use islands for flow, not obstacles
Seating Strategies: Overhangs, Banquettes, and Built-In Benches
When I plan seating for an island, I think about how people will move, eat, and linger there—choosing between overhangs, banquettes, or built-in benches based on function and flow.
I favor overhangs for flexible stools, banquettes for cozy dining nooks that save space, and built-in benches for durable, storage-friendly seating.
I balance comfort, clearance, and circulation for everyday use.
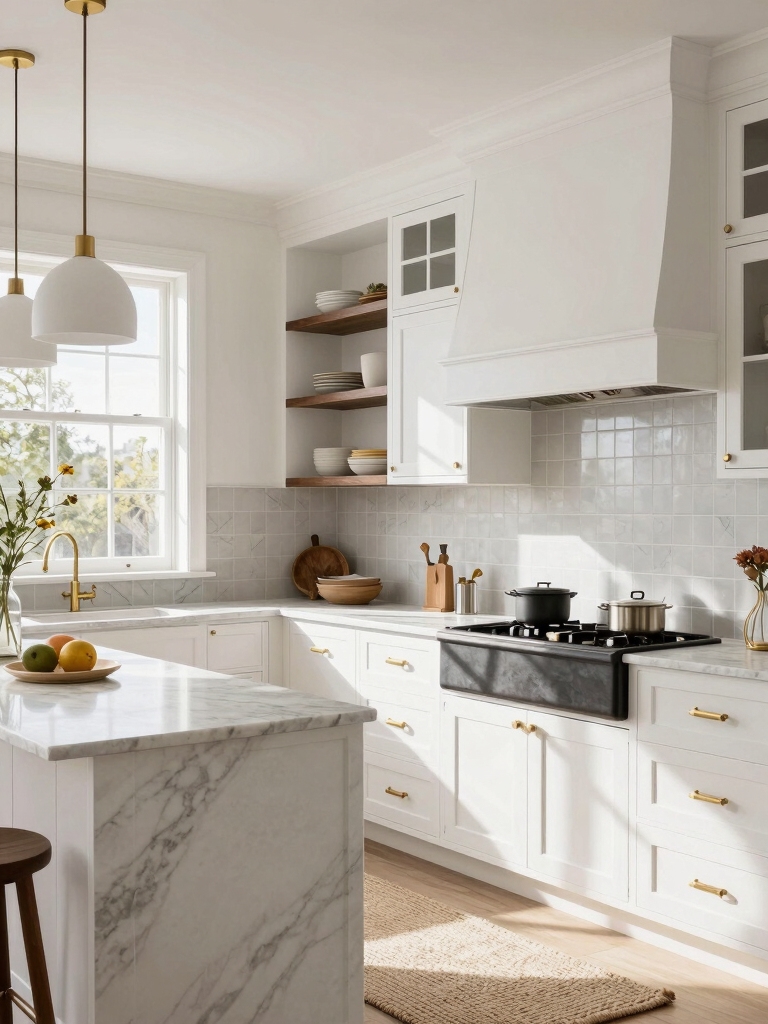
Lighting Plans to Highlight and Serve Your Island
Often I start lighting plans for an island by thinking about how the light will both serve tasks and create atmosphere, because good lighting needs to be functional for prep and comfortable for lingering.
I choose layers: pendants for focus, recessed for even task light, dimmers for mood.
Consider:
- Pendant spacing
- Light temperature
- Dimmable controls
- Under-cabinet fill
- Accent grazing
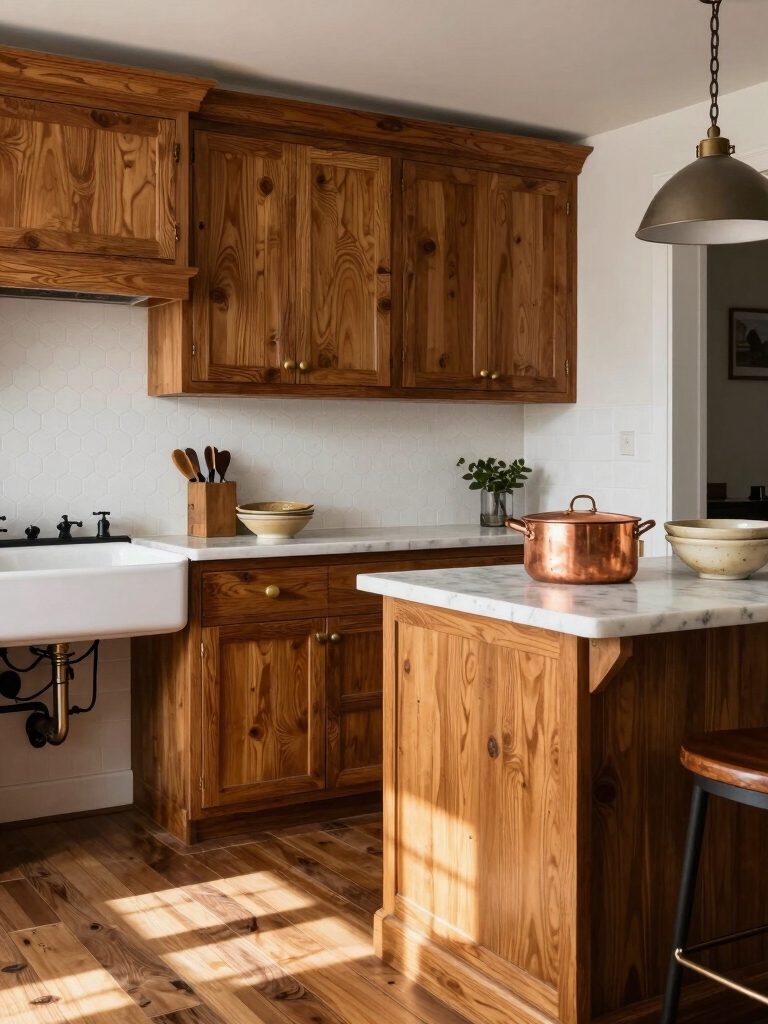
Durable Surface Materials and Finishes for High-Use Islands
A solid countertop can make or break an island’s day-to-day usefulness, so I look for surfaces that stand up to spills, heat, chopping, and heavy traffic without fuss.
I prefer quartz for low maintenance, butcher block for warmth with sealing, and honed granite for toughness.
Edge profiles, matte finishes, and sealed joints matter — they hide wear and simplify cleanup.
Smart Appliances and Power Solutions for Island Cooking
After choosing a durable countertop, I start thinking about how to power and equip the island so it actually works for everyday cooking.
I focus on safe, accessible power and compact smart gear that saves time and counter space.
- Recessed outlets with USB ports
- Induction cooktop with downdraft
- Under-counter microwave drawer
- Built-in charging station
- Smart lighting with task zones
Flexible and Mobile Islands: Carts, Casters, and Fold-Down Tops
I love how a mobile prep cart can add workspace exactly where you need it and tuck away when you don’t.
Wheels and sturdy casters make repositioning effortless, and I often recommend carts with lockable casters for safety.
If space is tight, a fold-down countertop gives you instant extra surface without committing to a permanent island.
Mobile Prep Carts
Think of a mobile prep cart as a pocket-sized island that I can roll to wherever I need it and tuck away when I’m done.
I use one for extra prep, storage, and serving. Consider features I value:
- Locking casters
- Durable countertop
- Deep drawers or baskets
- Towel bar and hooks
- Lightweight but sturdy build
Fold-Down Countertops
Fold-down countertops let me stretch my workspace when I need it and fold it away when I don’t, giving small kitchens a big boost in flexibility.
I love how a simple hinge or drop leaf creates extra prep space, a breakfast bar, or serving area.
They save room, feel sturdy when locked, and fold discreetly, making everyday cooking more efficient and pleasant.
Styling and Color Choices to Make Your Island a Focal Point
When I started planning my kitchen island, I focused on how color and styling could pull everything together and make the island the room’s natural center.
I chose contrasts, textures, and functional accents to guide attention. Consider these simple ideas:
- Bold paint or stained wood base
- Contrasting countertop material
- Statement lighting
- Open shelving accents
- Coordinated hardware finishes
Budgeting and Phasing Your Island Remodel
I loved picking the island’s colors and finishes, but budgeting and phasing are what keep the project on track and your wallet happy.
I break costs into materials, labor, and contingencies, setting priorities: structure and plumbing first, then surfaces and seating.
I phase work to minimize disruption, schedule trades efficiently, and track expenses weekly so surprises stay small and decisions stay clear.
When I helped my sister squeeze an island into her narrow galley, it felt like fitting a bookshelf into a tiny reading nook — suddenly the whole room had a purpose.
Studies show well-planned islands boost home value and function, so think of yours as that bookshelf: practical, stylish, and perfectly scaled.
Start with flow and utilities, choose flexible features, and phase upgrades so your island grows with your life and budget.