I’ve mapped out 14 weekend-ready cabinet fixes that’ll reclaim space fast. Start by pinpointing your clutter pain points and setting clear weekend goals, then measure, mock, and map layouts for easy access. Create a simple bins-dins system, use affordable dividers in drawers, and tackle corner cabinets with smart shelving. Establish a quick maintenance routine and use color cues for instant tool finds. If you keep going, you’ll uncover even more practical tweaks you can try.
Define Your Kitchen Clutter Pain Points and Weekend Goals

What exactly is clutter costing you in the kitchen, and what do you want to achieve this weekend?
I’m focusing on pain points and clear goals. I’ll pinpoint items you rarely use, duplication, and hidden junk.
Then I’ll set practical targets: reclaim a drawer, reduce bends, and create a daily reset routine.
You’ll gain space, efficiency, and confidence to finish this weekend. Additionally, consider implementing creative ways to organize your kitchen to maximize every inch of available space.
Measure, Mock, and Map Your Cabinet Layouts for Efficiency

I start by measuring the cabinet layout to get a solid baseline.
Then I mock up spacing to test reach, clearance, and flow before any rearranging.
Finally, I map efficiency plans that show what goes where for faster, calmer access. Additionally, consider implementing smart cabinet organization techniques to maximize your storage options and keep your kitchen tidy.
Measure Cabinet Layouts
To measure cabinet layouts effectively, start by sketching a quick map of your space and noting each cabinet’s width, height, and depth. I then verify aisle widths, door clearances, and appliance tallness to prevent clashes. I record interior shelf options and fixed features, like sinks or outlets. This precise data guides efficient planning, ensuring everything fits and flows smoothly. Additionally, consider kitchen cabinet organizing ideas that can enhance functionality and maximize space in your kitchen.
Mock Up Spacing
With spacing in mind, I sketch a quick mock-up of your cabinet layout to test flow before a single hinge is moved.
I focus on clear placement, accessible reach, and logical grouping. This gives real feedback fast.
1) Measure gaps and thresholds
2) Mock each zone with tape and paper
3) Prioritize daily items
4) Adjust based on reach comfort
Map Efficiency Plans
Map efficiency starts with a clear plan: measure what you have, mock the flow, and map it all for better efficiency.
I’ll measure cabinet dimensions, count items by category, and record reach zones.
Then I’ll mock the path with a quick sketch, noting obstacles.
Finally, I’ll map ideal layouts, labeling zones for ease, accessibility, and safety, guiding a calmer, smarter setup. Incorporating smart cabinet organization techniques can significantly enhance your kitchen’s functionality.
Create Simple Bins and Dins System for Everyday Clutter

A simple bins and dins system makes everyday clutter manageable in minutes.
I show you quick, practical steps you can trust.
- Label each bin clearly for quick returns
- Group similar items to reduce searching
- Use shallow bins to see contents at a glance
- Empty and reorder weekly to stay on track
Incorporating smart storage solutions can further enhance your kitchen’s organization.
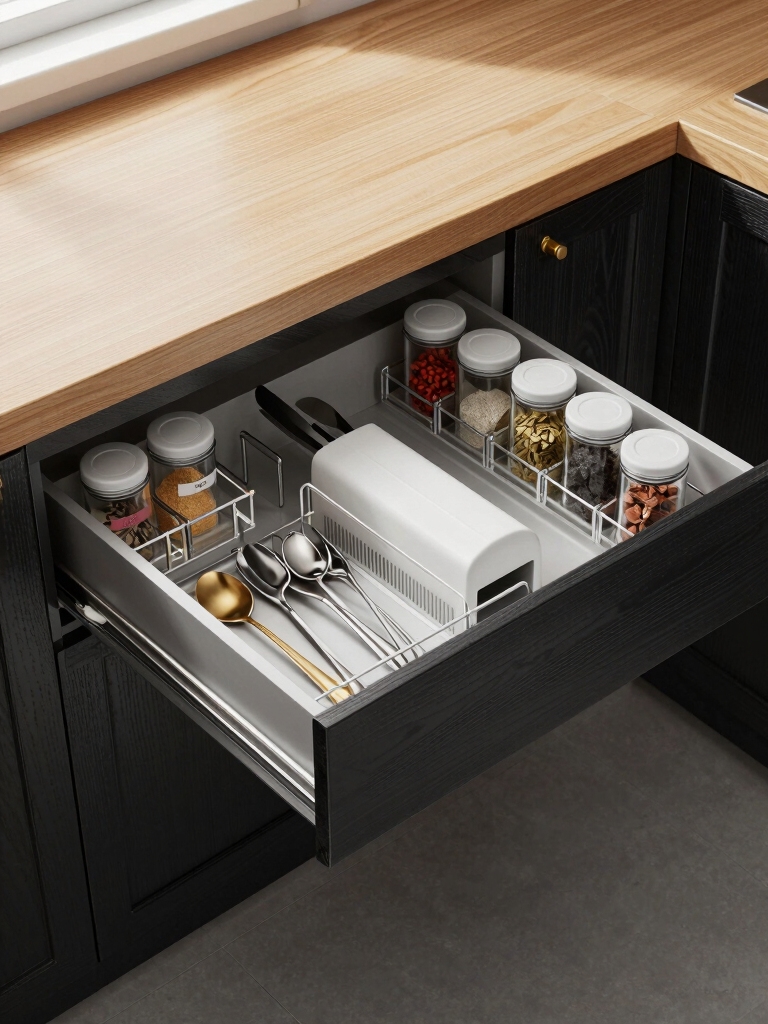
Maximize Drawer Space With Affordable Dividers and Inserts

I’m sharing affordable divider ideas that keep drawers tidy without breaking the bank. We’ll focus on creating flexible layouts for drawers, not cabinets, so everything has a clear home. Implementing kitchen drawer organization techniques can significantly enhance efficiency in your cooking space.
Affordable Divider Ideas
When you’re organizing a drawer, affordable dividers can do a lot with little effort.
I’ll share practical, budget-friendly ideas to maximize space without clutter.
- Repurpose labeled jars for small items.
- Use binder clips as makeshift separators.
- Trim cardboard boxes to create custom compartments.
- Invest in adjustable acrylic inserts for flexibility.
Additionally, using smart utensil organization tips can help you maintain a tidy and efficient kitchen space.
Drawers, Not Cabinets
Maximize drawer space with affordable dividers and inserts, because the right setup makes tiny areas surprisingly functional.
I know drawers beat cabinets for quick access, so I plan layouts that separate utensils, lids, and snacks.
Use adjustable, clear dividers to see everything at a glance, group similar items, and remove what’s unused.
I’ll label lightly and keep cadence steady for easy restocks. Additionally, incorporating kitchen cabinet organization ideas can enhance your overall efficiency and free up even more shelf space.
Tackle Corner Cabinets With Smart Shelving Solutions

Corner cabinets can feel like black holes, but smart shelving makes every inch count.
I share practical, concise steps to tame corners without chaos.
- Install adjustable shelves to customize depths.
- Use tiered risers for visibility and access.
- Add pull-out baskets for quick grabs.
- Label zones to keep every item in its place.
Make Vertical Space Work: Pull-Out Racks and Pegboard Hacks
Vertical space is a goldmine, and I’ll show you two simple tools—pull-out racks and pegboard hacks—that convert unused height into easy-access storage.
I install pull-outs for cans and spices, then hang pegboard with sturdy hooks for light tools.
Keep measurements tight, labels minimal, and hardware accessible.
This approach minimizes bending and maximizes visibility, finishing the makeover fast and clean.
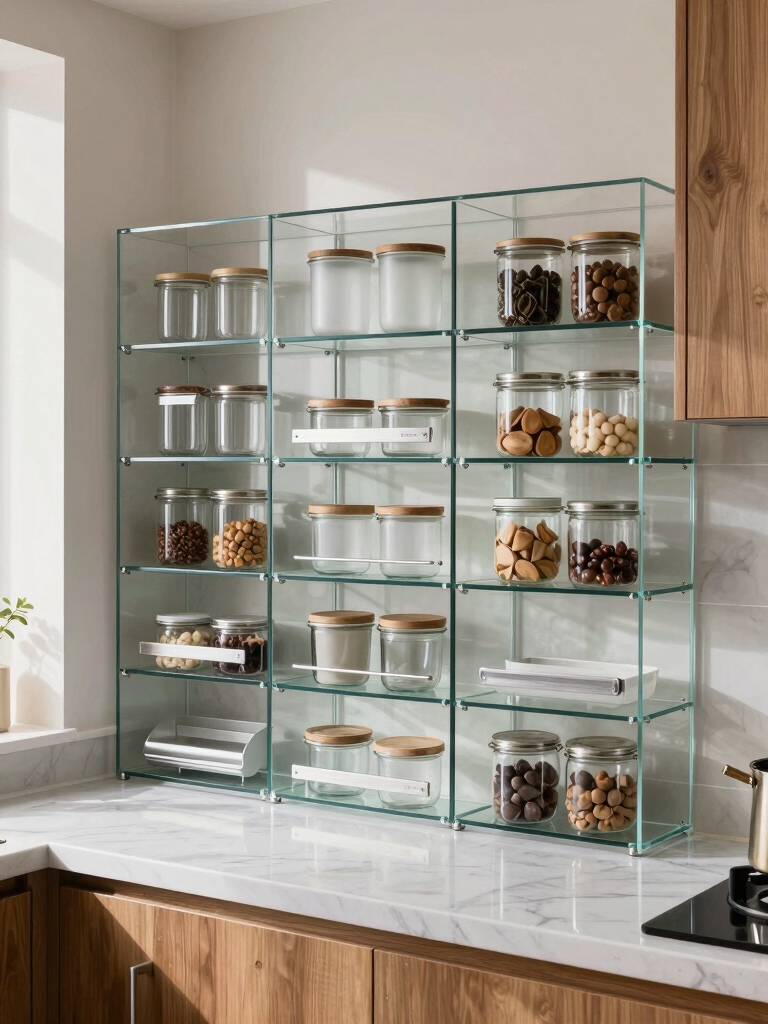
Group Like Items and Label Clearly for Quick Access
Grouping like items together and labeling them clearly makes quick access a breeze.
I group by task, then label by item type, so you can grab what you need fast.
- Gather similar tools
- Label containers clearly
- Use visible photos for quick recognition
- Keep a mini inventory for staples
This keeps cabinets calm, organized, and practical for every weekend reset.
Optimize Tall Cabinets With Adjustable Shelving
Adjustable shelving is a game changer for tall cabinets, letting you tailor every inch to what you actually use.
I start by measuring twice and noting item heights. Then I install shelf pins every 2 inches for flexibility, label tiers, and group items by frequency.
This setup minimizes wasted space, speeds loading, and keeps essentials reachable without digging.
Create a Pantry-Adjoining Turnaround Workflow
To keep a steady flow between prep space and the rest of the kitchen, I’m setting up a pantry-adjoining turnaround workflow that moves items in, used items out, and returns leftovers to their spots without delaying prep.
- Group groceries by usage
- Clear used items at the door
- Return leftovers to labeled bins
- Refresh staples weekly
Upgrade Under-Sink Storage Without Breaking the Budget
Under-sink storage can feel cramped, but with a few budget-friendly tweaks you can gain real organization without overspending.
I start by measuring space and choosing modular bins that stack vertically, not outward. Use a slim caddy for cleaners, and add a slide-out tray for easy access.
Label lids, group by use, and purge duplicates. Quietly, it stays tidy, simple, and doable.
Establish a Simple Maintenance Routine to Stay Organized
Creating a simple maintenance routine keeps you organized without overwhelming your day.
I suggest a practical plan you can actually keep up:
1) quick daily reset,
2) weekly cabinet sweep,
3) monthly inventory check,
4) seasonal purge.
Keep a small bin handy, label essentials, and batch tasks by zone.
Consistency beats perfection, and clarity prevents chaos.
Use Color and Texture Cues to Find Tools at a Glance
Color and texture cues help you spot tools at a glance, so I start by grouping items that you use together and giving each group its own distinctive look.
I label shelves with simple color tags, swap grips for tactile variety, and maintain consistent bin textures. This helps you skim setups quickly, grab the right tool, and stay organized without extra steps.
Troubleshoot Common Weekend-Organization Roadblocks
Weekend organization can stall for a few common reasons, but I’ve found practical fixes that get you back on track fast.
- Clarify goals, then prioritize tasks.
- Declutter first, then categorize items.
- Set a timer to maintain momentum.
- Revisit plan mid-project and adjust.
You’ll finish stronger by sticking to a simple sequence, staying proactive, and trimming distractions.
Schedule a One-Week Post-Launch Check and Tweak
After launching your new setup, schedule a one-week check-in to confirm it’s delivering as planned and to catch any tweaks early.
I walk you through a quick, practical review: test accessibility, confirm item placement, note friction points, and compare results to goals.
I’ll adjust zones, update labels, and document changes so your cabinet stays organized and efficient.
Conclusion
If you tackle your cabinets this weekend, you’ll notice the change fast—less digging, more finding, and real time saved. Here’s a quick stat to motivate you: households that reorganize their kitchens report a 25% drop in “lost item” moments within the first week. Keep it practical: label a few bins, measure for one more insert, and schedule a 15-minute follow-up. You’ve got this—tidy spaces, happier mornings, and a kitchen that works with you, not against you.