I’ll show you how to turn flat-pack IKEA into a kitchen that actually works. Start by mapping zones for prep, cook, and cleanup, then use drawer dividers and adjustable inserts to maximize tiny spaces. Add magnetic spice rails, pull-out trays, and pegboard ideas to free counters. Swap hardware and finishes for a custom look without the cost. Stick to practical organizers and test drives; more clever tweaks await if you keep going.
How to Design an IKEA Kitchen for Maximum Efficiency

Start by mapping how you actually use your kitchen: prep, cook, cleanup, and reach.
I design IKEA spaces around flow, not trends. Measure clearances, pick modular bases, and anchor often-used zones with pull-outs and shallow drawers.
Use tall cabinets for vertical efficiency, labeled interiors for every item, and door options that hide clutter.
Rework one wall at a time, then test, adjust, simplify. Incorporating smart cabinet organization techniques can further enhance your kitchen’s functionality and aesthetic.
Start With a Weekend Plan: Map Your Workflow Zones

If you mapped your space to design around flow before, you’re already ahead.
I’m here to help you plan a weekend efficiently: identify core zones (prep, cook, cleanup), sketch rough paths, and note bottlenecks.
Keep tools visible, store essentials near use points, and group tasks by sequence.
Consider incorporating small kitchen organization ideas to maximize your space effectively.
Test-drive a mock workflow, tweak, then commit to a simple, scalable layout.
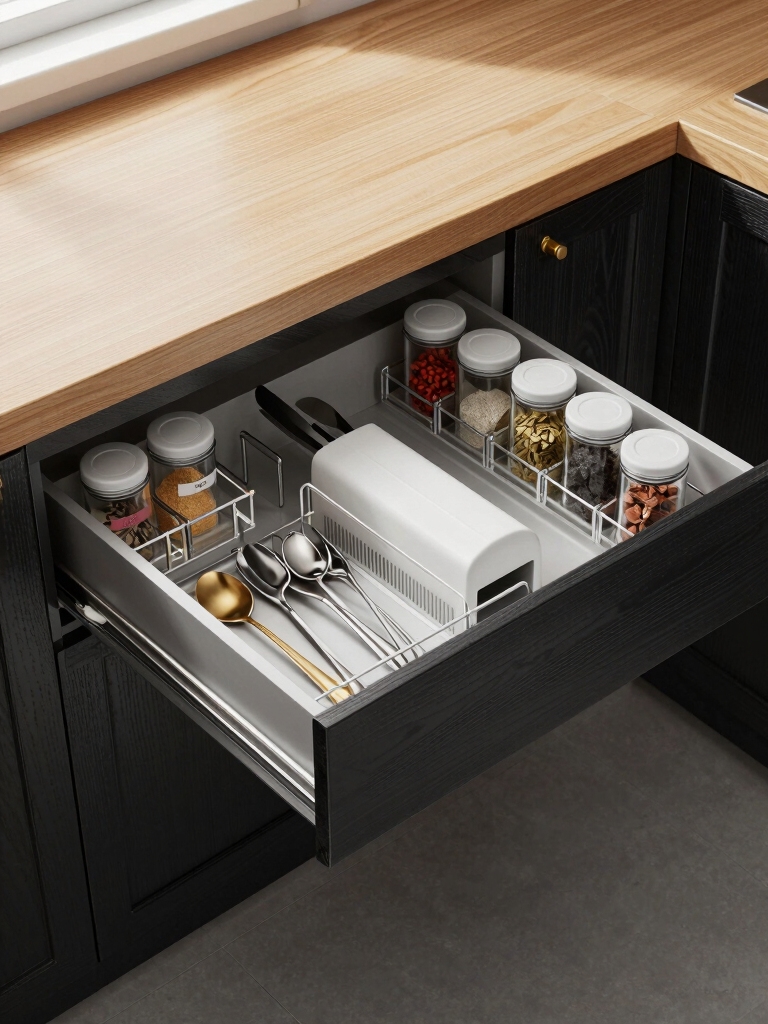
Drawer Dividers That Unlock Small-Space Storage

Drawer dividers can reveal a surprising amount of small-space storage by turning chaos into order right inside your drawers.
I start by measuring drawer depths, then pick adjustable, narrow options that grip without sliding.
Use labelable sections for utensils, tools, and lids. Keep regularly used items in front, rare parts in back.
DIY tweaks beat rigid inserts every time. Additionally, incorporating essential pantry staples into your kitchen organization can further enhance efficiency and ease of access.
Budget-Friendly Adjustable Cabinet Inserts for IKEA
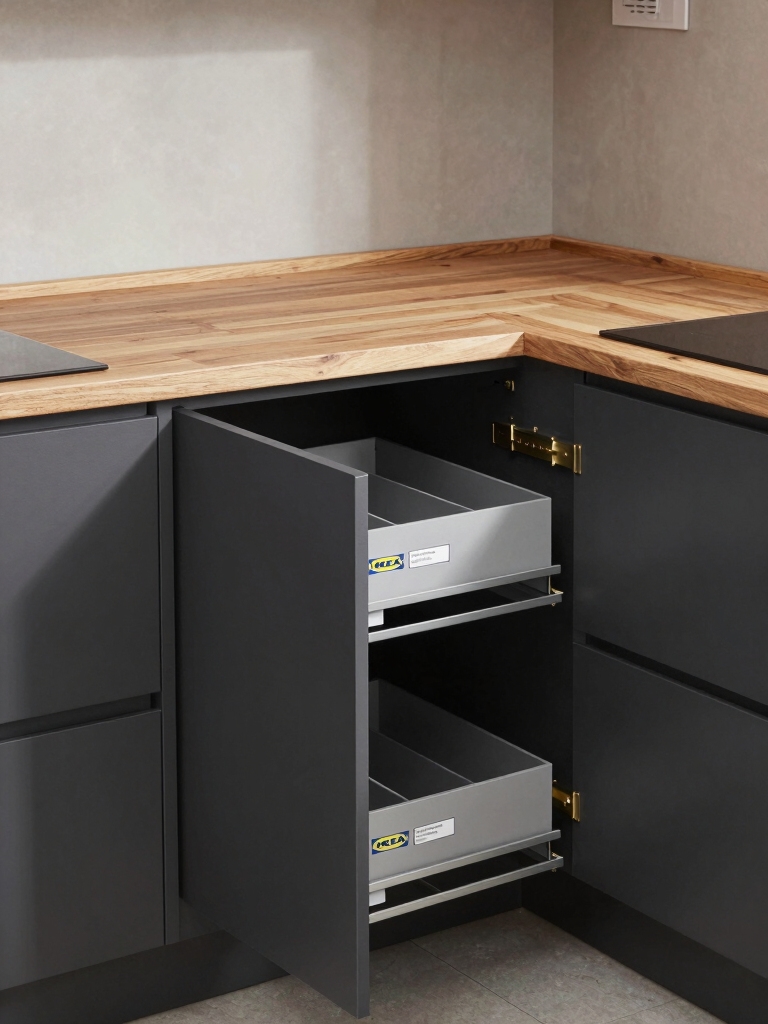
I’m excited to explore budget-friendly adjustable cabinet inserts for IKEA, because small tweaks can big-impact a cluttered space. I’ll show simple, practical options that stretch your dollars while keeping things flexible for changing needs. Let’s plunge into quick, DIY-friendly picks that balance cost, adjustability, and easy installation. Additionally, using drawer organization tools can significantly transform your kitchen drawers for effortless mornings.
Adjustable Cabinet Inserts
I love upgrading my IKEA cabinets with budget-friendly adjustable inserts, because they quickly create flexible storage that adapts to whatever you’ve got on hand.
I’ll share practical tweaks you can apply today.
- measure before buying to guarantee fit
- choose modular dividers for odds and ends
- use removable trays for easy cleaning
- label sections to stay organized
Additionally, consider incorporating budget-friendly DIY projects that enhance functionality while keeping costs low.
Budget-Friendly IKEA Solutions
Looking for budget-friendly ways to upgrade IKEA storage?
I’ll share practical, DIY-friendly budget inserts that maximize space without breaking the bank. I test, adjust, and recommend simple add-ons—baskets, pull-out dividers, and modular organizers—that fit common IKEA sizes.
You’ll customize layouts, group similar items, and keep essentials accessible. Affordable tweaks deliver tidy results with minimal effort and maximum payoff. Additionally, incorporating clever kitchen solutions can further enhance your organization and efficiency in tiny spaces.
Magnetic Spice Rails to Free Up Counter Space
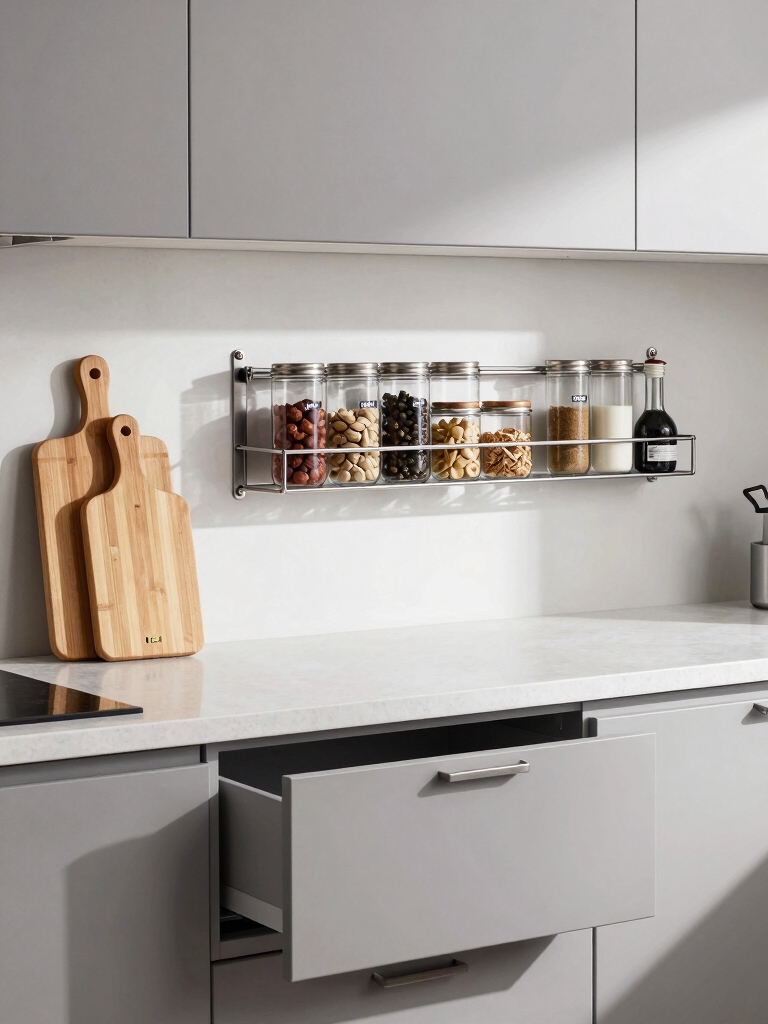
I’ll show you how magnetic spice rails can grab clutter off the counter and keep what you use most within reach. I’ll cover why magnetic rails save space, simple mounting tips, and a few smart ways to organize spices so you can see everything at a glance.
Let’s get practical with a setup that makes your IKEA kitchen feel bigger and more functional. Kitchen organization is crucial for maximizing your space and enhancing efficiency in the kitchen.
Magnetic Rail Benefits
Magnetic rail systems are a game changer for kitchen workflow, letting you keep spices within arm’s reach without crowding the counter.
I’ve found they streamline prep and reduce clutter, making routines feel smoother and more intentional.
- Easy visibility so you grab the right jar fast
- Reusable hooks for measuring spoons or scissors
- Custom spacing to fit your cabinet layout
- Simple, affordable DIY upgrade for flat-pack kitchens
Additionally, they promote smart kitchen organization by utilizing vertical space effectively, allowing for a more efficient use of your kitchen layout.
Space-Saving Mounting Tips
Ever wonder how to squeeze more counter space without a full remodel?
I mount magnetic spice rails within easy reach, then group jars by size and lid color for quick grabbing.
It’s simple: clean surface, measure spacing, mount level, and label.
Reclaim counter real estate by shifting spices to walls, leaving room for prep, appliances, and a calmer kitchen flow.
Spice Organization Ideas
Spice storage can be a game changer for a cleaner, more efficient counter, and magnetic rails make it surprisingly simple.
I love how a rail frees counter space and keeps jars visible. Here are quick ideas:
- Mount rails under a cabinet at kid height
- Label with simple tape for quick grab
- Use shallow jars to fit narrow gaps
- Group by use, not size
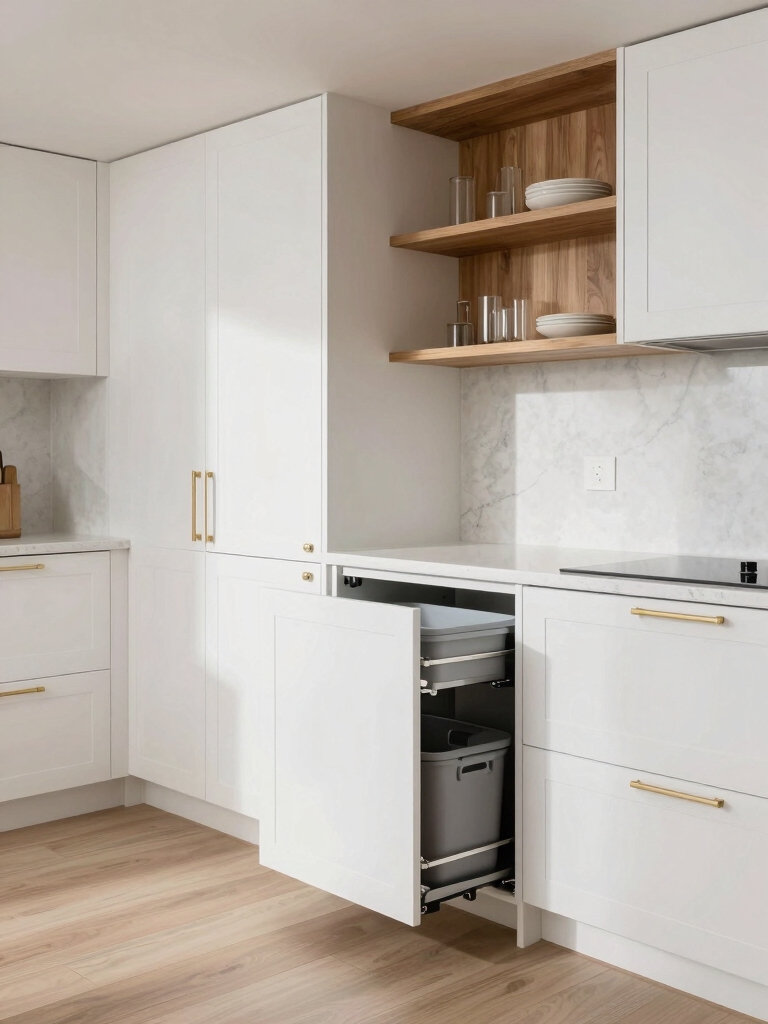
Pull-Out Trays That Put Essentials Within Reach
Pull-out trays keep daily essentials at your fingertips, so you waste less time digging through cabinets.
I love installing slim, full-extension trays under sinks and in corners, because they reveal spices, tools, and lids instantly.
With smooth glide rails and enamel-coated bases, cleanup is quick, and rearranging is painless.
You’ll customize zones, label clearly, and keep everything accessible without chaos.
DIY Pegboard Setups for Flexible Storage
Pegboard setups are a game changer for flexible storage, and I’ll show you how to make the most of them in a kitchen where needs change with the seasons or cooks.
- Mount low, then adjust hooks as tasks rotate
- Group frequently used tools near prep zones
- Label zones for quick reach and organization
- Add baskets for loose ingredients or gadgets
Corner Cabinet Hacks That Save Every Inch
If you’re tight on corner space, I’ll show you quick tweaks like elevating a Lazy Susan and using pull-out shelves to reclaim every inch.
I’ll walk you through simple setups that keep spices, lids, and small gadgets reachable without a full remodel.
Let’s explore practical, DIY-friendly hacks that make corner cabinets actually work for you.
Lazy Susan Elevation Ideas
Getting the most out of a corner cabinet often means rethinking how a Lazy Susan sits and moves.
I tune elevation to grant reach, visibility, and sturdy access. You’ll see better use with staggered shelves and a low-profile mechanism.
Try these ideas:
- raise the base platform for alignment
- install a tailpiece bumper
- add clear bins for visibility
- label zones near front edges
Pull-Out Shelves Tricks
Pull-out shelves are a game changer in tight corner cabinets, and they don’t have to break the bank.
I share quick setups you can replicate: install rails, mount hinges for smooth slides, and use labeled bins to maximize space.
When you access goods, pullouts reduce wasted reach, keep items visible, and simplify daily routines with DIY-friendly, cost-conscious tweaks.
Stackable Bins and Clear Containers for Visibility
Stackable bins and clear containers are my go-to for keeping an IKEA kitchen organized and easy to navigate.
I love stacking for compact storage and seeing contents at a glance. They’re affordable, customizable, and DIY-friendly.
- Maximize vertical space with modular lids
- Label fronts for quick finds
- Use for spices, lids, and small gadgets
- Group by use to streamline prep
Fast Labeling Systems to Speed Daily Routines
I’m all about quick wins, so I’ll share simple labeling methods that speed your morning and after-work routines.
I’ll cover practical tips for quick labels, pro tricks to save time, and how to systematize your everyday tasks.
Let’s explore how small labeling tweaks can sharpen your daily flow from the moment you open the drawer to the last coffee sip.
Quick Labeling Wins
Labels can transform chaos into clarity, and fast labeling is the easiest way to speed daily routines.
I share quick wins you can DIY tonight, no fuss, just function.
- Re-seal spice jars with color-coded lids for instant recognition
- Label drawers by zone to cut search time
- Create magnetic tags for metal shelves
- Use chalk or erasable labels on containers for easy updates
Pro Tips For Day
When you’re aiming to speed up daily routines, fast labeling systems are a game changer.
I keep labels simple: bold, legible fonts, and color cues that map to bins you actually use.
I reuse adhesive pocket labels on the fridge and matte tape on drawers.
Clear icons beat long words, so you grab what you need without thinking twice.
Systematize Morning Routines
Morning routines set the pace for the day, so I’ll apply the same fast-labeling mindset from the kitchen to what happens before anyone else wakes up.
I propose quick zones, color tags, and a simple checklist.
- Ready-to-grab bag by the door
- Color-coded outfits
- Prepped coffee station
- Morning tasks in 3-minute blocks
Under-Cabinet Lighting That Looks Premium
But what makes under-cabinet lighting feel premium? I aim for clean, even glow that highlights counters without glare.
Choose dimmable LEDs, warm tone (2700–3000K), and frosted diffusers to soften hotspots. Install low-profile strips with adhesive backs, hidden profile channels, or aluminum profiles.
I test brightness in task zones, then tweak spacing and color for a cohesive, crafted kitchen vibe.
Door-Mounted Storage: Add Depth Without Clutter
Door-mounted storage adds depth to your kitchen without adding clutter, and I’ll show you how.
I’m sharing practical, DIY-friendly ideas that keep your counters clear while making every inch count.
Let’s explore efficient ways to use doors for extra storage and quick-access essentials.
Depth Without Clutter
Door-mounted storage frees up cabinet space without adding bulk in the kitchen.
I’m showing you how to gain depth without clutter by using simple fixtures and custom spacing. You’ll install shelves that tuck behind doors, adding real storage without crowding.
- Install slim magnet racks for spices
- Use hooks for lids and utensils
- Add shallow pull-out bins
- Mount adjustable rails for versatility
Door-Mounted Efficiency
Door-mounted efficiency is all about cranking up usable space without crowding the countertops.
I attach slim racks to the inside of cabinet doors, storing spices, lids, and lightweight tools within arm’s reach.
You can swap to clear organizers so everything’s visible at a glance.
It’s simple, cheap, and transforms workflow without sacrificing legroom or style.
DIY mindset, practical results.
Wire Baskets and Shelves for Bulk Items
Bulk items like bags of pasta, snacks, and canned goods belong in sturdy wire baskets and open shelves that make bulk buying easy to grab-and-go.
I configure a simple system: clear labeling, uniform sizes, accessible heights, and mixed depths for flexibility.
- Easy-access bins
- Clear labels
- Stackable shelves
- Contained overflow and spill prevention
Custom Utensil Dispensers for Tidy Counters
Custom utensil dispensers keep on-counter clutter to a minimum and make prep faster.
I share a simple DIY approach: repurpose jars or tins with labels, mount a magnetic strip for metal tools, and drill a shallow groove in a wooden board to hold frequent utensils upright.
This keeps tools accessible, reduces search time, and fits a flat-pack budget.
Appliance Organization That Reduces Countertop Clutter
If you want to reclaim counter space, start with a plan that targets the appliances you actually use daily and stores the rest out of sight.
I share practical tweaks to cut clutter without sacrificing function, using smart placement and simple tweaks you can DIY today.
- Prioritize daily-use machines
- Use secondary storage out of sight
- Group by task for efficiency
- Tidy cords and outlets for safety
DIY Tray Inserts for Elevated Presentation
Want a little extra wow from your trays? I’m sharing simple DIY tray inserts that elevate presentation without breaking the budget.
Cut plywood or sturdy cardboard to fit, add adhesive-backed felt for grip, and use small risers to stagger heights. Line with removable, wipeable liners for easy cleanup.
Adjustable dividers keep utensils and lids organized, chef’s kiss-level neat.
Color and Finish Swaps to Read Custom, Not Cheap
Choosing color and finish can instantly elevate your kitchen from functional to custom without blowing your budget.
I’m showing practical swaps that read high-end, not mass-made, with simple DIY tweaks you can do this weekend.
- swap matte for satin hardware to reduce glare
- repaint frames in a warmer neutral
- add contrast edges to doors
- seal with clear matte topcoat for durability
Budget Hardware Upgrades That Wow Without Breaking the Bank
You don’t have to drain your budget to get kitchen hardware that looks luxe.
I’m sharing practical upgrades that punch above their price.
Swap plain knobs for affordable, statement pieces and install soft-close hinges for a premium feel.
Pick brushed brass or matte black to elevate cabinets, then add magnetic or hidden organizers inside drawers.
Small changes, big impact, DIY-friendly, no guilt.
Organizing by Zones to Streamline Daily Workflows
Think zones, not just rooms. I organize by task flow, not by luck, so you waste less time hunting pots or towels. Define zones: prep, cookware, cleaning, snacks. Keep a small tool like a pair of scissors handy.
Zone logic saves steps, reduces clutter, and speeds cleanup.
- Clear boundaries for each zone
- Common tools in reach
- Visual cues and labels
- Quick reassignments for daily needs
Weekend Setup Plan: Step-by-Step to Cohesive Upgrade
This weekend, I’ll walk you through a step-by-step plan to upgrade your kitchen in a cohesive, built-for-real-life way.
I’ll prioritize downtime-first tasks, map zones, and select budget-friendly IKEA pieces that blend.
We’ll measure, declutter, and assemble a simple system, then test it in daily use.
You’ll finish with a cohesive setup, easy maintenance, and instant-boosted flow.
Conclusion
Hey there, fellow DIY dreamer. So you’ve chewed through “flat-pack magic” and somehow emerged with a kitchen that looks custom enough to fool the neighbors. Cute, right? Remember: organization is a lifestyle, not a hobby you abandon after a weekend. Your drawers breathe, your spices stay put, and your workflow actually flows. If a magnet rail can tame chaos, so can you—one labeled zone at a time. Now go brag about your totally affordable, not-at-all IKEA masterpiece. You earned it.