I know how tight a zero-counter kitchen can feel, but you can reclaim space by prioritizing vertical storage first. I’d reclaim wall space with open shelves, magnetic storage, and slim pull-outs, then add over-sink hooks for easy access and quick-grab bundles to cut clutter. Keep tools grouped by use, label clearly, and use compact, multi-function appliances to save counter real estate. If you keep going, you’ll discover even more practical tweaks to streamline your flow.
Assess Your Tiny Kitchen Reality

If you’re working in a tiny kitchen, the first step is to take a clear, honest look at what you actually have to work with.
I inventory every drawer, rack, and surface, noting dimensions and gaps. I separate essentials from conveniences, measure how much I truly use each item, and identify outlets for potential rearrangement.
Clarity guides practical choices. Additionally, utilizing smart organization tips can help maximize your limited space and keep your kitchen functional.
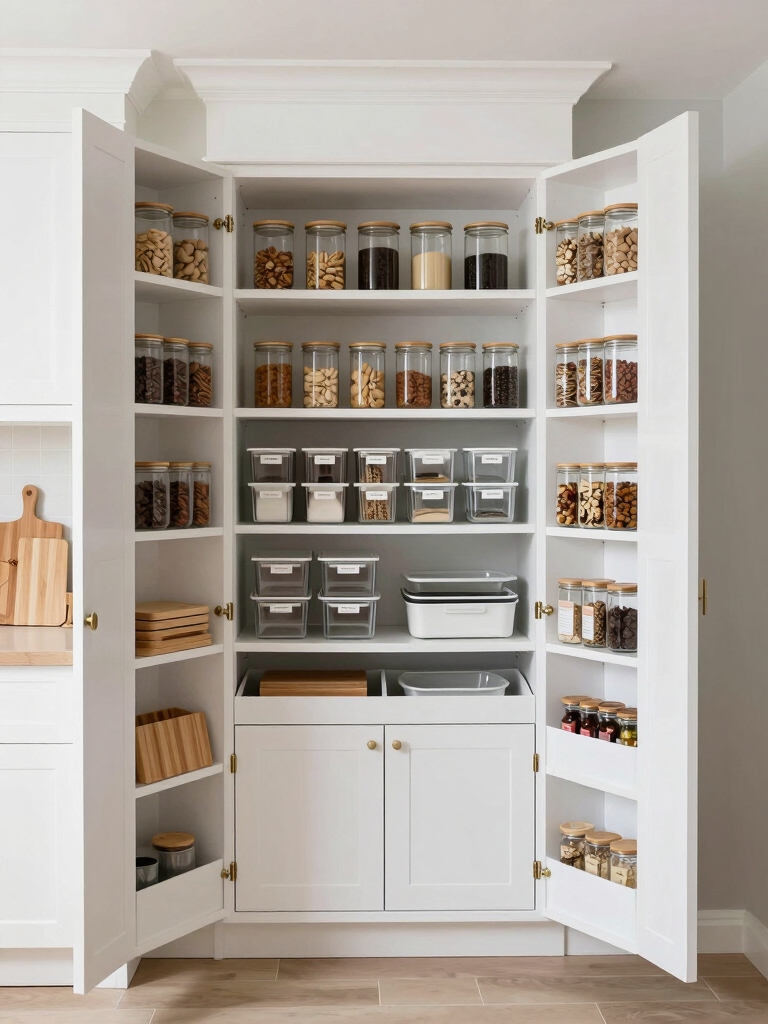
Maximize Vertical Storage First

Vertical space is gold in a small kitchen, so I start by reclaiming every inch above the counter.
I install open shelves and tall organizers, measure height clearances, and group like items.
I use labeled bins, consistent colors, and pull-out trays for easy access.
Every shelf earns a function check, avoiding wasted gaps and clutter. Additionally, incorporating tall organizers and shelves can dramatically enhance your kitchen’s efficiency and aesthetics.
Over-Sink Hooks for Instant Access

I love how over-sink hooks give me instant access to the tools I use most, right where I need them.
With the right setup—instant access hooks, smart over-sink storage tips, and easy grab-and-go tools—cleanup and prep become faster and neater. Clever small kitchen storage solutions can enhance this setup by maximizing vertical space and minimizing clutter.
Let’s explore practical placements and simple configurations that keep essentials within arm’s reach and clutter under control.
Instant Access Hooks
Over-sink instant access hooks keep frequently used items within arm’s reach, right above your workspace where you actually need them.
I position lightweight tools and towels here, so I grab them without stepping away. Keep items small and durable, and space them evenly for quick sight lines.
This setup minimizes clutter, boosts efficiency, and maintains a calm, organized flow. Additionally, utilizing space-saving solutions can further enhance your kitchen organization without sacrificing style.
Over-Sink Storage Tips
With the concepts from the Instant Access Hooks in mind, I turn to Over-Sink Storage Tips to keep what I use most within easy reach.
I install slim, suction or adhesive racks beneath the window or faucet, then hang lightweight tools and sponges.
Organize by frequency, label sections, and periodically purge. Regular checks prevent clutter and speed daily tasks. Incorporating small kitchen cabinet ideas can also enhance your overall organization and maximize space in your kitchen.
Easy Grab-and-Go Tools
To keep daily tasks speedy, I lean on easy grab-and-go tools using over-sink hooks so the essentials are always within arm’s reach.
I keep a small kit of utensils, towels, and measuring spoons on a single hook row, organized by use.
This simple setup minimizes searches, saves time, and keeps the counter clear for cooking and cleanup. Additionally, using smart cabinet organization can further enhance your kitchen’s efficiency by maximizing available space.
Narrow Pull-Out Pantry Solutions

A narrow pull-out pantry can be a game changer in a small kitchen, offering usable storage without stealing floor space.
I’ll share compact, practical ideas you can implement now.
1) Measure available depth and install adjustable shelves for tall cans.
2) Use labeled bins to group mixes, snacks, and oils.
3) Add a shallow pull-out for spices and small bottles.
4) Choose a slim unit with soft-close drawers for smooth access.
Additionally, consider incorporating smart storage solutions that make the most of your limited kitchen space.
Magnetic Wall Storage for Tools

I’m sharing how magnetic wall storage can boost tool reach with quick-access, tidy setups. I’ll show you sleek mounts that keep frequently used tools in plain sight, so you grab what you need fast. Let’s explore how a few well-placed magnets and organized zones can make a small kitchen workshop feel effortless. magnetic wall storage is a versatile solution that not only maximizes space but also keeps your kitchen tools organized and easily accessible.
Magnetic Tool Reach
Magnetic tool reach isn’t just about keeping things visible—it’s about making everyday tasks faster.
I share practical tips for using magnetic wall storage to boost efficiency without crowding counters.
1) Place frequently used tools at eye level for quick grabs
2) Group similar items together to reduce searches
3) Use labeled magnets to avoid mix-ups
4) Keep a small spare magnet kit for repairs
Sleek Wall Mounts
Sleek wall mounts keep tools visible and accessible without crowding your counters, so you can grab what you need in a snap.
I position magnets thoughtfully, grouping by task, not clutter. Tools stay within reach, freeing drawer space for essentials.
I wipe spills quickly and label zones for guests. This setup stays tidy, practical, and endlessly adaptable.
Quick-Access Organization
Quick-access organization means tools are up where you need them, not tucked away in drawers.
I rely on magnetic wall storage to keep essentials visible, reachable, and tidy.
- Mounts at eye level for quick grabbing
- Use labeled magnetic strips for frequently used blades
- Store rarely used items in higher sections
- Screen large tools to prevent metal clutter everywhere
Foldaway Counter Surfaces That Expand
If you’re short on counter space, foldaway surfaces can instantly add room when you need it and disappear when you don’t.
I rely on sturdy hinges and simple supports so setup takes seconds, not minutes.
Choose compact models that tuck into cabinets, then extend over the sink or stove for quick prep.
When finished, they fold flat again.
Simple, practical, organized.
Clear Containers for Quick Glance
Clear containers let you see at a glance what you’ve got, so you can grab the right ingredients without digging.
I keep them labeled, stackable, and airtight for freshness. You’ll waste less time, and space stays calm.
Here are quick picks:
- Glass square jars
- Wide-mouth canisters
- Stackable plastic bins
- Transparent spice jars
Drawer Dividers for Slim Spaces
I’ve found that slim drawer dividers save space by keeping items in place without crowding.
I’ll share practical, torque-saving tips that help you snap dividers in quickly and align each section for easy access.
Let’s explore how a simple setup can transform a narrow drawer into a neatly organized station.
Slim Drawer Dividers
Slim drawer dividers are a simple fix for tight spaces, letting you section utensils, lids, or cutlery without crowding the whole drawer.
I’ll keep this practical and direct, sharing how I use slim organizers to boost efficiency.
- Separate utensils by type for easy grabbing
- Pair lids with corresponding containers
- Create zones for rarely used tools
- Use adjustable widths to fit narrow drawers
Torque-Saving Organizer Tips
Using drawer dividers in tight spaces saves more than you’d expect: they keep utensils and lids reachable without stacking, so you grab what you need fast.
I group by size and function, then label sections mentally, so I can target the exact tool I want.
This simple system reduces clutter, speeds routines, and makes your slim setup feel calm and efficient.
Sliding Tray Feeding Station
A sliding tray feeding station can turn a chaotic kitchen into a calmer one, especially in a small space.
I’ll show you how to set up, use, and maintain it without clutter, so mealtime flows smoothly.
- Choose a slim, sturdy tray that fits under or beside your prep area.
- Install a simple track or glide rail for easy access.
- Zone the tray: bowls, utensils, and treats.
- Clean weekly; rotate items to prevent overfill.
Stack-Savvy Pot and Pan Racks
If your sliding tray setup showed you how careful zoning keeps small kitchens orderly, you’ll love how stacked racks free up cabinet space here.
I use vertical dividers and adjustable shelves so pots, pans, and lids aren’t tangled. I’ll group by size, label handles, and keep frequently used pieces within reach.
Clean corners, quick access, zero clutter—organized cooking begins with smart racks.
Multi-Use Appliances Save Counter Space
Multi-use appliances save counter space by doing double duty without clutter.
I show you how to choose compact, versatile tools that replace several gadgets.
Think one-device solutions and smart layouts that stay accessible.
1. Pick a blender with发表? (stick to concise items)
- Combo blender-processor
- 2-in-1 air fryer and dehydrator
- Microwave with grilling function
- Toaster oven that bakes, roasts, and broils
Corner Niches for Hidden Clutter
I’m sharing practical ideas for Hidden Corner Storage that keep clutter tucked away without stealing precious space.
I’ll show you how Maximizing Wall Niches can hold everyday items neatly, while Decluttered Niche Solutions keep the look clean and intentional.
Let’s explore simple, actionable ways to transform corner niches into calm, organized zones you’ll actually use.
Hidden Corner Storage
Hidden corner storage makes the most of tight spaces by tucking shelves and bins into awkward nooks where clutter tends to pile up.
I show you practical steps that fit in small corners and stay organized.
- Install slim shelves
- Use stackable bins
- Label clearly
- Keep frequently used items accessible
Maximizing Wall Niches
Think of wall niches as quiet, underutilized helpers that can curb clutter without expanding the footprint.
I tailor each niche to your small kitchen, placing essentials where they’re visible yet out of the way. Use slim shelving, magnetic strips, and labeled containers to keep tools accessible but tucked.
Rotate items seasonally so nothing competes for space or attention.
Decluttered Niche Solutions
Corner niches can be a game changer when clutter hides in plain sight.
I share practical, bite-sized steps to declutter hidden space and keep your counters free. You’ll feel in control and efficient, not overwhelmed.
- Measure and map the nook, then decide each item’s purpose.
- Install slim drawers or magnetic strips for odds and ends.
- Use stackable containers to maximize vertical space.
- Label lids, tops, and bases for quick retrieval.
Fridge Edge Storage With Magnets
Fridge edge storage with magnets is a simple, hands-on way to free up shelf space and keep essentials within reach.
I stick magnetic clips, jars, and small baskets along the door frame, grabbing items without opening shelves. It’s clean, unobtrusive, and adjustable.
I label nothing loudly, just reposition as needs shift, maintaining a calm, organized flow.
Readers, try this.
Clear Labels for Easy Sizing
Clear labels help me size and pack items quickly, so I can spot what I’ve and what I need at a glance.
I’ll share simple labeling tips that cover clear wording, consistent sizing terms, and smart label placement.
Let’s keep labels visible, durable, and easy to update as your collection changes.
Clear Labels, Clear Sizing
Clear labels make sizing obvious at a glance, so you can grab what you need without a second thought.
I keep things simple and predictable, guiding you to fast decisions and less rummaging.
1) Label plainly with size markers
2) Use consistent fonts and colors
3) Group by function, not just container
4) Update labels when you change contents
Label Placement Principles
Label placement isn’t just about where a label sits—it’s about making size information impossible to miss.
I keep labeling predictable and scannable: top edge, bolded size, and consistent font. I place labels near openings, use contrasting colors, and align with containers’ fronts.
This reduces rummaging, speeds decisions, and helps you grab the right size—every time. Practical, clear, and organized.
Task-Zone Kitchen Layout
If you’re redesigning a small kitchen, a task-zone layout helps keep prep, cooking, and cleanup efficient by grouping work areas and tools where you actually use them.
It’s practical, tidy, and saves steps.
- Define core zones: prep, cook, and clean
- Place tools near each zone
- Minimize motion between zones
- Use wall-mounted storage for essentials
One-In-One-Out System
A One-In-One-Out system fits neatly with a task-zone kitchen because it keeps each area lean and predictable—you only bring in what you truly need for a task, and you take out what you’ve used.
I protect space by admitting only essentials, labeling items, and wiping surfaces after use.
It reduces clutter, speeds tasks, and welcomes calm, intentional cooking.
Quick-Grab Bundles to Cut Clutter
When I want a fast, tidy kitchen, I create simple grab-and-go bundles for the tasks I repeat most, so I can grab what I need without rummaging.
- Breakfast tote
- Snack pack
- Daily prep kit
- Quick-clean pouch
These bundles cut clutter by keeping essentials near the work zone, reducing search time, and maintaining focus during busy mornings.
Streamlined Cleaning Tools Storage
Streamlined cleaning tools storage keeps my routines crisp and fast: I group essentials by task, store them in clearly labeled cips or bins near the cleaning zone, and rotate weekly so I’m never fishing for the right tool.
I keep lightweight items reachable, heavier items on a lower shelf, and purge duplicates. Clear labels save seconds and reduce clutter every day.
Temporary Work Surfaces That Reuse Space
Temporary work surfaces that reuse space save real estate without sacrificing functionality.
I share quick, practical tweaks you can try today. You’ll swap clutter for clever placements and stay organized.
- Fold-down prep boards that latch to walls
- Extendable countertops over the sink or stove
- Sliding butcher blocks on rails
- Over-door hooks and magnetic rails for utensils
Custom Setup for Your Cooking Rhythm
To tailor my kitchen to how I cook, I start by mapping out my typical sessions—prep, cook, and finish—then assign tools and zones that support those moves.
I keep assemblies simple: a prep spot with knives, a cook zone with heat, a finish area for plating and notes.
This rhythm minimizes motion, boosts focus, and reduces clutter. Consistency wins.
Conclusion
If you’re living with zero counter space, tiny wins add up fast. I’ve seen kitchens where vertical shelves add 40% more usable area, and a simple magnetic strip keeps knives within arm’s reach—no clutter scramble. One quick stat to picture: homes with organized kitchens cut cleanup time by about 20–30%. Start small today: assess your reality, label what you grab, and build a setup that fits your cooking rhythm. You’ve got this; steady, practical shifts pay off.