I turn wasted island space into gold with practical, DIY ideas you can try today. From deep drawers and pull-out organizers to slim rails and hooks, I group tools and ingredients for quick grabs. I love vertical shelves, mug rails, and labeled zones that keep prep, cook, and clean separate but near. I rotate bins and purge monthly to keep it tidy. Stick with me and you’ll uncover more tips to makeover your island fast.
What Makes Kitchen Islands Great for Organization

Islands aren’t just stylish; they’re built to streamline our everyday routines.
I use mine as a command center: a resistant worktop, accessible storage, and a clear flow from prep to cleanup.
By design, they group tools, ingredients, and gear, reducing trips.
I customize drawers, mount organizers, and label zones so everything has a home—and stays there.
Simplicity speeds every kitchen task. Clever kitchen island storage tricks can maximize the functionality of your space even further.
Quick Hidden Storage Ideas You Can Add Today

Hidden storage can be added in minutes with a few simple tweaks. I swap out a shallow tray for a deeper bin under the island, install a magnetic strip for measuring spoons, and mount a slim peg rail inside a cabinet door. I label misc containers and use clear, stackable jars—no fuss, quick wins, tidy results. Utilizing smart storage solutions can maximize your space even further. You’ll thank me later.
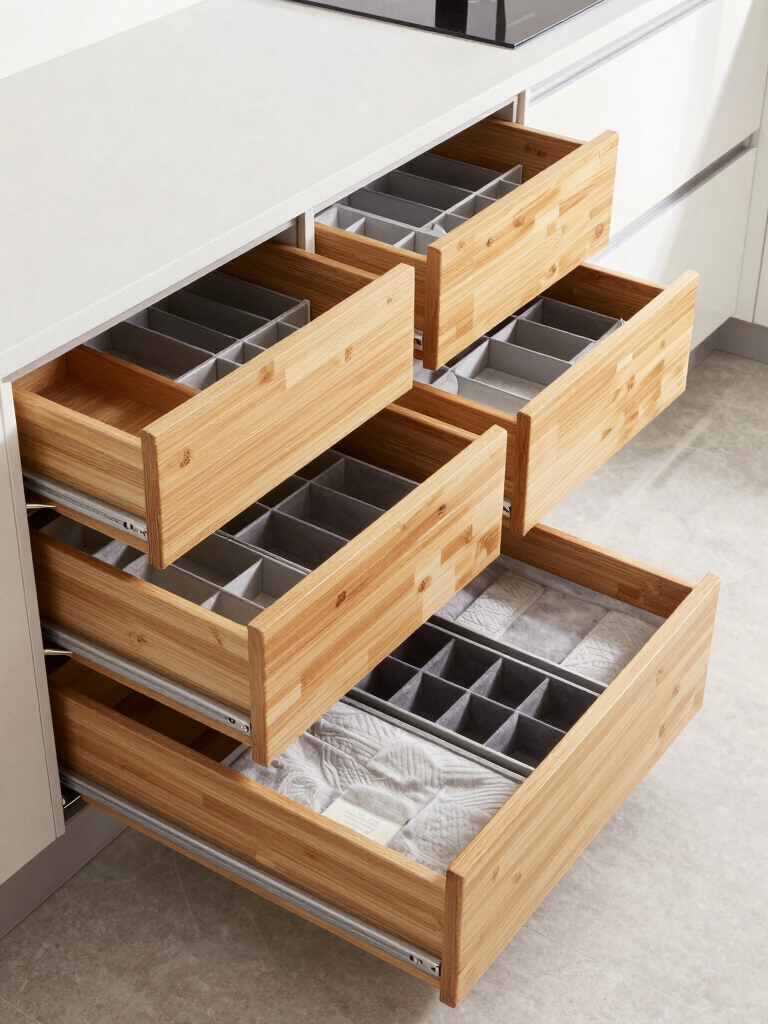
Deep Drawers and Pull-Out Organizers for Utensils

I’m thinking about how Deep Drawer Zoning, Pull-Out Modularity Ideas, and Utensil Placement Systems can tighten up your prep space.
With deep drawers, you can carve out dedicated zones for forks, knives, and spoons, and add pull-outs that keep everything visible and reachable. Smart cabinet organization can significantly enhance your kitchen’s efficiency and aesthetics.
Let’s chat about simple layouts that work for your tools and your kitchen flow.
Deep Drawer Zoning
When you open a deep kitchen drawer, you should be able to see every utensil at a glance, and that’s exactly what deep drawer zoning delivers with pull-out organizers.
I group by task—measuring spoons with scoops, spatulas beside tongs—so everything has a home. It speeds prep, reduces rummaging, and fits my DIY mindset: simple shelves, clean lines, practical efficiency. Additionally, using pull-out organizers can maximize vertical space, allowing you to store more utensils without clutter.
Pull-Out Modularity Ideas
Pull-out modularity keeps deep drawers clean and flexible, so I can swap in new organizers as needs change.
I love deep drawers with pull-out organizers for utensils; they hide clutter and reveal options fast.
I use simple dividers, adjustable trays, and slim baskets to fit oddly shaped gadgets.
This setup stays practical, affordable, and genuinely DIY-friendly for busy cooks. Additionally, utilizing smart cabinet organization techniques can enhance overall kitchen efficiency and accessibility.
Utensil Placement Systems
Three quick truths about utensil placement: deep drawers with pull-out organizers keep mealtime gear visible, easy to grab, and far from clutter.
I prefer dividers that separate spatulas, forks, and knives, so I don’t dig.
Install sturdy slides, label zones, and grease tracks regularly.
This simple setup saves time, reduces mess, and makes DIY kitchen upgrades feel doable, even on weekends. Additionally, utilizing kitchen cabinet organizing tips can enhance your overall kitchen efficiency.
Mug and Gear Racks That Reclaim Counter Space

I’ve found that mug storage magic and sturdy gear racks can free up a ton of counter space, so I’ll share practical setups you can try.
I’ll walk you through simple upgrades that keep mugs within easy reach and gear neatly corralled without clutter.
If you’re after a clean, functional kitchen, these ideas will help you reclaim every inch with a DIY touch. Additionally, implementing smart organization tips can significantly enhance your kitchen’s efficiency and overall aesthetic.
Mug Storage Magic
If you’re tired of crowded counters, mug storage that actually works can free up space and make morning routines smoother.
I swap mugs onto a slim rail under cabinets, or into a wall rack, keeping saucers nearby but out of the sink’s reach.
Lightweight, affordable hooks or pegboard strips make quick changes easy, practical, and totally doable. Additionally, incorporating smart organization tips can help maximize your kitchen’s overall efficiency.
Gear Rack Upgrades
Even small upgrades can make a big difference, so I’ll show you practical mug and gear racks that reclaim counter space without clutter.
I favor wall-mounted or pegboard setups, plus swing-arm racks for mugs. Use labeled hooks for quick finds, and aluminum or wood rails for lightweight tools.
Install at reachable height, keep cords tucked, and enjoy an organized, efficient workspace.
Counter Space Reclaimed
A few simple mug and gear racks can reclaim valuable counter space without crowding the kitchen.
I show you practical layouts to keep daily essentials accessible, while freeing work surfaces.
Here are steps:
- Mount slim racks under cabinets for mugs and small tools
- Use vertical racks by the kettle for cups
- Group items by task to minimize clutter and maximize flow
Vertical Organizers: Shelves, Rails, and Hooks

Vertical organizers are a smart way to free up counter space without sacrificing access.
I mount slim shelves under upper cabinets and add a rail for mugs, freeing drawers for bulk staples.
Hooks keep spatulas handy, and a peg rail holds knives safely.
DIY tips: space evenly, label baskets, and use mixed heights to maximize every inch.
Practical, tidy, quick.
Drawer Dividers That Tame Utensils and Gadgets
Drawer dividers are the backbone of a tidy, fast-kive kitchen.
I show you how to pick smart gaps and sturdy blades for utensils and gadgets, then place them for quick grabs.
- Group by use
- Label lightly
- Adjust as you grow
With simple cuts, DIY fits, and less clutter, your drawers become tools, not chaos.
Pull-Out Pantry Ideas for Extra Ingredients
Pull-out pantry bins and shelves let extra ingredients sit within easy reach, so I can grab what I need without digging through stacked boxes.
I use shallow drawers for spices, labeled jars for grains, and a slim pullout for oils.
Install smooth slides, group similar items, and keep a quick-count list.
DIY tips save space, time, and trips to the cabinet.
Multi-Tier Trays and Lazy Susans for Fast Access
I love using multi-tier trays and Lazy Susans because they put everything within arm’s reach, from spices to snacks.
With quick access, I can grab what I need fast and keep the rest neatly visible—no digging required.
Let’s chat about which configurations—multi-tier, rotating shelves, or a mix—work best for real, everyday cooking and DIY organization.
Multi-Tier Accessibility
Multi-tier setups keep your kitchen essentials within easy reach.
I design trays and lazy susans for fast access, keeping daily tools in reach without hunting. You’ll notice fewer steps and spills when items are visible and organized.
- Group by use
- Stack for sight lines
- Rotate for quick grab
DIY-friendly, sturdy, tidy—effort that pays off daily.
Lazy Susans Efficiency
Moving from organizing by use to speed, a well-placed Lazy Susan or multi-tier tray keeps the most used kitchen tools right where you can grab them.
I keep essentials visible and reachable, so I don’t hunt. Spin or lift, and I’ll find spatulas, lids, and spices fast.
This DIY tweak cuts clutter and saves minutes every day. Simple, sturdy, effective.
Quick-Grab Organization
When you need fast access in a kitchen island, a quick-grab setup with multi-tier trays and a Lazy Susan keeps the essentials within arm’s reach, so I don’t waste time digging.
I organize by frequency, not size.
1) Group staples
2) Use labeled tiers
3) Recycle space weekly, rotate items seasonally, and keep tools nearby for instant action.
Practical, doable, homey.
Dedicated Task Zones on the Island: Prep, Cook, Clean
On the island, I like carving out dedicated zones for prep, cook, and clean so tasks flow smoothly without bumping into each other.
I assign a clean-dish area near the sink, a prep side with cutting boards, and a cook space by the stove.
Clear bins, labeled compartments, and a rolling cart keep every tool within reach and clutter at bay.
Practical, simple, effective.
Safe, Tech-Friendly Layouts With Charging Hubs
Stable, tech-friendly layouts start with a charging hub that’s easy to reach but tucked away enough to keep cords under control; I like a designated spot on the island where you can drop phones, tablets, and a small power strip without turning the counter into a tangle.
- Designate a central hub
- Hide excess cables
- Use wireless accessories for clutter-free use
Seating With Hidden Storage for a Tidy Island
A simple trick that makes a kitchen island feel bigger is seating with built-in storage.
I’d add cushions that hinge open or ottomans with hollow cores, giving you hidden bins for linens, snacks, or tools.
Keep the front clear for traffic, while the storage stays under wraps.
This approach blends seating and practicality without clutter piling up.
Lighting and Surfaces That Support Ongoing Organization
I keep the island bright with simple, energy-efficient lighting and smartly placed fixtures that don’t clutter the counter.
I choose surfaces that wipe clean in a snap and stay looking neat with minimal upkeep.
Let’s chat about setups that make daily organizing second nature, not a chore.
Lighting That Stays Bright
Lighting that stays bright isn’t an afterthought here; it’s a practical pillar of ongoing organization.
I’ll show you how I keep grime and glare at bay, while staying DIY-friendly.
- Use bright, warm LEDs in adjustable fixtures to reduce shadows and eye strain.
- Install under-cabinet strips for task light right where you work.
- Plug into a simple, labeled outlet scheme to prevent clutter and confusion.
Surfaces For Easy Maintenance
Surfaces that stay clean and endure daily use are the backbone of a well-organized kitchen.
I pick materials and finishes that wipe easy, resist stains, and hide wear. Laminate, quartz, and sealed wood survive daily prep with minimal maintenance.
I place utensils and boards where they drain and dry, so messes are quick to vanish and items stay organized.
Stay practical.
Kid-Friendly Islands: Lower Storage and Labeled Zones
Kids love helpers in the kitchen, and a kid-friendly island makes that easy with lower storage and clearly labeled zones.
I keep tools reachable and tasks age-appropriate, so kids learn by doing.
- Store kid-safe utensils
- Label zones for snacks, prep, and cleanup
- Use bright, simple cues for quick learning
Budget-Friendly Swaps That Declutter Without Breaking the Bank
We can tighten up our kitchen without tightening our budget by swapping in budget-friendly, high-impact organizers and materials.
I’ll grab inexpensive clear bins, stackable shelves, and adhesive mason-jar lids for spice spice stacks, then rethink drawer dividers with gift-card inserts.
Declutter means two-minute purges, clear labeling, and reusing jars.
DIY mindset, practical swaps, big payoff, little spend, and a sleeker, calmer island.
Style-Conscious Organization: Matching Bins and Aesthetics
If you want your island to feel cohesive, start with color and material harmony that ties every bin together.
I team up form, function, and vibe, choosing bins that match your kitchen’s story.
1) Pick a unifying palette.
2) Mix textures for depth.
3) Label subtly to guide hands and eyes.
DIY-friendly, practical, stylish, and totally doable.
Maintenance Habits to Keep the Island Organized
Maintaining an organized island isn’t a one-and-done task; it’s a habit you build into daily routines.
I keep a quick tally of essential tools and regularly purge unused items. Wipe surfaces nightly, rotate contents, and label bins for easy access.
A weekly reset block prevents clutter creep, while simple trays stop loose items from spreading. Small, consistent steps yield lasting order.
Conclusion
You and I can transform this island with simple steps, simple shifts, simple systems. We’ll reclaim space, clarify purpose, and celebrate function over fuss. We’ll stash smartly, label clearly, and group by need, not guesswork. We’ll install, adjust, and adapt until every drawer, rack, and shelf serves with ease. We’ll maintain what works, tweak what misbehaves, and enjoy the daily wins. We’ll cook, create, and live more organized, more joyful, more us.