
I’ve designed island booth seating to make family meals, homework and hosting effortless and cozy by combining a slim L‑shaped banquette with a multifunctional island top that doubles as prep space and dining table.
I use cushioned, wipeable upholstery, hidden under‑seat storage, and rounded edges for safety, plus dimmable pendants and discreet pop‑up outlets for devices. The result feels anchored, social and uncluttered — keep going and I’ll share layout, material and tech tips.
Designing a Multi-Use Island With Built‑In Booth Seating
When I’m planning a multi-use island with built-in booth seating, I start by asking how we’ll use the space day-to-day—cooking, homework, casual dining, or entertaining—so every inch earns its keep.
I balance durable materials with layered textiles, add storage beneath benches, configure seating for sightlines to the cook, and choose flexible tables and lighting so the island shifts effortlessly between work, play, and cozy meals.
Kitchen island table hybrids are popular because they combine the prep space of an island with the sociability of a table, creating a focal point for family life and gatherings kitchen island table hybrids.
Space‑Saving Corner Booths for Small Kitchens
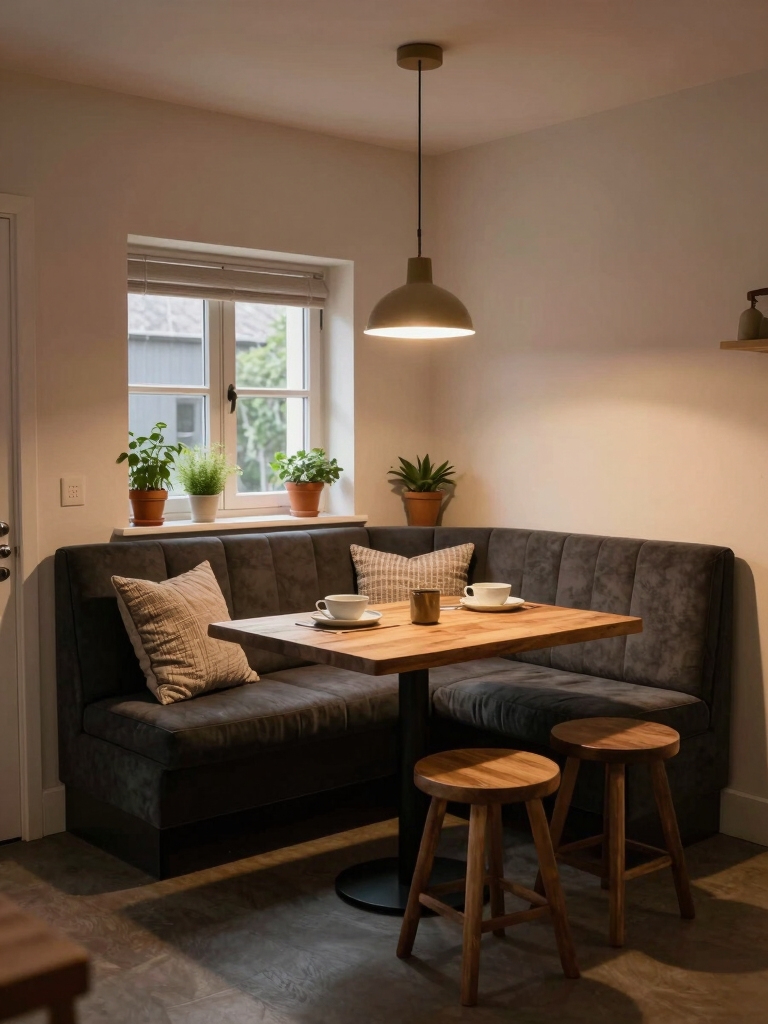
Moving from a multi-use island to a compact corner booth, I focus on making every inch work harder in a small kitchen.
I choose a tailored L-shaped banquette that tucks into a nook, adds hidden storage under seats, and keeps sightlines open with slim backrests.
Mixed textures and a small round table create intimacy without crowding, balancing function and refined, lived-in charm.
This approach echoes unexpected small kitchen island inspirations by prioritizing space-saving corner solutions that adapt to tight layouts.
Bench Wraps and Cushioned Seating for Comfort
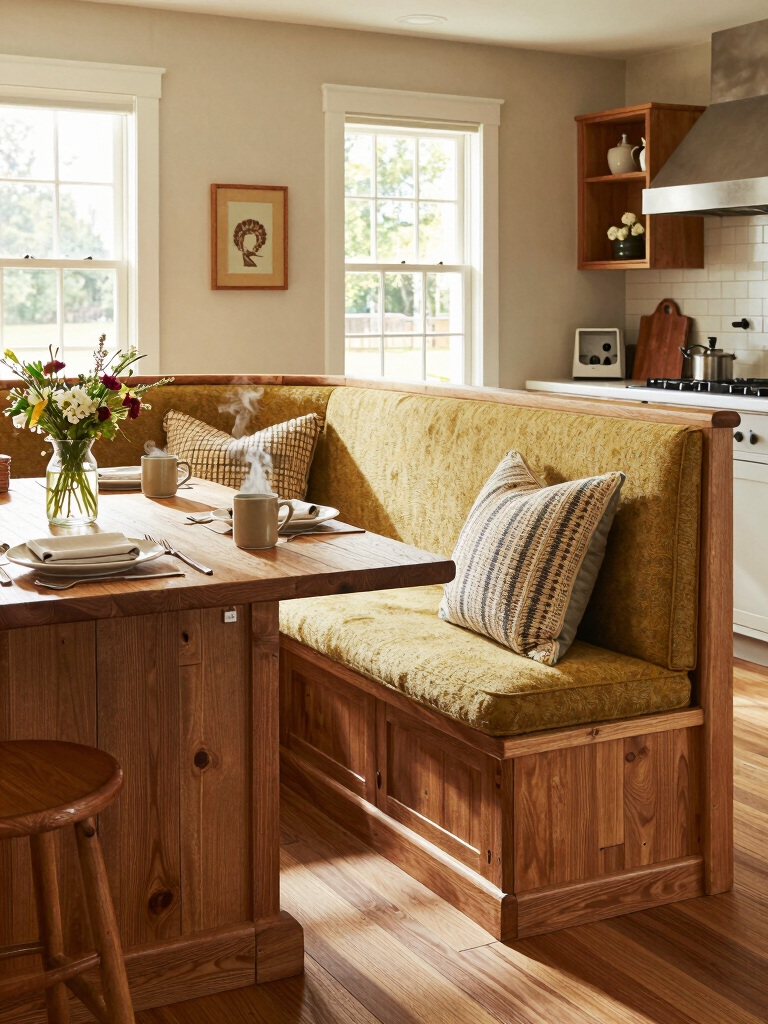
I wrap a bench in layers of cushioning and tactile fabrics to make island seating feel like an invitation rather than an afterthought.
I mix tailored foam, softer padding, and a few artful throws so every meal feels linger-worthy.
I balance pattern and texture for personality, add low-profile bolsters for lumbar support, and keep profiles sleek so the island reads elegant, cozy, and deliberately lived-in.
I also consider small kitchen island layouts to ensure seating for two fits comfortably without crowding.
Choosing Durable Fabrics and Upholstery for Everyday Use
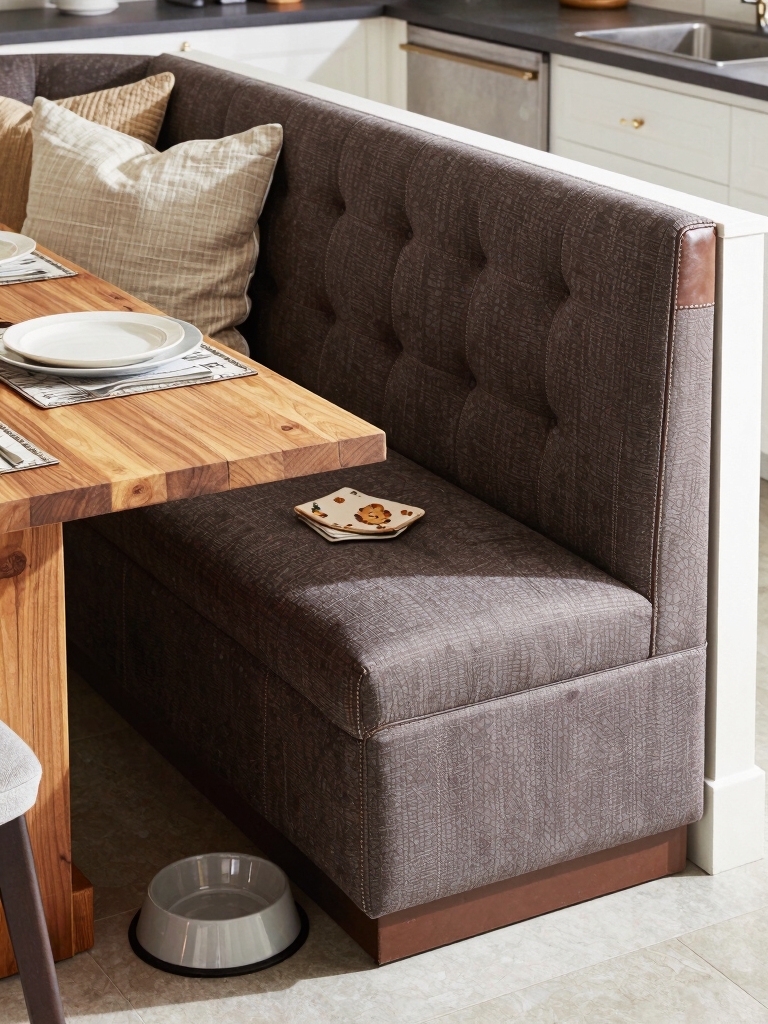
Start by thinking about how your island will be used day-to-day—I’m realistic about spills, kids, pets, and quick breakfasts—then choose fabrics that stand up to that life without sacrificing style.
I favor performance linens, treated cotton blends, and leather-look vinyl for easy wipes.
Pick darker weaves or subtle patterns to hide wear, and removable, washable covers when possible for lasting, polished comfort.
Consider also affordable seating options like stylish kitchen island stools that save money without skimping on durability or style.
Storage Solutions Under Booth Seats
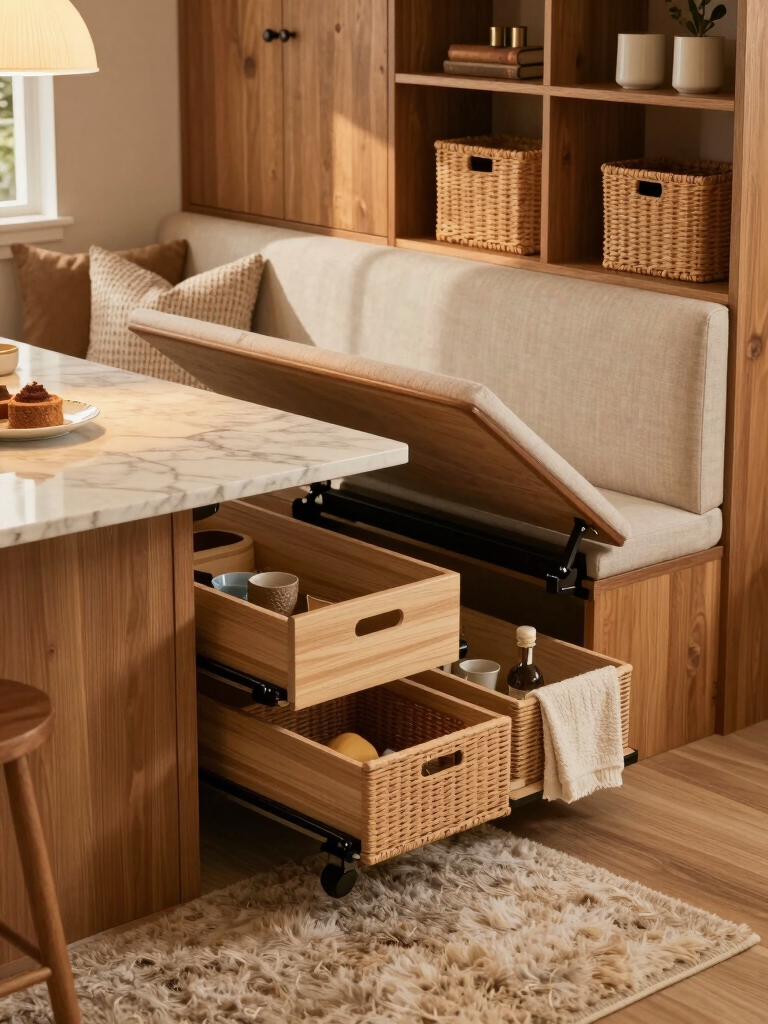
Once you’ve picked fabrics that stand up to daily life, it’s smart to think about using the space beneath booth seats to keep that tidy look going.
I favor deep drawers for linens and games, hidden lift-up benches for bulkier items, and labeled baskets for quick access.
Thoughtful hardware keeps movement smooth, and a mix of open and concealed storage balances practicality with a warm, collected aesthetic.
Clever Kitchen Island Storage Tricks you’ll love and can be adapted to booth seating designs.
Optimal Dimensions and Clearances for Island Booths
When I plan island booths I start with the essentials: seating depth and width that fit your cushions and bodies comfortably.
I account for legroom and knee clearance so people can sit and stand without awkward shuffling.
Then I map aisle and traffic space to keep the kitchen flowing smoothly while the booth feels intimate.
Small islands can be surprisingly versatile, often proving that size doesn’t matter when it comes to functionality and style.
Seating Depth and Width
Balancing comfort and circulation means getting the seating depth and width right for an island booth, and I’ll walk you through the dimensions that actually work.
I favor a 16–20 inch seat depth for supportive cushions and 18–22 inch seat widths per person for cozy yet unfussy spacing.
Allow wider widths for loungier vibes or shared kids’ seating; keep proportions balanced with the island scale.
Small kitchens benefit from planning that maximizes space without overcrowding the floorplan.
Legroom and Knee Clearance
Because people linger at islands as much for conversation as for eating, I make legroom and knee clearance a priority so everyone sits comfortably without bumping the cabinetry or each other.
I aim for 12–15 inches under the counter and 9–12 inches between apron and knees, adjusting for cushions and posture. That modest clearance feels generous, tidy, and utterly livable.
Aisle and Traffic Space
If you want people to move easily around an island booth, I plan aisles that feel spacious without wasting floor area.
I aim for 36–42 inches behind seating for comfortable passage and 48 inches if someone needs to pass a seated diner or pull out chairs fully.
These clearances balance traffic flow with cozy intimacy, keeping the kitchen efficient and inviting.
Integrating a Backrest: Supportive and Stylish Options
When I added a backrest to our island seating, the difference was immediate: guests lingered longer and my mornings felt more settled.
I chose shapes and heights that support posture without crowding the space, balancing comfort with clean lines.
Consider these simple choices for lasting comfort:
- Slim, padded backrests for daily coziness
- Low-profile benches for visual openness
- Curved backs for gentle support
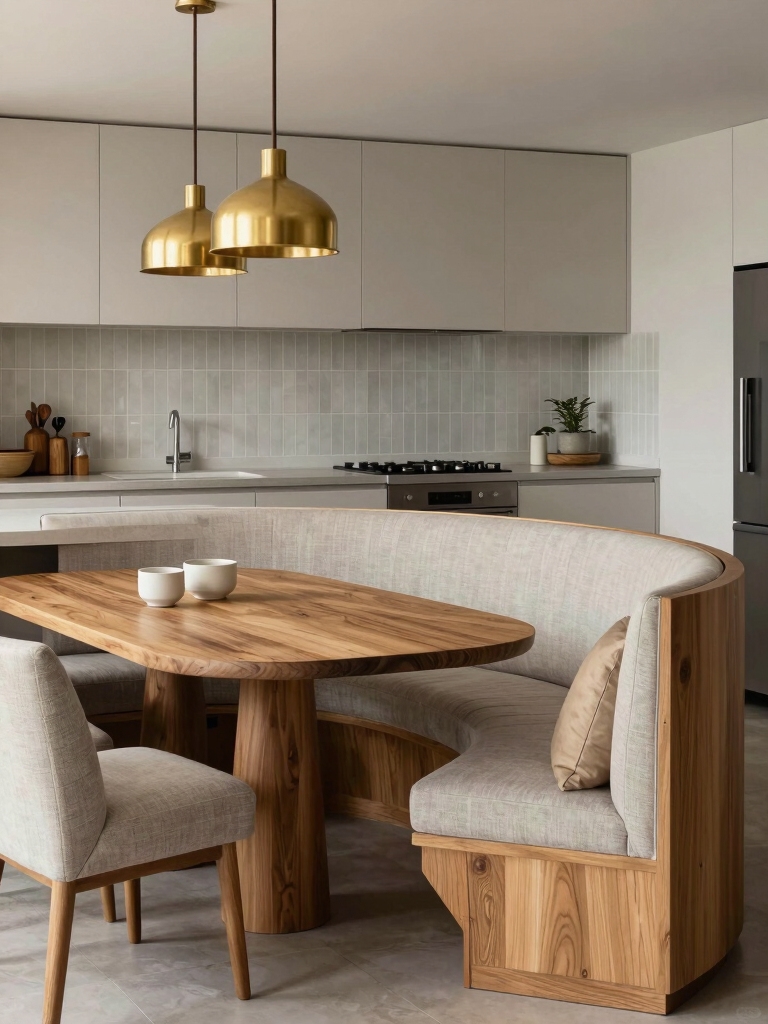
Mixing Materials: Wood, Stone, Metal, and Upholstery
I like pairing warm wood with cool stone for a grounded yet inviting island base, then adding metal accents to introduce a modern edge.
I’ll often choose upholstered cushions or backs to soften the mix and improve comfort. Contrasting textures—raw grain, polished stone, matte metal, and cozy fabric—keep the look curated and balanced.
Pairing Wood and Stone
I like pairing wood and stone because their contrast feels grounded yet unexpectedly warm, and that balance suits a kitchen island booth perfectly.
I choose materials that speak to each other: a live‑edge bench with honed quartz, worn oak with soapstone, or reclaimed planks beside a pebbled countertop.
- tactile comfort
- visual depth
- durable elegance
Metal Accents With Upholstery
Alongside the warmth of wood and the cool permanence of stone, I like to thread metal accents and soft upholstery through a kitchen island booth to give the space a tailored, lived-in feel.
I choose slender brass legs, matte black brackets, and durable, stain-resistant fabrics in muted tones. The result feels polished but cozy, practical for family life and quietly stylish.
Contrasting Textures Mix
When I mix wood, stone, metal, and upholstery around a kitchen island booth, I aim to let each material play a clear role so the whole feels intentional rather than cluttered.
I balance textures by limiting palette and scale, then layer tactility for comfort and durability.
- Warm wood anchors
- Cool stone accents
- Metal and fabric refine the look
Adding a Tabletop Drop Leaf or Extendable Surface
Although a fixed island feels solid, I’ve found a drop leaf or extendable tabletop transforms it into a flexible centerpiece that adapts to meals, homework, or a quick prep station.
I choose materials that echo existing surfaces, add discreet supports, and keep hardware simple.
When folded it preserves flow; when extended it welcomes extra plates, laptops, or a board game with effortless, curated charm.
Lighting Strategies to Create a Cozy Dining Nook
I like to layer ambient lighting with a few softer sources so the booth feels enveloping without glare. I stick to warm color temperatures to make meals feel relaxed and inviting.
Then I add task and accent fixtures—a focused pendant for reading or prep and a small wall sconce or LED strip to highlight texture—to balance function with atmosphere.
Layered Ambient Lighting
Because good lighting layers depth and mood, I start by thinking of three simple planes—ambient, task, and accent—and how they’ll work together to make a kitchen island booth feel like a true nook.
I layer soft overhead, focused pendant task light, and small accents to sculpt comfort:
- dimmable overhead for even wash
- pendant for dining focus
- wall sconce or LED strip for subtle highlights
Warm Color Temperatures
Having set the layers, I next focus on color temperature because the tone of light shapes how cozy a booth will feel.
I prefer warmer bulbs—2700K to 3000K—for their golden hug. They soften wood tones, flatter skin, and invite lingering.
I balance warmth with dimmability so evenings feel intimate while daytime remains clear and inviting.
Task-And-Accent Fixtures
How do you layer task and accent lighting so a booth feels both practical and plush? I plan focused pendant or under-cabinet task lights for reading and prep, then add softer wall or strip accents to sculpt mood. Combine finishes for curated contrast and dimmers for control.
- adjustable pendants
- low-glow wall sconces
- subtle LED strips
Styling With Pillows, Throws, and Seasonal Textiles
When I layer pillows, throws, and seasonal textiles on a kitchen island booth, I aim for comfort that looks effortless and curated; mixing textures, scales, and pops of color lets the space feel both lived-in and deliberately styled.
I rotate linens for seasonality, pair a chunky knit with a sleek linen, and balance bold patterns with quiet neutrals to keep the nook inviting and refined.
Child‑Friendly Designs and Safe Finishes
I love how pillows and throws make a booth feel cozy, but with kids around you also have to think about durability and safety;
I choose fabrics and finishes that stand up to spills, sticky fingers, and the occasional enthusiastic jump.
I favor rounded edges, wipeable textiles, and sturdy anchors.
- stain‑resistant performance fabrics
- soft rounded corners
- non‑toxic, durable finishes
Open‑Plan Layouts: Anchoring the Island Booth
Because open-plan rooms can feel scattered, I anchor the island booth so it reads as both a social hub and a design statement—tying sightlines, traffic flow, and scale together so the booth feels intentional rather than tacked on.
I use rug boundaries, balanced lighting, and complementary materials to define the area, creating a cozy, curated nook that guides movement and invites lingering without overpowering the larger room.
Incorporating Power Outlets and Charging Stations
Anchoring the island booth as a social hub also means making it work for modern life, so I plan power thoughtfully where people naturally gather.
I hide outlets under the overhang, add a discreet pop‑up charger, and keep cords tidy to preserve the cozy look.
Benefits include:
- easy device charging
- snack prep and tablet recipes
- safe, uncluttered surfaces
Color Palettes and Finishes to Define the Space
When I choose color and finish for an island booth, I think of them as the room’s signature—what draws people in and sets the tone for meals, homework, and late-night chats.
I balance durable, wipeable surfaces with layered hues: muted green or deep navy for coziness, warm wood tones for texture, and brass or matte black accents to elevate. Contrast defines the nook.
I’ve loved how these island booth ideas balance practical order with unexpected personality—sleek storage beside plush bench wraps, hardwearing fabrics next to soft cushions.
I picture our family gathered around an anchored island, gadgets charging, toys contained, snacks within reach; it’s efficient yet intimate.
Mix durable finishes with a touch of curated whimsy, and you get a cozy, resilient hub where everyday life feels both effortless and thoughtfully designed—comfort and craft, side by side.


