

I organize my kitchen to cook faster, easier, and with less clutter, turning every meal into a smooth, confident routine. Start by decluttering, then define zones that match my workflow. I build storage by zone with cabinets, drawers, and shelves, and I use drawer dividers to tame utensils and gadgets. I keep up with simple maintenance and budget-friendly upgrades, rotate stock, and purge regularly. If you keep going, you’ll uncover more tips that fit your space and style.
What It Feels Like to Cook in a Well-Organized Kitchen
When I cook in a well-organized kitchen, everything feels calmer and more efficient, and I can focus on the task at hand instead of searching for tools.
With everything in its place, I move smoothly from prep to plating, trusting my plan. I measure, slice, and simmer without detours, savoring clear space, confident routines, and steady momentum throughout each practical, enjoyable moment. The smart cabinet organization allows me to access my tools effortlessly, enhancing my overall cooking experience.
Declutter First: Decide What to Keep and What to Let Go

After noticing how a tidy, organized kitchen feels calm to cook in, I realize the next step is to clear the clutter and decide what to keep and what to let go.
Start with a quick sweep of cabinets and drawers, pull out everything, and ask: Do I use this weekly? If not, donate or recycle.
Keep essentials, group by frequency, and discard duplicates.
Consider implementing clever small kitchen storage solutions to maximize space while keeping your kitchen looking neat and clutter-free.
Focus, simplify, and proceed.
Define Cooking Zones That Match Your Workflow

I start by explaining how I define cooking zones that fit my workflow, so you can do the same.
I map each zone by its core tasks—prep, cooking, and cleanup—then arrange tools and ingredients accordingly.
Let’s discuss how you can tailor these zones to your routine and keep the flow smooth.
In small spaces, clever kitchen solutions can maximize your efficiency and organization.
Define Your Cooking Zones
To cook efficiently, I map my kitchen into zones that fit my workflow—prep, cooking, and cleanup—so I move smoothly from one task to the next.
Define your cooking zones by frequency of use and tool proximity: keep knives near prep, pans near heat, and trash and towels close at hand.
Test, adjust, and keep accessories visible for quick access. Additionally, consider utilizing smart organization tips to maximize your kitchen space and improve functionality.
Map Workflow By Zone
Think about your workflow in chunks and map each chunk to a zone that supports it.
I organize tasks by proximity and purpose, preventing backtracking and saves time.
Map zones to your typical moves, not just appliances.
- Gather everything you need before you start
- Prep near the sink with waste and disposal in reach
- Cook with utensils within easy grip
- Plate and serve close to dining area
- Clean as you finish for consistency
In addition to these tips, consider implementing smart kitchen cabinet organization techniques to further enhance your efficiency.
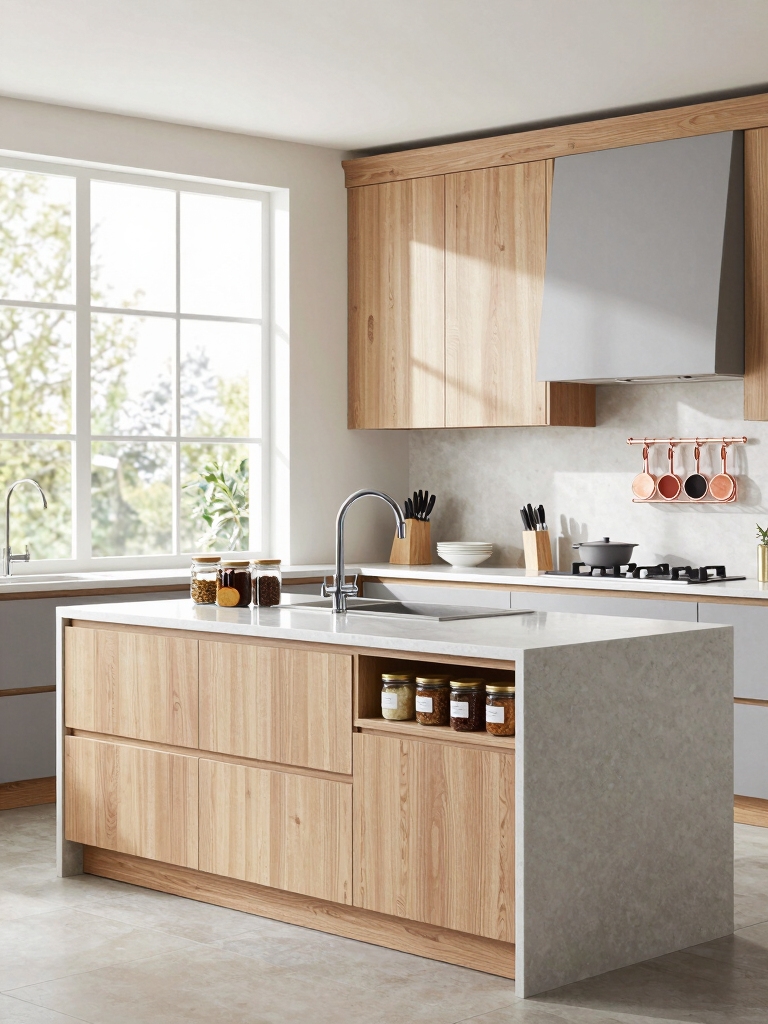
Build Storage by Zone: Cabinets, Drawers, and Shelves
I’m changing how we think about storage by zoning cabinets, drawers, and shelves to match how you actually cook.
We’ll map each zone to specific items—cabinet footprints for staples, drawers for tools, and shelves for bowls and bins—so everything has a home.
If you tell me your workflow, I’ll help you layout practical placements that cut steps and clutter. Additionally, incorporating must-have kitchen accessories can further enhance your organization and efficiency in the kitchen.
Cab Cabinets Layouts
Cab cabinets layout is all about zoning for efficiency.
I design by zone, placing daily-use items within easy reach and rare items tucked away. Think tall pantry sweep, mid-height staples, and under-cipe tools for quick access.
- Prioritize frequent-use items at eye level
- Group by recipe workflows
- Use tall cabinets for bulk storage
- Keep heavy items low
- Label shelves for clarity
Incorporating kitchen cabinet organizing tips can further enhance your space and streamline your cooking process.
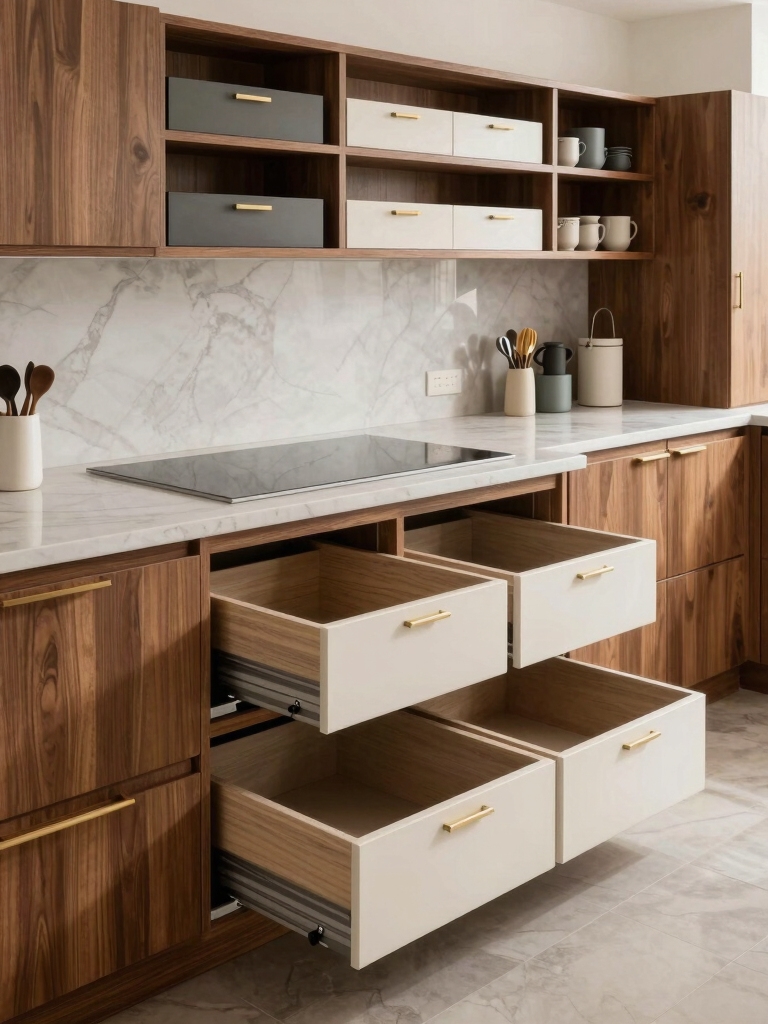
Drawer and Shelf Zoning
Drawer and Shelf Zoning is where the daily rhythm of your kitchen comes together.
I map tasks to zones, keeping frequently used items accessible and occasional tools out of the way. I group utensils, plates, and spices by routine, label clearly, and adjust seasons. This practical setup saves time, reduces clutter, and makes every drawer a deliberate, confident step. Additionally, smart organization tips can further enhance your kitchen’s efficiency and functionality.
Use Drawer Dividers to Tame Utensils and Gadgets
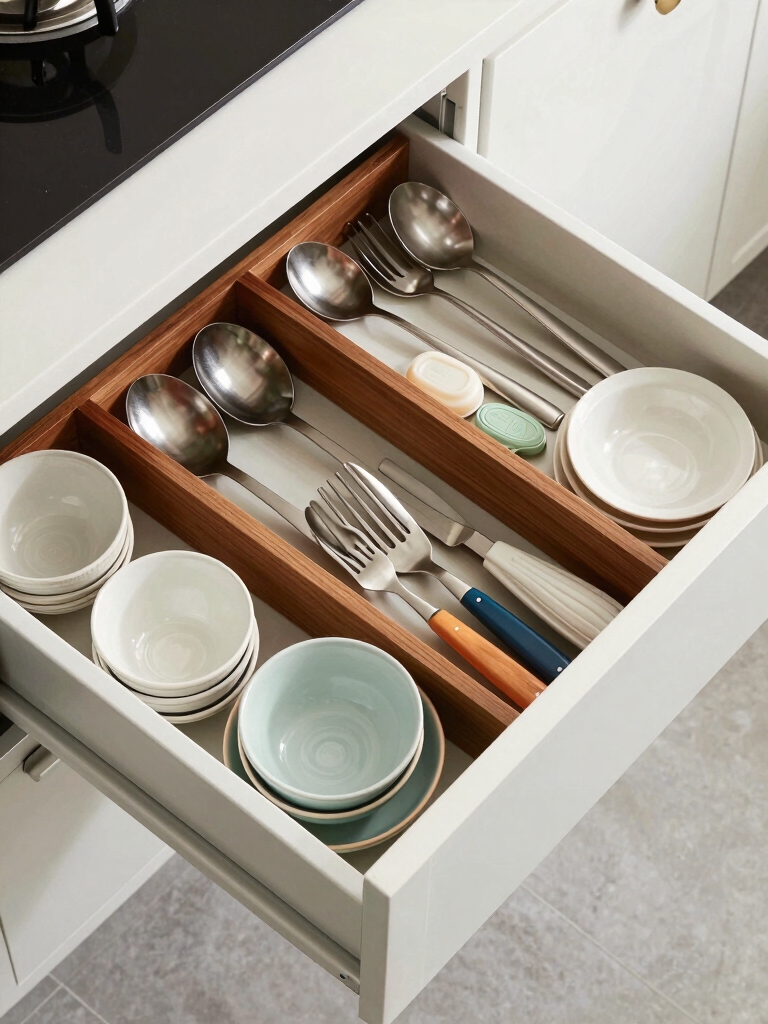
Using drawer dividers keeps utensils and gadgets easy to grab and easy to put away, so morning routines stay smooth.
I organize by function, not size, and label sections for quick picks. Also, I rotate rarely used tools to back of drawer to reduce clutter and save time.
- Clears space for everyday essentials
- Keeps similar items together
- Reduces search time
- Protects sharp edges
- Encourages tidiness
Maximize Cabinet Space With Adjustable Shelves
Adjustable shelves are a simple upgrade that pays off in bigger, smarter storage.
I swap fixed heights for adaptable spacing, tucking snacks, small appliances, and dishes into clean rows. Set shelves at eye level for easy access, then stagger dividers to separate zones.
Quick reorganizations keep cabinets tidy, upgrading everyday efficiency without costly remodels or extra tools.
Streamline Pan and Lid Storage to Avoid Stacking Chaos
Pan lids and pan bases can turn into a chaotic stack, but keeping them paired and accessible saves time and frustration.
I keep lids in a file organizer and bases in a shallow bin, labeled by size. This simple system cuts search time and chaos.
- Pair lids with matching pans
- Use a labeled bin or tote
- Store upright or nested by size
- Add a small divider
- Regularly declutter and wipe down
Pantry Strategy: Clear Bins, Labels, and Visible Contents
Clear bins and labels make pantry items easy to spot, so I can grab what I need fast.
I keep staples visible at eye level and group similar items together. Labels guide quick checks, not tricks, so I know when staples run low.
Clear contents reduce search time, prevent duplicates, and help kids help out without making a mess.
Practical, friendly, and simple.
Turn Corners and Dead Space Into Useful Storage
Corners and dead space don’t deserve to waste anything. I turn tight corners into clever storage by adding pull-out trays, slim canisters, and hanging organizers.
You’ll gain quick access without sacrificing counter space. Try these ideas:
- Install corner pull-outs
- Use slim canisters
- Add over-sink racks
- Mount magnetic strips
- Hang measuring tools
Practical, friendly, and concise.
Fridge Reality: Visibility, Labels, and Rotation
Visibility, labels, and rotation aren’t glamorous, but they make weeknight dinners and meal prep easier.
I keep visibility high with clear bins and light placement, so staples stay where I expect them. Labels guide what to grab, reducing guesswork, while rotation guarantees older items front and center.
This practical approach minimizes waste and makes fridge checks faster and calmer.
Countertop Rhythm: Essential Tools, Not Clutter
After getting the fridge in order, I shift to the countertop where rhythm matters as much as reachability.
I keep essential tools within easy sight, not clutter. Priorities guide layout, so chaos stays away and prep flows.
- frequently used items at eye level
- knife block away from edges
- cutting board ready to roll
- measuring cups nearby
- small device charger tucked neatly
The One-In, One-Out Habit That Keeps Chaos Down
I use a simple one-in, one-out rule to keep my kitchen from overflowing, and I’ll show you how it works in practice.
By keeping essentials visible, I only bring in what I’ll actually use and remove what’s already there, so clutter stays manageable.
Let’s track and tidy daily, so the rhythm stays steady and chaos stays away.
One-In-One-Out Rule
The One-In, One-Out rule is a simple habit that keeps kitchen clutter from exploding: for every new item you bring in, you remove one you already have.
I’ll show you quick, practical ways to apply it, so your counters stay calm without feeling limiting.
- Decide approval time for new items
- Audit storage monthly
- Choose multi-use tools
- Label and track decisions
- Celebrate clean, functional space
Keep Essentials Visible
Keeping essentials visible helps the One-In, One-Out habit actually work.
I keep everyday items within arm’s reach and group them by use, so I grab what I need without hunting. A clear tray, labeled containers, and a small rail organize utensils, spices, and towels.
When I see them, I remember what’s in use and what isn’t, reducing clutter.
Track and Tidy Daily
Track and Tidy Daily: the One-In, One-Out habit that keeps chaos down is simple to implement.
I commit to adding one item and removing one, every day, so surfaces stay clear and cooking flows. Small swaps prevent clutter buildup and save time.
Try these:
- Choose the item to remove
- Place new item where it belongs
- Check expiration reminders
- Recycle or donate regularly
- Celebrate daily consistency
Quick-Access Spice and Oil Stations You’ll Actually Use
Small changes can turn your spice and oil setup into a one-way street to flavor, so I’m sharing quick-access stations you’ll actually use.
I keep daily staples in a shallow, labeled rack near the stove, and reserve larger bottles in a dedicated cabinet.
I group by usage: salt and pepper within reach, oils together, herbs nearby, and a tiny prep bottle for sauces.
Simple Maintenance Habits to Prevent Reorganization Ruin
To keep your cabinets from sliding back into chaos, I rely on simple daily habits that stop reorganizing disasters before they start.
I stay flexible, rotate items, and commit to quick resets after cooking. Small, steady actions beat big messes over time.
- Clear, wipe, and return every item
- Label shelves for easy re-stowing
- Audit weekly and discard duplicates
- Designate zones by use
- Tidy as you go, not later
Budget-Friendly Upgrades That Feel Premium
Budget-friendly upgrades can make a kitchen feel premium without breaking the bank.
I’m sharing small, thoughtful changes I’ve used: oil-rubbed cabinet hardware, affordable under-cabinet lighting, fresh paint in a soft neutral, and open shelving with curated items.
These tweaks boost perceived quality, aren’t flashy, and are easy to implement.
Practical, durable choices keep clutter low and daily tasks smoother.
Smart Shopping and Periodic Purges for Lasting Order
I’m sharing smart shopping habits, a simple periodic purge schedule, and lasting-order techniques to keep your kitchen calm and functional.
By planning purchases and scheduling regular checks, you’ll reduce waste and clutter while saving time and money.
Let’s start a practical routine that fits your real life and sticks.
Smart Shopping Habits
Smart shopping and periodic purges go hand in hand to keep your kitchen organized without breaking the bank.
I practice intentional purchases, compare prices, and buy only what fits weekly meal plans. This prevents clutter, saves money, and reduces waste.
- Make a simple shopping list and stick to it
- Track prices and stock to prevent overbuying
- Buy versatile staples
- Avoid impulse buys
- Prefer durable, reusable containers
Periodic Purge Schedule
A periodic purge schedule keeps kitchen chaos in check by pairing regular clears with smart shopping habits.
I set a simple cadence: monthly checks, quarterly restocks, and a quick seasonal review.
I only keep what I truly use, label leftovers, and rotate spices.
This keeps space open, reduces waste, and makes every shopping trip faster and more intentional for you.
Lasting Order Techniques
Lasting order comes from smart shopping paired with regular purges, so I keep a simple cadence that fits real life.
I share practical, friendly tips that work in a busy kitchen without drama.
- Plan before buying to avoid duplicate items
- Inspect expiry dates weekly
- Rotate stock, use oldest first
- Buy in bulk only for essentials
- Schedule quarterly purge for unused foods
Tailor These Ideas to Your Kitchen Style and Size
When it comes to tailoring ideas to your kitchen, start by taking stock of what you actually use and what fits in your space.
I’ll help you choose tools and storage that reflect your style—clean, rustic, or modern—without clutter. Measure cabinets, note traffic patterns, and adapt.
Prioritize containers, colors, and layouts that feel effortless and stay functional every day.
Conclusion
Here’s the truth I’ve learned: when your kitchen feels calm, cooking becomes easier and more joyful. If I declutter first, define zones, and build smart storage, I actually enjoy putting meals together, not fighting the space. So try small wins today—one drawer, one shelf. You’ll notice how the rest follows: fewer searches, faster prep, steadier routines. Trust the process, stay practical, and tailor it to your style. Your organized kitchen is within reach—and you’ll taste the difference.


