

I’ll help you wring usable storage from every inch of your pantry by mapping needs, measuring tight gaps, and zoning like a tiny supermarket. I’ll show you where to add slim pull-outs, adjustable shelves, door racks, tiered risers and clear bins so things stay visible and reachable.
I’ll prioritize ergonomic heights, FIFO rotation, and appliance cubbies to cut waste and chaos. Stick with me and you’ll get practical layouts, hardware picks, and maintenance tricks to make it all work.
Assessing Your Pantry’s Current Footprint and Needs

Measuring your pantry’s footprint is the smartest place to start, because you can’t plan what you don’t know.
I walk you through tallying shelves, door swings, and usable depth, noting blind spots and everyday items that crowd space.
We’ll catalog frequency of use, bulky versus small goods, and lighting needs so your cabinet choices actually fit life, not just ideal layouts.
Clever small kitchen cabinet ideas maximize storage by using vertical space, pull-outs, and specialized organizers.
Planning Around Cabinet Dimensions and Clearances
Because cabinets only work when they fit both the space and the way you move, I start by mapping clearances and typical cabinet dimensions against how you actually open doors, pull drawers, and reach for everyday items.
I check door swing, aisle width, and drawer overlap, then prioritize ergonomic heights for daily items.
Small tweaks—trim, inset doors, or sliding options—save big headaches. I also suggest simple pantry ideas that suit small kitchen owners to make the most of limited space.
Choosing Adjustable Shelving for Maximum Flexibility

When I plan pantry shelving I always choose height-adjustable shelves so jars, mixers, and cereal boxes can find a comfy spot as needs change.
I’ll walk you through the common shelf-clip options—pin holes, metal standards with brackets, and euro-style supports—so you can pick the sturdiness and look you want.
Small choices here save big headaches later, trust me.
Tiny kitchens benefit most from smart cabinet layouts and space-saving cabinetry that squeeze storage into narrow gaps.
Height-Adjustable Shelves
I’ve learned that adjustable shelves are the secret weapon of a smart pantry—they let you tweak spacing as your needs change so nothing’s wasted or crushed.
I favor tall, shallow bays for cereal and baking tins, with a few low, deep shelves for bulk items.
They keep things visible, tidy, and adaptable—so your pantry evolves with your shopping habits, not the other way around.
Smart organizing often includes using simple cabinet organization techniques to maximize space and function.
Shelf Clip Options
Let’s dig into shelf clips — the small details that make adjustable shelving actually usable day to day.
I prefer metal spring clips for strength, plastic pegs for quiet, and slotted standards when I want micro-adjustment.
Choose stainless for humidity, clear plastic for invisibility, and soft-touch for heavy glass.
Pick clips that match load, look, and how often you’ll rejig things—it’s the tiny decisions that pay off.
Organizing kitchen cabinets benefits from simple, consistent systems like Kitchen Cabinet Organizing Ideas that make maintenance easy.
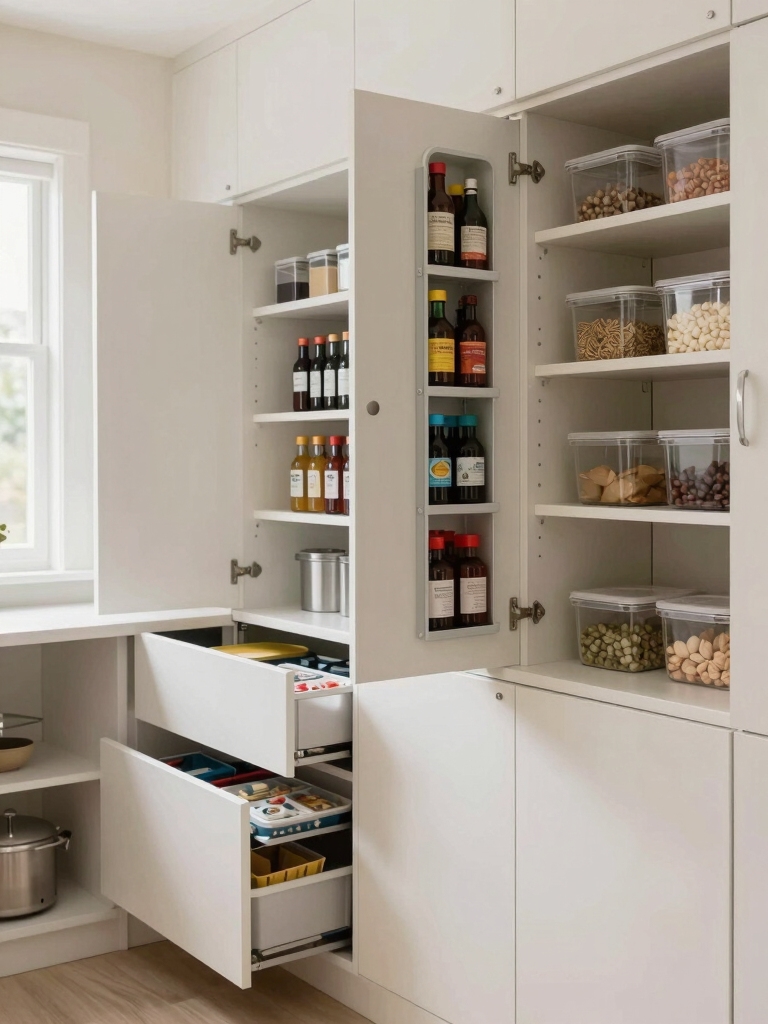
Installing Pull-Out Trays and Roll-Out Shelves

With a few simple measurements and the right hardware, I can turn a cramped pantry into an organized, easy-access space by installing pull-out trays and roll-out shelves.
I pick smooth-glide runners, measure depth and clearance, and stagger tray heights for spices, cans, and small appliances. Pull-outs prevent lost items at the back, boost visibility, and make daily cooking feel effortlessly deliberate.
Smart storage solutions like pull-out trays can transform how you use cabinet space.
Using Vertical Space With Tall Shelves and Risers
I love stretching a pantry upward — tall shelves let me stack cereal boxes, baking supplies, and infrequently used gadgets without wasting airspace.
Adding tiered risers keeps jars and cans visible and reachable, so nothing hides in the back of the shelf.
With a few well-placed risers and a taller top shelf, you can double your usable storage while keeping everything stylish and accessible.
Clever small kitchen storage that hides clutter, like using pull-out bins and hidden compartments, keeps countertops clear and makes small spaces feel larger clever small kitchen storage.
Maximize Vertical Storage
Stacking taller shelves and slipping in risers is one of the simplest tricks I use to turn wasted airspace into real, usable storage—no renovation required.
I add adjustable tall shelving for cereals and baking supplies, fit clear containers to keep lines neat, and use door-mounted racks for oils and spices.
Little changes multiply capacity, keep things visible, and make pantry life delightfully efficient.
Tiered Shelf Risers
When I slide in tiered shelf risers, the whole pantry suddenly feels like it was designed with me in mind—every jar, box, and bottle gets its face forward instead of hiding in the back.
I love how risers:
- Elevate spice jars for instant visibility.
- Stack cans neatly.
- Create a coffee station tier.
- Let tall bottles tuck behind shorter items.
They’re small design wins.
Incorporating Corner Solutions and Lazy Susans
Let’s tackle corners head-on: I’ve turned awkward, wasted nooks into smooth-running storage with the right corner solutions and a few well-placed Lazy Susans.
I swap dead space for rotating shelves, pull-out kidney trays, and half-moon units that keep spices and cans accessible.
You’ll reduce rummaging, spot everything at a glance, and enjoy a pantry that actually works as hard as you do.
Adding Door-Mounted Storage and Racks
I love squeezing extra function out of pantry doors, and a slim spice rack mounted inside keeps seasonings visible and handy without stealing shelf space.
You can also fit adjustable hanging baskets for snacks, baking supplies, or bulk packets so everything has a spot that adjusts as your stash changes.
It’s an easy, high-impact tweak that makes your pantry feel deliberately organized rather than accidentally chaotic.
Utilize Door-Mounted Spice Racks
Across the inside of a pantry door I hung slim spice racks and instantly claimed valuable shelf space back for bulkier items.
I love how labels face me like tiny storefronts. Try these visuals:
- Row of glass jars, amber spices.
- Magnetic tins clinging like orderly soldiers.
- Tiered racks showing labels.
- A single cinnamon jar anchoring the display—practical and pretty.
Install Adjustable Hanging Baskets
I often reach for hanging baskets when door space feels wasted, because they instantly turn that flat plane into layered storage without crowding the pantry.
I hang adjustable baskets to corral snacks, produce, and baking tools, shifting heights for jars or taller bottles.
They’re inexpensive, easy to install, and keep frequently used items visible and handy—small change, big organization payoff.
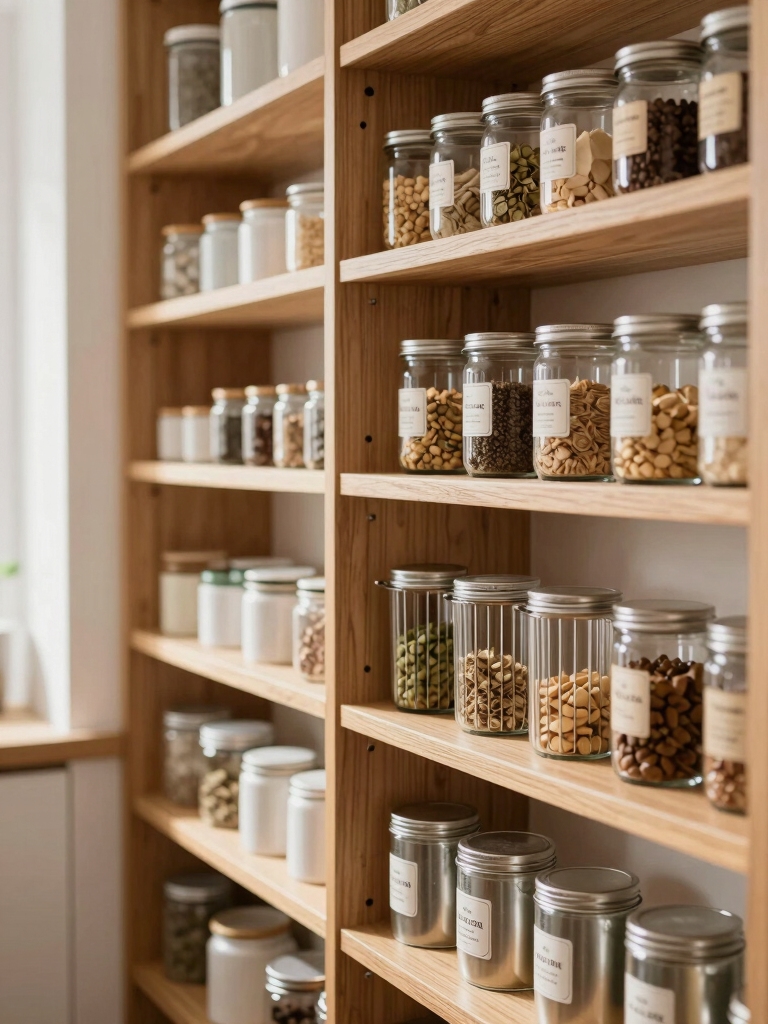
Using Clear Containers and Uniform Labels for Visibility
I’ll start by saying clear containers are a small change that pays off big: they let you spot what you need at a glance and cut down on overbuying.
I use uniform labels and consistent jars to calm the chaos. Imagine this:
- Glass canisters
- Stackable bins
- Chalkboard tags
- Measuring-friendly scoops
It’s tidy, stylish, and truly functional.
Creating Zones for Food Types and Meal Prep
Think of your pantry as a tiny supermarket where I’ve carved out clear, purposeful departments so you don’t have to hunt for dinner.
I assign zones—breakfast, baking, snacks, canned goods, and a meal-prep shelf with chopping tools and frequently used spices.
That small logic saves time, reduces stress, and makes grabbing ingredients feel like second nature rather than a scavenger hunt.
Utilizing Narrow Gaps With Slim Pull-Out Units
I’ll show you how to turn those awkward skinny gaps into real storage winners by measuring every millimeter first so nothing binds or wiggles.
Pick slim pull-out mechanisms that match the gap width and weight you’ll store — soft-close slides for spices, heavier slides for oils and mixers.
Then organize each narrow shelf by function (baking, condiments, snacks) so everything’s easy to grab and nothing gets lost in the cracks.
Measure Gaps Precisely
When you measure those skinny in-between spaces, treat them like precious real estate—I always carry a tape and a feel for millimeters, because slim pull-out units live or die by a few millimeters.
I measure twice, picture the rack, and plan for clearance:
- Tape tight to edge
- Check floor and trim
- Note hinge or molding
- Allow 2–3 mm wiggle
Measure, then smile.
Choose Appropriate Mechanisms
You’ve measured every millimeter and smiled—now pick the hardware that makes that skinny space sing. I opt for slim pull-out units, soft-close runners, and narrow spice racks that slide smoothly without wiggle.
Think sturdy yet sleek: metal frames, full-extension slides, and adjustable shelves. They transform gaps into usable storage, keeping things visible, reachable, and delightfully organized with minimal fuss.
Organize by Function
Since narrow gaps are tiny real estate, I treat each slim pull-out as a dedicated zone — spices in one, baking sheets in another, oils and vinegars in a third — so everything lives where I expect it and I don’t waste time fishing around.
I picture:
- Row of labeled spice jars
- Vertical baking trays
- Oil & vinegar bottles
- Tall snacks and wraps
This keeps cooking calm and efficient.
Selecting the Right Lighting for Deep Cabinets
I often find that deep pantry cabinets swallow light like a black hole, so I focus on practical lighting choices that actually let me see what’s inside.
I prefer slim LED strips along shelves, motion-activated puck lights for corners, and warm daylight tones to keep food looking appetizing.
Proper placement prevents shadows and makes retrieval quick—small upgrades, huge payoff.
Integrating Small Appliance and Bakeware Storage
When I plan pantry storage for small appliances and bakeware, I think about workflow first and aesthetics second — because if I can’t reach the mixer without unpacking half the shelf, the prettiest setup won’t help.
I prioritize accessible zones and labeled spots. Visualize:
- Slide-out shelf for mixer
- Vertical dividers for trays
- Pull-out bin for cords
- Open cubby for toaster
This keeps use joyful.
Maximizing Shelf Depth With Dividers and Bins
Let’s dig into making deep shelves actually useful, not just mystery caverns where things go to hide.
I use narrow dividers to create vertical zones for baking sheets, cutting boards, and trays, then stack labeled bins for snacks, cans, and packets.
Clear, uniform containers keep sightlines clean, sliding baskets pull everything forward, and rhythm replaces chaos—practical, pretty, and instantly reachable.
Optimizing for Grocery Rotation and Expiration Management
We’ll beat the “first in, last out” trap by creating a pantry flow that nudges me—and you—to use older groceries first.
I arrange zones, label dates, and keep grab-and-go snacks fronted. Imagine this:
- Front shelf: ready-to-eat
- Middle: weekly staples
- Back: long-life items
- Top: overflow
Small rituals—scan dates; rotate forward—save money and meals.
Maintaining and Reassessing Pantry Organization Regularly
Regularly, I revisit the pantry like it’s a living room—tidy up, rethink the layout, and ask what’s actually being used versus what’s just taking up space.
I swap seasonal items, realign labels, and test sightlines so frequently used goods live front-and-center.
A quick monthly reset keeps inventory honest, reduces waste, and lets the cabinet breathe—stylish, practical, and invigoratingly low drama.
You’ve now got the tools to squeeze every inch from your pantry—think adjustable shelves, roll-outs, risers and smart bins—and it’s surprising how much more calm and usable space appears.
I’ll keep tweaking mine as needs change; you should too. Start small, swap one shelf or add a tray, and let progress build on itself—before you know it, you’ll be cooking with less fuss and more joy, like finding treasure where you least expected it.


