I start every kitchen by zoning workflow: a tight sink‑stove‑fridge triangle, clear prep and cleanup lanes, and a centered island for staging and seating. I prioritize durable, timeless surfaces, layered task and ambient lighting, strong venting and easy‑reach storage with smart drawers and dividers.
I balance varied counter heights and cozy sightlines so the space feels accessible and lived‑in. Stick with these rules and you’ll find the remodel stays useful, joyful, and surprisingly future‑proof as you explore options.
Prioritize the Work Triangle and Workflow

When I plan a kitchen, I always start with the work triangle—sink, stove, and refrigerator—and map the traffic patterns between them so cooking feels effortless; good workflow saves time and reduces frustration.
I place prep space near the sink, keep clear sightlines, and allow comfortable staging for groceries.
Smart placement of outlets, lighting, and durable surfaces supports joyful, efficient cooking without fuss.
Architects often center an island to optimize circulation and create a multifunctional hub with island placement that supports both cooking and socializing.
Design for Zoned Task Areas

I like to arrange the kitchen into clear zones so the work triangle stays efficient and nothing feels in the way.
I’ll show how a dedicated prep station—complete with cutting board space, nearby tools, and a trash pull-out—speeds cooking and keeps countertops tidy.
Clear traffic paths between zones make the whole room flow, so guests and cooks don’t collide.
Smart kitchen islands can maximize usable space and storage with the right layout, including efficient island layouts that make every inch count.
Work Triangle Efficiency
Because good cooking depends as much on flow as on ingredients, I’ll start by explaining the work triangle and why zoning your kitchen into clear task areas makes things easier, faster, and more enjoyable.
I recommend placing stove, sink, and fridge in a compact, unobstructed triangle, minimizing steps and cross-traffic.
Thoughtful distances and sightlines keep cooking pleasant, efficient, and pleasantly playful.
U-shaped kitchens often benefit from adding an island to expand prep space and improve workflow, especially when the island reinforces zoned task areas.
Dedicated Prep Stations
Having the stove, sink, and fridge arranged in a tidy work triangle makes everything smoother, but carving out dedicated prep stations brings that flow to life.
I create zones for chopping, assembling, and plating with durable surfaces, accessible tools, and task lighting.
You’ll love a small landing for groceries, a butcher-block chopping spot, and a tidy mise en place drawer that keeps cooking joyful and efficient.
Clever kitchen islands often include built-in storage solutions to maximize space and accessibility.
Clear Traffic Paths
By arranging zones so people and tasks never cross paths, I help kitchens feel calm and efficient instead of crowded and chaotic.
I map clear traffic lanes—cooking, prep, cleanup, and casual dining—so movement is intuitive.
Thoughtful placement of islands, walkways, and storage keeps flow uninterrupted, reduces collisions, and makes daily routines smoother, cozy, and a little bit delightfully tidy.
I also design kitchen islands to enhance flow and define zones without disrupting movement.
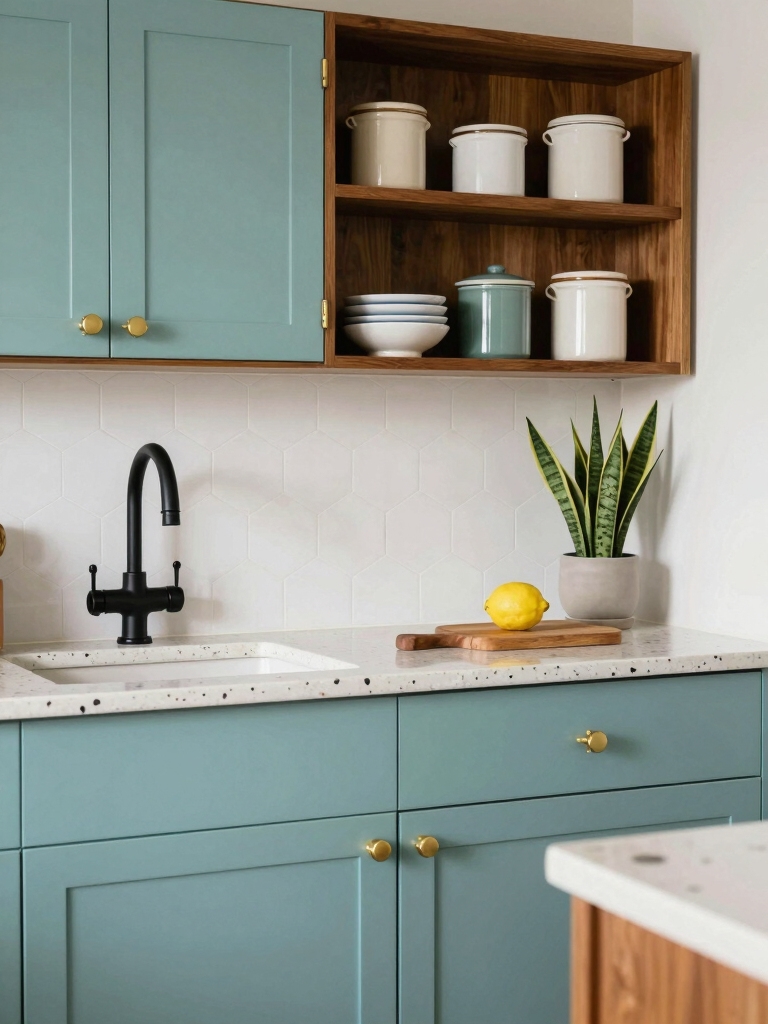
Choose Durable, Timeless Materials

When I’m planning a kitchen that lasts, I pick surfaces that handle daily life—think quartz or honed granite for countertops that age gracefully.
I choose cabinetry finishes that hide wear and can be refreshed, and flooring materials that resist traffic without shouting trends.
Let’s look at enduring countertop options, long‑lasting cabinet finishes, and timeless flooring choices so your kitchen feels thoughtful for years.
Durable countertops are essential for everyday use, and many homeowners prefer materials like quartz because of their everyday durability and low maintenance.
Enduring Countertop Options
I usually start countertop conversations by asking what kind of wear you’ll put them through, because the right surface balances durability, maintenance, and style.
I steer clients toward quartz for low upkeep, honed granite for resilience and character, and stainless or butcher block where function meets warmth.
Pick timeless tones, subtle veining, and finishes that age gracefully so your counters stay useful and lovely.
Marble is also a classic choice that many consider a timeless investment despite requiring more care.
Long-Lasting Cabinetry Finishes
Countertops set the stage, but cabinetry defines how a kitchen lives day to day, so I pick finishes that stand up to hands, spills, and years of style shifts.
I favor materials that age gracefully, resist wear, and stay visually fresh.
- Painted hardwood: repairable, versatile
- Stained oak: warm, durable grain
- Thermofoil or lacquer: low-maintenance sheen
Timeless Flooring Choices
Floors take the most literal daily wear, so I pick materials that’ll keep looking smart for years without demanding constant fuss.
I favor hardwoods with real grain, large-format porcelain that mimics stone, and warm, textured tiles—each resists scratches, moisture, and trends.
I mix neutrals with a single playful pattern near work zones, creating durability that feels collected, not contrived.
Maximize Functional Storage Solutions

Let’s dig into how we can squeeze more usefulness out of every cabinet and corner so your kitchen works as beautifully as it looks.
I prioritize clever drawers, vertical dividers, and hidden pull-outs that keep things visible and joyful.
Small tweaks make daily routines smoother and spaces feel custom, not cramped.
- Deep drawers for pots and lids
- Vertical trays for baking sheets
- Corner pull-out carousels
Layer Lighting for Function and Ambience

When you can open a drawer and instantly find the right pan, the next step is to make every task easier and every meal more inviting through thoughtful light.
I layer bright task lighting over prep zones, softer ambient fixtures for dinners, and playful accent lights to highlight textures.
Dimmers, undercabinet strips, and pendants give control, mood, and a curated, cheerful vibe without fuss.
Plan Countertop Workspace Strategically
I map out countertop zones around how I cook: a landing spot by the stove for hot pans, a chopping station near the sink, and a clear stretch for plating or gathering ingredients.
- Keep frequently used tools within arm’s reach.
- Reserve a clutter-free zone for plating and serving.
- Use durable surfaces where prep is heavy; decorative areas can be lighter.
Balance Open Shelving With Concealed Storage
After mapping countertop zones, I think about how shelving plays into that flow: open shelves make frequently used plates and spices easy to grab at the chopping station, while concealed cabinets hide bulk storage and less-attractive gadgets near the stove.
I balance display and practicality by grouping pretty items where I cook and reserving drawers and tall cupboards for overflow, keeping the kitchen calm and efficient.
Select Appliances for Capacity and Fit
I’ll size appliances to the way you actually cook, not just to how kitchens in magazines look. I pick ovens, fridges, and dishwashers by capacity, clearance, and workflow, so tools feel effortless.
- Match oven size to meal habits and cookware.
- Choose fridge layout for your shopping rhythm.
- Confirm dishwasher fit and door swing for tight spaces.
Optimize Sightlines and Visual Flow
Picking the right appliances is about how you move and work in the kitchen, and the same care should shape what you see when you step in.
I aim sightlines toward a focal point—window, artwork, or range hood—keep clutter concealed, and balance heights so vistas feel open.
Subtle contrasts and repeat materials guide the eye, making movement intuitive and the room quietly joyful.
Integrate Seating That Works for the Family
I think seating should feel like it was made for your people, so I recommend right-height counters that let everyone sit and stand comfortably.
I also like mixing flexible zones—a banquette for homework, stools for quick breakfasts—so the room adapts to your day.
Choose durable, easy-clean materials so those welcoming spots stay beautiful without constant fuss.
Right-Height Counters
When I’m planning counter heights, I always start with who’ll use them most — kids, tall adults, or a mix — because the right level turns a counter from awkward to inviting.
I pick heights that support cooking, homework, and casual meals, then choose stools and finishes to match.
- Standard prep height for cooks
- Lowered edge for kids
- Raised bar for perching adults
Flexible Seating Zones
A few thoughtful seating zones can change how your family uses the kitchen, so I design spots that adapt to cooking, homework, and hanging out.
I mix banquettes, counter stools, and a cozy corner chair so people move naturally. Each spot has purpose: quick breakfasts, focused homework, or relaxed chats.
I balance scale and sightlines so flow feels effortless and welcoming.
Durable, Easy-Clean Materials
While those seating zones invite people to linger, they only work if the materials stand up to real family life — spills, sticky hands, and the occasional craft-project catastrophe.
I choose surfaces and upholstery that clean easily, feel cozy, and still look collected.
- Vinyl or performance fabric for kids and pets
- Sealed wood or laminate table edges
- Removable, washable cushions
Consider Accessible and Universal Design Features
Because accessibility doesn’t mean giving up style, I make design choices that welcome everyone into the kitchen while keeping the space beautiful and functional.
I include varied counter heights, easy-grip hardware, clear sightlines, and adjustable shelving so people of different abilities move confidently.
Subtle cues, softer task lighting, and non-slip flooring blend practicality with charm, making the kitchen usable, safe, and delightfully personal.
Coordinate Finishes for Cohesion and Contrast
I like to layer finishes so the kitchen feels intentional rather than thrown together, balancing cohesion with sparks of contrast that catch the eye.
I pick a dominant metal, a secondary wood tone, and one playful accent to unify surfaces without monotony.
- Matte black fixtures with warm brass highlights
- Oak open shelving against painted cabinetry
- Textured backsplash as the accent focal point
Incorporate Ventilation and Indoor Air Quality
I want your kitchen to feel as good as it looks, so we’ll plan the range hood placement to capture steam and smoke right at the source.
We’ll also think about fresh-air make-up so your space stays balanced and doesn’t go stale, and consider air-cleaning systems for pets, cooking smells, and lingering particulates.
Small choices here make a big difference in comfort and health, so we’ll pick practical, efficient solutions that suit your style.
Range Hood Placement
When you cook frequently, I insist on placing the range hood where it can capture steam, smoke, and odors before they spread through the house.
I prefer practical placement centered over the cooktop, high enough to clear sightlines but low enough to grab fumes.
Consider:
- Direct above the burner, vented outside.
- Proper capture width beyond edge of stove.
- Quiet, adequately powered fan for real use.
Fresh-Air Make-Up
After we’ve got the hood pulling cooking fumes effectively, we need to think about where the replacement air will come from so the house doesn’t go into negative pressure.
I balance fresh-air intakes, trickle vents, and controlled mechanical make-up to keep smells and humidity moving out without drafts.
It’s about gentle exchange, sensible placement, and keeping the kitchen comfortable and airy during lively cooking.
Air-Cleaning Systems
Often I start with the simplest question: what air do you want circulating in your kitchen, and what do you want removed?
I recommend pairing strong range hoods with filtered recirculation for tight homes, adding localized purifiers, and designing intake paths that prevent drafts.
Consider these quick options:
- High-efficiency ducted hood
- HEPA/activated-carbon purifier
- Controlled fresh-air inlet with dampers
Allow Flexibility for Future Needs
Because I want your kitchen to work for years, I design with flexibility in mind: adjustable shelving, modular islands, and wiring placed for future appliances let you adapt without a full overhaul.
I choose durable finishes, movable lighting, and multipurpose zones so your space can shift with lifestyle changes.
Small decisions now save disruption later and keep your kitchen feeling curated, playful, and practical.
Budget Realistically for Long-Term Value
While I love clever DIY hacks, I also factor costs toward long-term value so your remodel won’t feel outdated or fall apart a few years in, and that means prioritizing investments that earn back comfort, durability, and resale appeal.
- Choose durable finishes that age gracefully.
- Invest in smart lighting and efficient appliances.
- Allocate contingency for unexpected structure or code issues.
I’ve laid out principles that let your kitchen sing — practical, pretty, and built to last. Think of the room as a well-rehearsed orchestra where the work triangle conducts workflow, storage keeps rhythm, and layered light sets the mood.
Choose durable materials, coordinate finishes, and plan for air quality and future needs so your space stays useful and lovely. Budget for long-term value, and you’ll cook, gather, and live with joy.