

I turned an old dresser into a kitchen island and you can, too — I picked a solid-frame piece, measured my kitchen flow, reinforced the top with hardwood rails, and swapped drawers for open shelving where needed.
I added locking casters, wired a GFCI outlet, and sealed surfaces for sink use. It’s great for prep, storage, and style, and I’ll show how to pick materials, prep the dresser, add plumbing and lighting so you can follow along.
Choosing the Right Dresser for Your Island Project
When I pick a dresser for a kitchen island project, I look beyond just its looks—I’m thinking size, structure, and how it’ll handle daily use.
I favor solid construction, sturdy drawer glides, and a stable base. Vintage pieces can be charming if sound; avoid warped frames or weak joinery.
Think about material, drawer depth, and how easy it’ll be to refinish. I also consider clever storage solutions like repurposed dressers with built-in clever kitchen island storage to maximize functionality.
Measuring and Planning the Layout
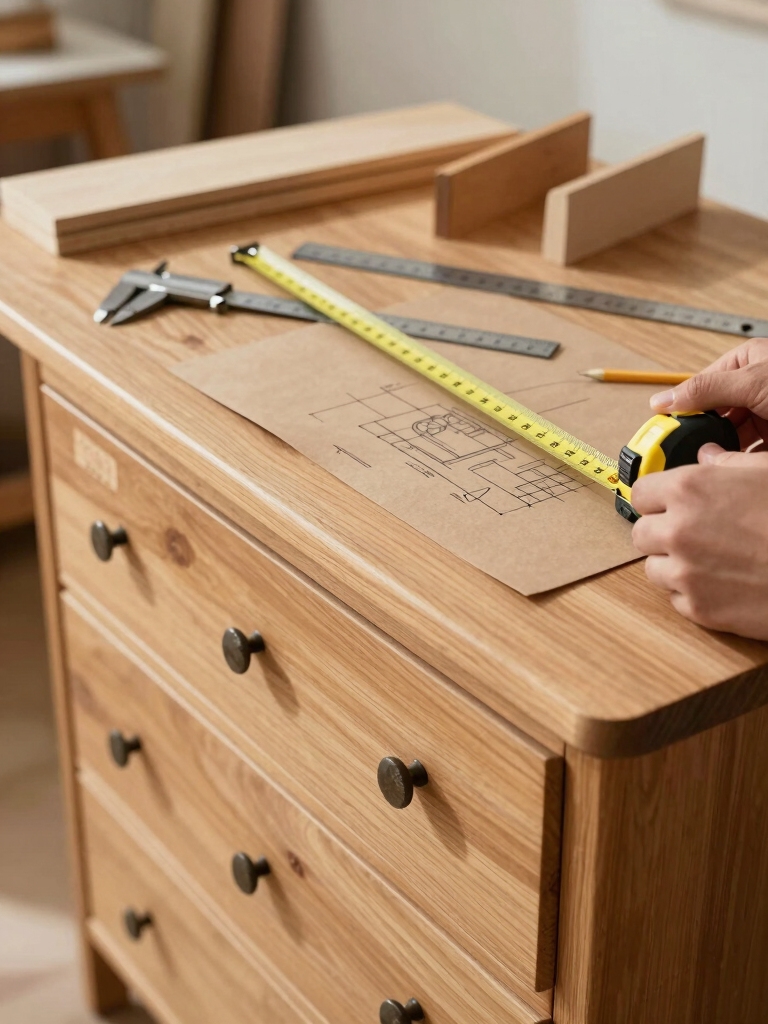
Because a good layout prevents surprises down the line, I always start measuring with a clear plan: sketch the kitchen footprint, note walkways and appliance locations, and record ceiling height and counter heights you want for the island.
I measure twice, imagine traffic flow, then finalize placement. Consider practical spacing:
- Clearance around island
- Sightlines to appliances
- Door swing and drawer access
- Work triangle balance
A well-sized island that complements a small kitchen can maximize usable space and functionality.
Tools and Materials You’ll Need
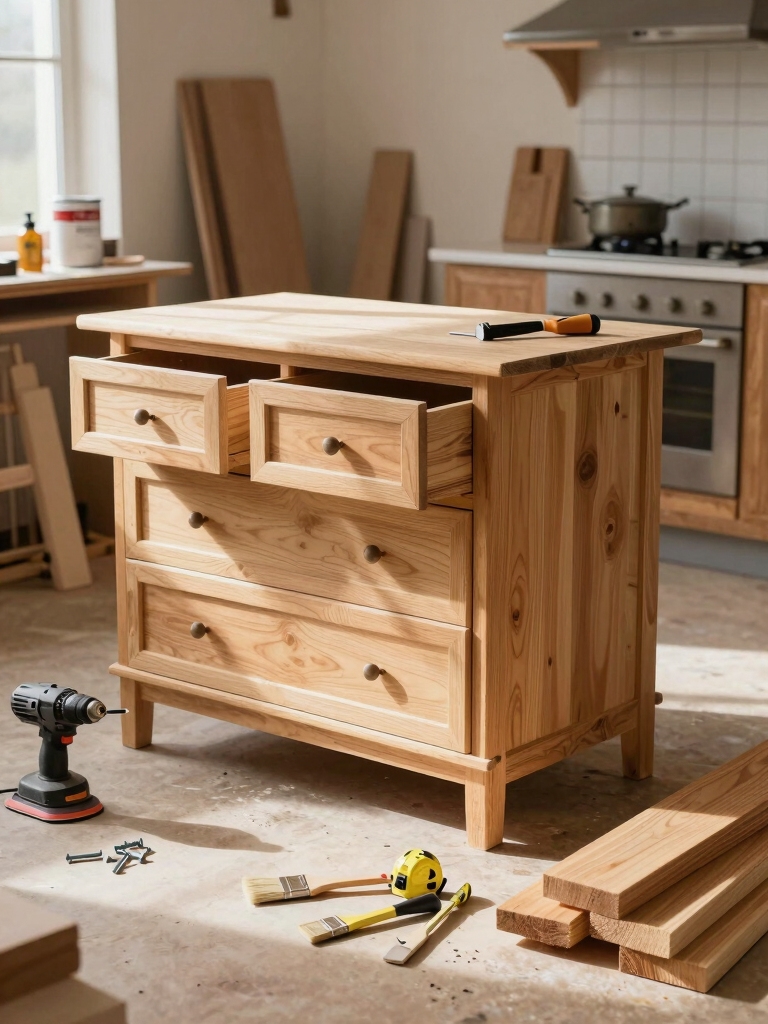
If I’m going to turn an old dresser into a functional kitchen island, I make sure I’ve got the right tools and quality materials before cutting a single board—having a clear kit saves time and keeps the build solid.
I gather a drill, sander, circular saw, clamps, level, screws, wood glue, primer, paint, protective top (butcher block or quartz), and hardware—simple, durable, stylish.
Many of these projects can be completed on a budget with proper planning and sourcing of materials, especially when aiming for options that typically cost under $500 like budget-friendly builds.
Prepping the Dresser: Cleaning and Repairs

I start by giving the dresser a good once‑over: dusting, vacuuming drawers and crevices, and wiping down surfaces with a mild degreaser so I can see the true condition of the wood and finish.
Then I tackle repairs—tighten joints, glue splits, sand scratches, and treat stains. I follow a simple repair checklist:
- Inspect for loose joints
- Clean stubborn grime
- Sand damaged spots
- Fill and seal imperfections
Weekend projects often focus on quick, high-impact updates like paint and hardware changes to achieve an impressive result with minimal time commitment, especially for kitchen cabinet makeovers.
Removing or Modifying Drawers and Hardware
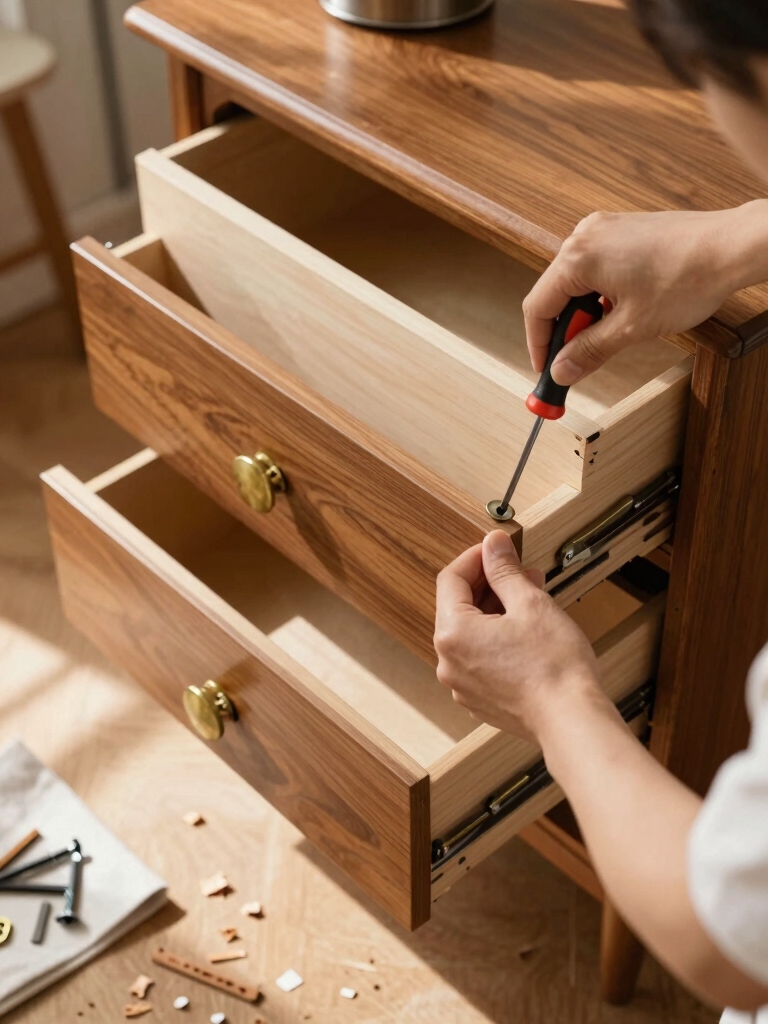
Now that the dresser’s clean and sound, I’ll start removing or modifying the drawers and hardware to reshape its function and look. I unlatch runners, label pieces, and slide drawers free.
Some become open shelves, others get shallow liners for utensils. I swap dated knobs for sleek pulls, fill unwanted holes, and sand edges. The result is practical, polished, and ready for styling.
Beginner-friendly projects like these are perfect for those tackling DIY kitchen cabinet makeovers for the first time.
Reinforcing the Frame for Countertop Support
Now that the drawers are sorted, I’ll show how to make the dresser frame stout enough for a heavy countertop.
Start by adding internal support rails across the top and mid-span, and then reinforce the drawer-to-frame connections so they carry load instead of just holding boxes.
With a few well-placed screws, glue and corner brackets, the island will be steady and ready for a stone or butcher block top.
A budget-friendly approach often uses simple materials and techniques to achieve a sturdy small island without overspending.
Add Internal Support Rails
Let’s reinforce the frame by adding internal support rails that carry the countertop’s weight and keep everything square; I’ll show you how to position and secure them so the island feels solid under heavy use.
I cut and fit oak rails, screwed them to the dresser sides, and added blocking at seams for stability.
- Measure span
- Choose hardwood
- Use glue + screws
- Check level and square
Finishes like oil and wax develop a patina and can help protect the rails over time, especially when you use hardwood finishes that age well.
Reinforce Drawer-to-Frame Connections
With the internal rails in place to carry the countertop, I also reinforce how each drawer ties into the frame so the whole island acts like one stiff unit rather than a stack of parts.
I add corner blocks, glue, and long screws into hidden studs, shim for perfect alignment, and test each drawer under load so the countertop feels solid and stays flat for years.
Adding or Building Open Shelving
I like to open up a dresser-turned-kitchen island by adding open shelving because it instantly lightens the piece and gives you usable display and storage space.
I strip drawers I won’t need, add stained pine shelves, and secure them with cleats for strength. Open shelves show curated dishes and keep essentials accessible.
- Visual lightness
- Practical access
- Personalized styling
- Structural simplicity
Installing Casters or Leveling Legs
Now that the shelving’s in, I’ll talk about making the island mobile or perfectly level.
We’ll weigh caster options—locking vs. non-locking, rubber vs. hard wheels—and how each affects stability and floor protection.
Then I’ll show how to fit adjustable leveling legs so your dresser island sits stable on any surface.
Choosing Caster Types
Let’s talk about casters versus leveling legs so you can decide which fits your dresser-turned-kitchen island best.
I’ll walk you through practical choices: size, material, locking, and floor protection so your island looks great and moves or stays put as needed.
- Wheel diameter
- Material (rubber/nylon)
- Locking mechanism
- Floor-friendly base
Installing Adjustable Legs
After weighing caster options and floor protection, I’ll show you how to install adjustable legs so your dresser island sits level and performs the way you want—mobile when needed, rock-steady otherwise.
I mark mounting points, pre-drill, and screw in threaded inserts or mounting plates.
Then I fit adjustable feet, level with a bubble, and lock them. Quick, tidy, and reversible.
Selecting and Installing a Countertop
I’ll walk you through picking a countertop that matches your dresser-turned-island and fits how you’ll actually use the space. I’ll help you choose material, measure precisely, secure overhangs, and fasten safely without fuss.
Consider weight, maintenance, and style so the piece feels intentional and functions well.
- Weight limits
- Edge profile
- Overhang depth
- Attachment method
Painting, Staining, and Finishing Techniques
When I refinish a dresser-turned-island, I think about the look I want, how tough the surface needs to be, and how much time I’m willing to spend—those priorities guide whether I paint, stain, or apply a protective finish.
I prep thoroughly, choose paint or stain for mood, seal with poly or oil for durability, and sand between coats for a smooth, lasting result.
Adding Functional Features: Hooks, Racks, and Rails
For extra everyday usefulness, I like to add hooks, racks, and rails to a dresser-turned-island so the piece works as hard as it looks.
I mount towel rails, pot racks, utensil hooks, and wine glass holders to keep tools reachable and surfaces clear.
Thoughtful placement balances function and style, turning storage into intentional design.
- Towel rails
- Pot racks
- Utensil hooks
- Wine glass holders
Installing Electrical Outlets and Lighting
Now we’re talking electricity: I’ll help you map where outlets and lights will work best for prep, appliances, and ambience.
I’ll also cover safe wiring practices and when to call an electrician so your island looks great and meets code.
Let’s plan power placement that’s both practical and stylish.
Planning Power Placement
Because I want your dresser-turned-island to be as useful as it’s beautiful, we need to map out where power and lighting will go before we build or move anything.
I’ll help you consider function, flow, and aesthetics so outlets and lights serve cooking, charging, and ambiance.
- Countertop appliance locations
- Charging and USB needs
- Task lighting zones
- Switch and dimmer placement
Safe Wiring Practices
I always start wiring with safety and local code front of mind, and I’ll walk you through the basics so your dresser-turned-island gets reliable, code-compliant power and lighting.
I measure circuits, choose GFCI outlets, route cables in conduit or flex, secure connections in junction boxes, and mount lighting with rated fixtures.
When unsure, I call an electrician—no shortcuts on safety.
Creating a Sink-Ready Dresser Island
With a few careful cuts and a steady plan, I’ll show you how to turn a sturdy dresser into a sink-ready kitchen island that looks custom-built.
I walk you through measuring for a basin, reinforcing the frame, routing plumbing access, and sealing surfaces so it’s durable and safe.
- Measure precisely
- Reinforce structure
- Plan plumbing path
- Waterproof finishes
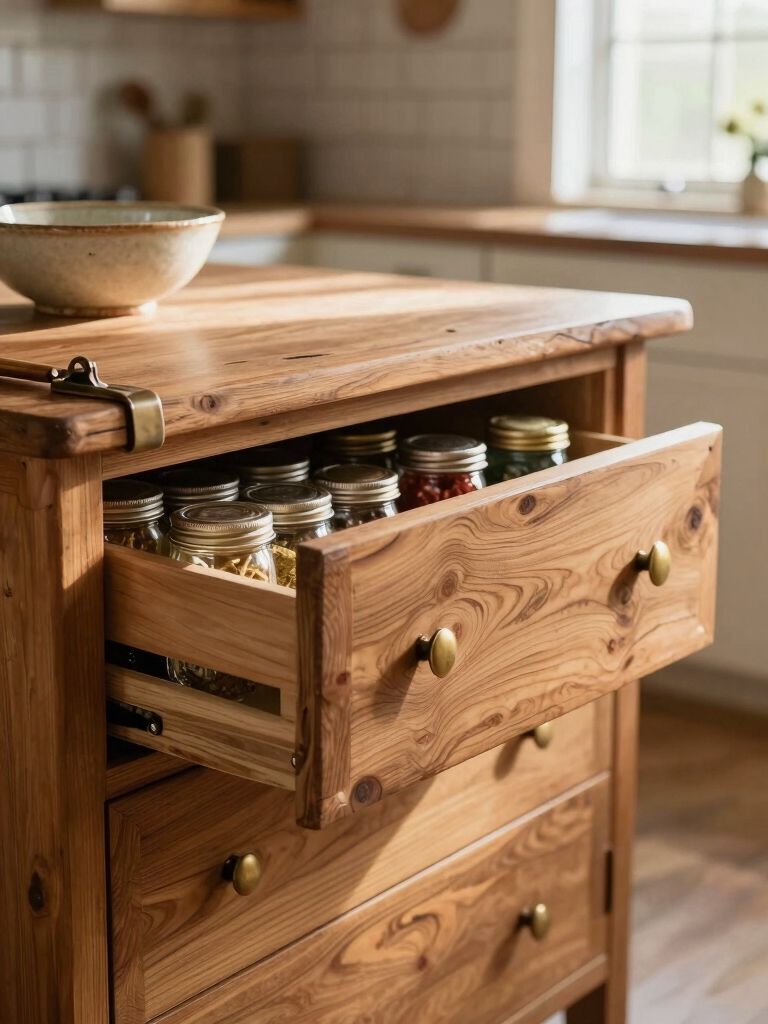
Styling and Storing: Organizing Drawers and Shelves
I love using smart drawer dividers to keep utensils and tools neatly separated so everything’s easy to find.
Open shelving lets me display everyday dishes and keep frequently used items within arm’s reach.
Let’s walk through simple divider ideas and styling tips to make your dresser island both beautiful and highly functional.
Smart Drawer Dividers
Although a dresser-turned-kitchen island already boosts surface space, I’m finding that smart drawer dividers make the real difference between clutter and calm; they let me customize each drawer for utensils, linens, or gadgets so everything’s easy to find.
- Measure and plan by use.
- Mix fixed and adjustable sections.
- Use durable, washable materials.
- Label zones for quick resets—small choices, big impact.
Accessible Open Shelving
Smart drawer dividers keep small things in their place, but open shelving gives you the freedom to style everyday items so they work as storage and decor at once.
I arrange frequently used plates, baskets, and cookbooks within arm’s reach, mixing textures and colors for balance.
Labels and consistent containers keep clutter low while still letting the island feel airy and accessible.
Tips for Moving and Securing Your Finished Island
Once you’ve finished the dresser island, I’ll walk you through moving it safely and locking it down so it stays put—without scratching floors or tearing up baseboards.
I’ll explain lifting, wheels, and anchors so you can enjoy a stable, stylish centerpiece.
- Use furniture sliders and a helper.
- Install locking casters.
- Anchor to studs with brackets.
- Add felt pads for protection.
You’ve turned a simple dresser into a striking kitchen island by choosing wisely, measuring carefully, and prepping thoroughly; by repairing thoughtfully, modifying boldly, and wiring safely; by cutting for a sink, sealing for spills, and styling for life.
You’ve organized drawers for function, added lighting for mood, and anchored the piece for safety. Take it slow, enjoy the process, and show off the result — practical, personal, and utterly yours.


