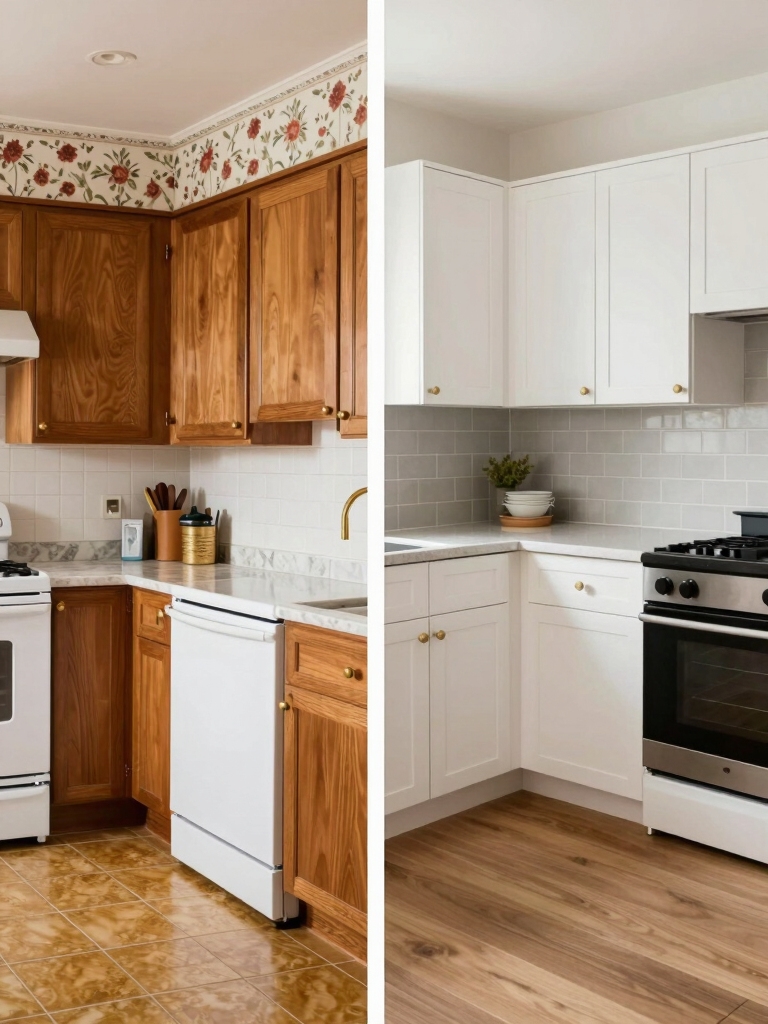
I’ll show you how to make an old kitchen feel collected and high-end without gutting it or overspending: I start by keeping solid bones, refacing or painting cabinets with careful sanding and new pulls, swapping faucets and lighting, and using butcher block or engineered laminate counters and peel‑and‑stick backsplashes for texture.
I add under‑cabinet task lights, thrifted accents, smart storage pulls, and time projects off‑season to save. Stick with durable splurges and smart saves and you’ll want the rest of my plan.
Assess What’s Worth Keeping First

Before you swing a hammer, I always start by walking the room slowly and asking, “What do I actually need to replace?”
Take cabinets, countertops, appliances, and even trim one at a time—look for structural problems, functional failures, or finishes that truly date the space.
I keep solid bones, refresh hardware, and upgrade only what’s inefficient, saving money while shaping a cohesive, eclectic look.
Consider updating surfaces beyond paint by exploring cabinet treatments like refacing or resurfacing that preserve structure while giving a fresh look with transform your cabinets to avoid full replacements.
Paint Tricks That Fake a Full Remodel

I’ll show you how a fresh coat on your cabinets can make the whole kitchen read like a remodel without the price tag.
With simple techniques—careful sanding, the right primer, and a quality semi-gloss—you’ll get crisp, durable results that feel custom.
Then we’ll add faux trim details to create depth and style, turning plain fronts into something that looks built-in and intentional.
Weekend projects can transform your space quickly when you focus on smart, high-impact updates like cabinet painting and faux trim.
Paint the Cabinets Right
I usually start cabinet painting as if I’m staging a small theater set—every detail matters because people notice the finish more than the hardware—and you can fake a full remodel with the right paint tricks.
I sand, prime, and choose a durable satin in a curated color.
Thin, even coats, light sanding between layers, and attention to edges yield a boutique, lived-in look without replacing cupboards.
I recommend beginner-friendly projects like simple cabinet updates to build skills and confidence while keeping costs low, since DIY Kitchen Cabinets are surprisingly approachable for novices.
Add Faux Trim Details
When you want big impact without tearing anything out, I add faux trim—simple shadow lines, applied rails, or beadboard strips—that read like custom millwork once they’re painted, and they cost a fraction of new cabinetry.
I measure, cut lightweight moulding, and glue or brad-nail it to doors and islands. A coat of paint, subtle glaze, and new pulls turn tired fronts into curated, cohesive focal points.
I often keep projects under $500 by using budget-friendly materials and techniques like cost-effective moulding to maximize impact without overspending.
Cabinet Facelift Options That Cost Less Than New Units

Start by picturing your kitchen without the sticker shock of all-new cabinets—I’ve learned a few tricks that let you refresh doors, drawers, and hardware for a fraction of the cost.
I’ll paint or refinish cabinet faces, swap doors for open shelves, add trim or new knobs, and reglaze or refinish worn surfaces.
Small changes create layered, collected charm without breaking the bank.
A freshly painted update can transform your kitchen with surprisingly dramatic results.
Affordable Countertop Alternatives That Look High-End

Often I’ll choose alternatives that mimic luxe materials without the price tag, because you can get a high-end look through smart choices and good installation.
I favor butcher block, engineered quartz-look laminate, and honed concrete overlays for warmth and durability.
Mixing textures—matte metal trim, patterned tile backsplashes—makes the counters feel custom.
Careful edging and proper sealing sell the illusion.
You can also build a functional centerpiece by repurposing cabinets or creating a Budget-Friendly homemade kitchen island to keep costs well under $500.
Strategic Lighting Upgrades for Instant Impact

I’m a big believer that the right lights transform an old kitchen without a big budget.
Start with a layered plan—ambient, task, and accent—then add under-cabinet task lights to make food prep safer and more polished.
Finish with dimmer switches everywhere so you can shift mood and save energy on the fly.
Island lighting often becomes the room’s main character, so consider pendant or statement fixtures to highlight a kitchen island and draw the eye.
Layered Lighting Plan
While reworking your old kitchen, I’ll show you how a layered lighting plan can change the whole space without a major overhaul.
I mix ambient ceiling fixtures, a focal pendant over the table, and subtle toe-kick or shelf accenting to add depth.
The result feels curated and cozy, practical yet stylish, and it transforms mood and function without ripping anything out.
Under-Cabinet Task Lights
I always reach for under-cabinet task lights first when I want instant, practical impact in an old kitchen without tearing anything apart. They wash counters with clear, usable light, hide behind trim, and cost little.
I prefer warm LEDs on dimmable drivers (easy to retrofit) and mix puck and strip styles for eclectic charm. Installation’s quick; style and function improve overnight.
Dimmer Switches Everywhere
Usually I reach for dimmer switches next, because swapping a single wall plate can change a room’s mood, save energy, and make your old kitchen feel thoughtfully updated without tearing anything out.
I’ll mix warm and bright settings for prep, dining, and ambiance, choosing tactile knobs or sleek sliders that suit your eclectic style—small, affordable swaps that read intentional and lift daily life.
Smart Appliance Swaps and When to Buy Used
Let’s swap in smarter appliances without blowing the budget: I’ll show you which pieces to buy new, which you can confidently buy used, and where a small compromise gives the biggest payoff.
I favor buying new for ranges and fridges with warranties, used for solid-condition mixers, vintage sinks, or sealed small appliances.
Prioritize energy efficiency, test functionality, and embrace eclectic finds for character.
Budget-Friendly Backsplash Ideas That Pop
I love swapping a tired backsplash for something that actually makes the room sing without breaking the bank, and there are a few tricks I always reach for.
Peel-and-stick tiles give instant pattern and shine, painted-pattern backsplashes let you customize color and motif, and a strip of reclaimed wood or tile can add soulful texture as an accent.
Let me show you how to pick the right option for your style and skill level.
Peel-And-Stick Tiles
Peel-and-stick tiles breathe new life into a tired backsplash without busting your budget, and I’ve found they’re one of the fastest ways to make a kitchen feel intentional.
I pick patterns that mix modern and vintage, trim edges carefully, and use a level for crisp lines.
They’re forgiving, removable, and let me experiment with texture and color without committing long-term.
Painted-Pattern Backsplashes
If you like the quick wins of peel-and-stick tiles but want something even more personal, painted-pattern backsplashes are a low-cost way to make the wall feel custom without replacing anything.
I’ll walk you through simple stencils, bold color choices, and easy sealants.
- Stencil basics
- Color contrast tips
- Durable topcoat steps
Reclaimed Materials Accent
Although salvaging scraps might sound like a weekend hobby, I’ve found reclaimed materials can transform a tired backsplash into a focal point without blowing the budget.
I mix weathered wood, thrifted tiles, and metal offcuts for eclectic texture.
You’ll get character by arranging pieces thoughtfully, sealing for cleaning, and keeping grout simple—practical, curated, and delightfully budget-friendly.
Hardware and Fixture Upgrades That Transform Style
Swap the small details and you’ll be amazed how quickly your kitchen feels new: I’ve found that changing cabinet hardware, faucets, and light fixtures gives the room an instant style upgrade without a gut renovation.
I pick pieces that mix eras, then:
- Replace pulls for cohesive contrast.
- Swap a faucet for function and flair.
- Update lighting to layer mood and task.
Flooring Choices That Balance Cost and Durability
After upgrading hardware and fixtures, I start looking at the floor because it anchors the whole room and affects both look and longevity.
I favor luxury vinyl plank for budget-friendly water resistance and easy install, or porcelain tile where durability matters.
Prefinished hardwood works if you find deals.
Choose neutral tones, mixed textures, and practical maintenance to keep style cohesive without breaking the bank.
Thrifted and Salvage Finds That Add Character
I love hunting through thrift stores and salvage yards because you can uncover pieces that instantly give a kitchen personality without blowing your budget.
I salvage practical charm: a reclaimed butcher block as an island, mismatched vintage knobs, and open shelving from old cabinets.
Try these:
- Farmhouse sink or repurposed basin
- Vintage lighting fixtures
- Mixed brass/ceramic knobs and pulls
Layout Changes You Can Do Without a Contractor
I’ve learned you can make meaningful layout changes without hiring a contractor if you plan carefully and respect safety.
You can move appliances safely by checking electrical and plumbing needs and using proper disconnects, and small non-structural walls can be rerouted or removed with basic tools and a stud finder.
Let me walk you through practical steps so your budget remodel feels intentional and sturdy.
Move Appliances Safely
You can shift a lot of appliance placement without calling in a contractor, and I’ll walk you through the safe, practical steps I’ve used to do it. I’ll keep it tidy, stylish, and doable.
- Unplug, shut off valves, measure clearances.
- Use appliance sliders, get help for heavy lifts.
- Reconnect, test, secure against tipping.
Reroute Non-Structural Walls
If a wall isn’t bearing weight, you can reroute it yourself and reshape the room without tearing the house apart.
I’ve moved short partitions, kept wiring tidy, and used lightweight frames to shift traffic flow.
Measure, mark plumbing/electrical, and use metal studs or pocket walls for flexibility.
It’s budget-friendly, stylish, and transforms function without calling in heavy demolition or contractors.
Seasonal Timing and Negotiation Tactics to Save Big
Because contractors and suppliers slow down after peak seasons, I plan my remodel around those quieter months so I can negotiate better rates and get faster start dates.
I’ll share quick tactics:
- Ask for off-season discounts and flexible scheduling.
- Bundle tasks to reduce labor days.
- Get multiple bids and play them gently against each other.
This approach saves money and time without cutting quality.
DIY Prep and Finish Techniques Pros Use
After lining up better rates and a flexible schedule, I switch gears to the hands-on prep and finishing tricks that pros use to get a polished look without hiring out every step.
I sand smart, fill seams carefully, prime for longevity, and choose paints with forgiving dries. I tape clean edges, use quality brushes for trim, and inspect light angles so surfaces read crisp and intentional.
Small Storage Solutions That Maximize Function
I lean into clever little fixes that make every inch count, because in an old kitchen you can’t waste real estate.
I install narrow pull-outs, tiered lazy Susans, and magnetic strips to tame clutter while keeping things stylish.
Try these:
- Slim pantry pull-out for spices.
- Corner lazy Susan for pots.
- Magnetic knife and tool rail for vertical storage.
Where to Splurge and Where to Save
When you’re working with an old kitchen, I focus my splurges where they’ll last and save on the things that wear out or can be cleverly disguised.
I invest in a durable countertop, reliable plumbing, and timeless lighting, then save with paint, hardware swaps, and open shelving.
Mixing thrifted accents with a few quality anchors creates a curated, practical space that feels expensive without breaking the bank.
Funny how the kitchen I almost tore out became my favorite room—because I learned to look twice. Keep what’s solid, fake what’s pricey, and splurge where it counts; the tricks I shared saved me cash and a ton of regret.
You’ll patch, paint, and prime like a pro, snag bargains in the right season, and still end up with a kitchen that feels collected, practical, and unapologetically yours—cozy proof less can be plenty.