

I’ve seen every cabinet-painting mistake, so here’s what to avoid: clean and degloss thoroughly, remove and label doors and hardware, sand well (and between coats), seal edges, and pick a primer that matches your topcoat and substrate.
Use cabinet-grade paint, thin even coats, quality brushes or sprayer, and let everything fully cure before rehanging. Protect counters and floors, wear a respirator, and test colors in your light — keep going and I’ll walk you through the exact steps.
Skipping Proper Surface Cleaning

I always start by cleaning every surface because paint won’t stick to grease, dust, or old finish, and skipping this step is the quickest way to ruin your work.
I use degreaser, a scuff pad, and tack cloths, working methodically so primer and paint bond.
Clean surfaces save time, prevent peeling, and give crisp edges—trust me, prep beats touch-ups every time.
Professionals also recommend using proper sanding to ensure the primer adheres evenly and creates a smooth final finish.
Failing to Remove and Label Doors and Hardware
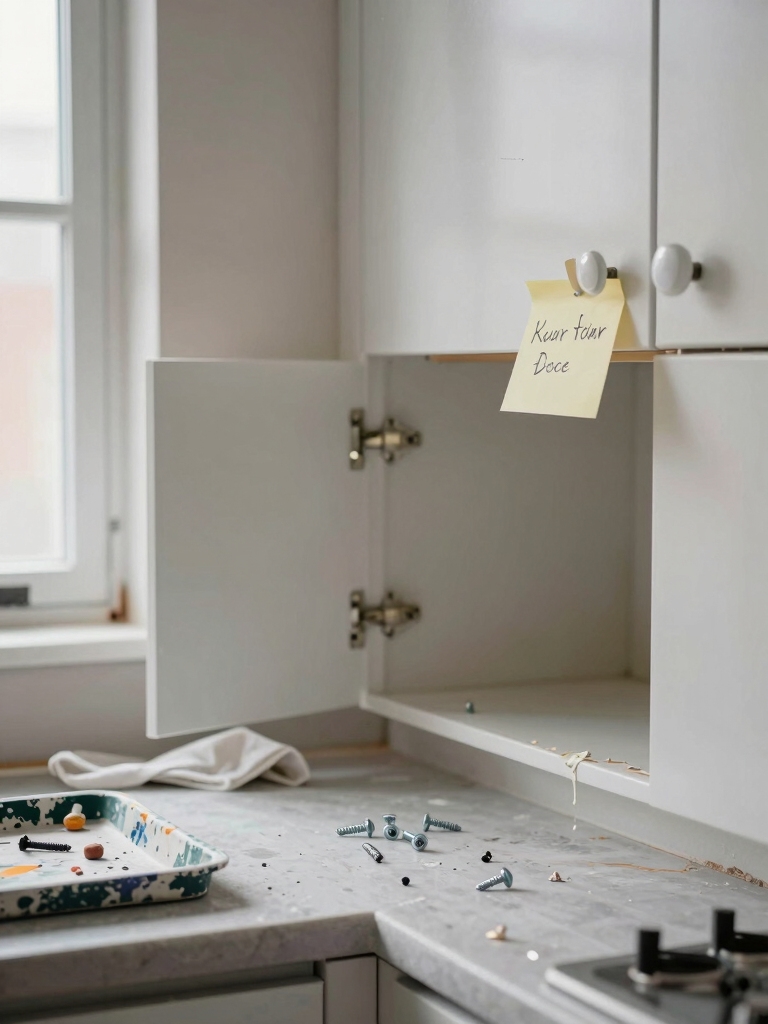
Once the cabinets are clean and prepped, don’t skip removing doors and hardware—it’s a small step that saves a lot of headaches.
I always label parts so reassembly is painless.
My quick checklist:
- Remove hinges and knobs carefully
- Label each door (A1, A2, etc.)
- Bag matching screws together
- Photograph layout for reference
- Store pieces safely while painting
For some surfaces you can use adhesion primers or bonding agents to skip sanding entirely when prepping cabinets.
Neglecting to Sand Thoroughly

I learned the hard way that skimping on sanding leaves a rough surface that makes even the nicest paint look amateurish.
If the grain and old finish aren’t properly smoothed, the new paint won’t stick evenly and you’ll get peeling or uneven wear sooner than you’d expect.
Take the time to sand right and you’ll save touch-ups and headaches down the road.
Freshly painted cabinets can truly transform your kitchen and make the whole space feel updated.
Rough Surface Issues
Even if the paint looks promising at first glance, I’ll tell you why skipping thorough sanding is the quickest way to ruin a smooth, durable finish: painted cabinets need a properly roughed and clean surface to bond to, and any gloss, old finish, or uneven spots will show through or cause peeling later.
- I sand to remove gloss.
- I level drips and bumps.
- I degloss cabinets.
- I clean dust fully.
- I test with primer.
Begin with simple, beginner-friendly steps like removing hardware and labeling doors to make the project manageable for total beginners.
Paint Adhesion Problems
Skip sanding and you’re inviting trouble: paint won’t properly grab onto a glossy or uneven surface, and I’ll end up with peeling edges, visible brush marks, or short-lived results.
I always sand lightly, clean dust, and use a deglosser when needed. That simple prep creates a smooth bite for primer and paint, giving my cabinets a durable, professional finish that actually lasts.
For inexpensive updates, consider budget-friendly cabinet techniques from Kitchen Cabinets Makeover Transformations Under $500 to stretch your renovation dollars further.
Choosing the Wrong Type of Paint

When it comes to paint, I’ve seen people grab whatever’s on sale and regret it later—oil and water-based formulas behave very differently on cabinets.
I’ll walk you through when oil is worth the smoother, tougher finish and when water-based paints make cleanup and color retention easier.
And we’ll talk about sheen choices too, since satin vs. gloss changes durability and how much every little ding shows.
Weekend projects can transform your space quickly, especially with simple cabinet updates like DIY Kitchen Cabinet Makeovers that deliver big impact.
Oil vs. Water-Based
I’ve learned the hard way that picking oil or water-based paint isn’t just a matter of preference—it changes how the finish looks, how long it lasts, and how much prep you’ll need.
I usually weigh pros and cons:
- Oil: durable, smooth leveling
- Water: low odor, quick dry
- Prep differs
- Cleanup ease varies
- Compatibility with primers matters
Stunning painted cabinet transformations can really shock homeowners when the right paint choice brings out the finish.
Finish Matters
Because the sheen you choose affects both the look and durability of your cabinets, I always start by picturing how the room will be used and lit.
High-gloss hides less but cleans easily; satin balances sheen and forgiveness; matte feels modern but shows stains.
Match finish to traffic, cleaning needs, and style.
Pick a tough, cabinet-specific enamel for lasting results.
Using Inappropriate Primer

Choose the wrong primer and you’ll undo hours of careful prep and paintwork. I learned to match primer to substrate and topcoat—no guessing. I want you to avoid adhesion failures and blotchy finishes.
- Oil primer for tannin bleed
- Shellac for stubborn stains
- Bonding primer for slick laminates
- Latex for raw wood
- Stain-blocking for knotty pine
Ignoring Proper Ventilation and Safety
If you skimp on ventilation, you’ll pay for it with headaches, lingering odors, and a higher risk of breathing in harmful fumes—so I always set up airflow before I even open a can of paint.
I wear a respirator, goggles, and gloves, prop windows, and run a fan out the door. Safety isn’t glamour, but it preserves your health and your clean finish.
Rushing Between Coats
I know the urge to hurry through coats when you’re excited to see the finished cabinets, but wet paint can tack, attract dust, and cause visible streaks.
If you don’t let each layer fully cure you’ll end up with an uneven finish and areas that look patchy. Worse, shortcuts now mean chips and peeling down the road, so patience pays off for a durable result.
Wet Paint Risks
When I’m impatient and slap on another coat before the first has dried, the finish ends up tacky, uneven, or full of brush marks — and that’s how a supposedly quick refresh turns into a long redo.
I learn to wait. Tips I use:
- Check tackiness with a fingertip
- Follow manufacturer’s recoat time
- Control humidity and temperature
- Thin coats, not thick
- Use proper drying time
Uneven Finish
Frequently, rushing between coats is the quickest way to get an uneven, streaky finish on your cabinets — I’ve learned that impatience shows up as visible brush marks, lap lines, or blotchy sheen.
Take time to let each layer dry fully, follow manufacturer recoat times, and lightly sand between coats.
You’ll get a silky, consistent surface that reads professionally and holds up visually.
Poor Durability
That silky finish won’t stay that way if you hurry the curing process — I’ve learned the hard way that slapping on a topcoat before the previous layer has fully set invites chips, scratches, and peeling down the road.
I now wait properly and follow steps:
- Check manufacturer dry times
- Lightly sand between coats
- Work in stable temperature
- Thin coats, not thick
- Test adhesion on scrap
Applying Paint Too Thickly
I always tell clients not to glob paint on cabinets. Thick coats hide detail, drip, and take forever to dry, leaving sticky, uneven surfaces.
I recommend thin, even layers—multiple light passes build a durable, smooth finish. Use high-quality brushes or a fine spray, keep runs in check, and sand lightly between coats for that professional, furniture-like result your kitchen deserves.
Overlooking Edge and End Grain Sealing
After you’ve learned to lay down thin, even coats, don’t overlook the edges and end grain—those areas soak up paint and moisture differently and will betray even the nicest finish if you ignore them.
I seal them carefully; here’s what I focus on:
- Sand edges smooth
- Apply thin sealant
- Let cure fully
- Re-sand lightly
- Finish with topcoat
Skipping Deglossing or Chemical Prep on Glossy Surfaces
If you skip deglossing or a proper chemical prep on shiny cabinet faces, your paint can sheer off or peel within months.
I always recommend using a compatible deglosser or light chemical etch so the primer actually bonds to the surface. Trust me — a few minutes of proper prep saves you from sanding and repainting later.
Skip Deglossing Risks
Trust is easy to lose when paint peels off glossy cabinet doors, and that’s exactly what happens when I skip deglossing or a chemical prep on shiny surfaces.
I’ve learned the hard way—gloss resists adhesion. Quick risks I face (and warn you about):
- Flaking paint
- Visible brush marks
- Uneven sheen
- Shortened finish life
- Costly touch-ups
Chemical Prep Essentials
Start by tackling glossy surfaces with a proper chemical deglosser—I learned the hard way that sanding alone won’t cut it on factory finishes.
I rinse thoroughly, neutralize per product instructions, and dry before priming. Skipping this step risks peeling and adhesion failure.
Trust me: a clean, chemically-prepared surface saves time, gives a smoother topcoat, and keeps your cabinets looking professionally finished for years.
Not Allowing Adequate Drying and Curing Time
While rushing to reinstall doors and hardware might feel efficient, I’ve learned that skimping on drying and curing time almost always comes back to haunt you.
I wait patiently because finish durability matters.
Tips I follow:
- Check manufacturer cure times
- Keep humidity low and temperature steady
- Avoid heavy use for days
- Test a hidden spot before full wear
- Be patient; it pays off
Reinstalling Hinges and Hardware Before Paint Fully Cures
If you reinstall hinges or hardware before the paint has fully cured, you’ll likely nick the finish or leave impressions that show up as the paint hardens; I’ve seen perfectly painted doors ruined by a careless rehang.
I wait the full cure time, use soft pads under metal, and reattach carefully, aligning screws without forcing. Patience preserves a smooth, professional-looking result.
Forgetting to Protect Surrounding Surfaces
Around the cabinets I always lay down drop cloths and tape off countertops and floors—I’ve learned the hard way that paint splatters and dust travel farther than you expect.
I protect appliances, trim, and nearby décor, and I recommend:
- Cover appliances tightly
- Mask light switches and outlets
- Shield open shelves
- Protect flooring seams
- Use low-tack painter’s tape for edges
Neglecting Brush and Roller Quality
Protecting the room is only half the battle; I also pay close attention to my brushes and rollers because cheap tools will wreck a flawless finish.
I choose a high-quality angled sash brush for trim and a dense, shed-resistant roller for flat panels.
They lay down smooth, even coats, reduce brush marks, and save time. Replace worn tools between coats for best results.
Failing to Plan for Color and Finish Coordination
When I rush into picking a color or sheen without visualizing the whole room, I end up with cabinets that clash with countertops, hardware, or molding. I learned to test, compare, and commit thoughtfully.
- Sample paint next to countertops
- Check cabinet sheen with lighting
- Coordinate hardware finish
- Consider wall and trim tones
- Live with samples for days
Painting cabinets can feel overwhelming, but avoid those common missteps and you’ll get pro results. Did you know 72% of DIYers skip proper prep—and that’s the main reason paint fails sooner? I’ve learned that a little extra cleaning, sanding, and the right primer changes everything.
Trust me: take your time, label parts, protect surfaces, and use quality tools. You’ll love the finished look and save time (and money) down the road.


