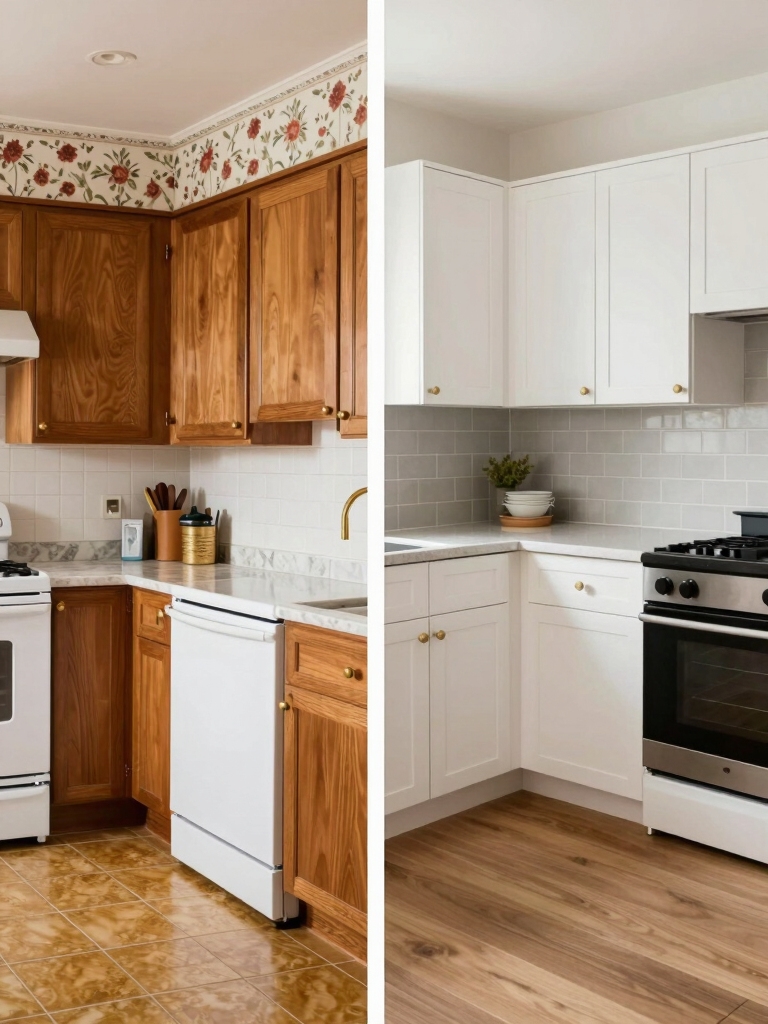
I stripped a 90s honey‑oak kitchen down to painted Shaker cabinetry, swapped floral wallpaper for a bold teal accent wall, and opened the galley into a brighter, more social plan.
I replaced ornate brass with matte black hardware, added a freestanding island, glass‑front cabinets, sleek integrated venting and energy‑smart appliances for quiet, efficient cooking. The result feels layered, modern‑vintage and lived‑in — keep going and I’ll show how each choice transformed function and feel.
From Honey Oak to Painted Shaker Cabinetry

I started by stripping away the heavy honey oak that dated the whole room and brought in painted Shaker cabinetry to give the kitchen a cleaner, more timeless backbone.
I chose muted creams and deep charcoal for contrast, swapped ornate hardware for simple brass pulls, and kept some original grain as warmth.
The result felt layered, modern-vintage, and instantly more purposeful without losing charm.
We focused on updates that refresh the space without major demolition, like refacing cabinets and replacing finishes for a big impact with minimal disruption and lasting value.
Swapping Floral Wallpaper for a Bold Accent Wall

I started by stripping the old floral wallpaper carefully, using patience and the right solutions so the drywall underneath stayed sound.
Then I picked a bold, vintage-inspired hue to make the wall sing against our new painted Shaker cabinets.
To finish, I added contrasting trim for a crisp, layered look that feels both modern and nostalgic.
Many readers love dramatic transformations, especially those showing striking kitchen before and after photos that highlight the impact of smart design choices.
Remove Wallpaper Carefully
Although the floral wallpaper had charm, I wanted a cleaner, bolder look, so I started by removing it carefully to protect the drywall beneath.
I scored the paper, applied a steaming solution, and peeled slowly, keeping a razor at the ready for stubborn seams.
Patch, sand, and prime followed—gentle steps that preserved texture and set the stage for the new focal wall.
Stunning transformations often begin with updated surfaces like painted or refinished cabinets, which can dramatically change a kitchen’s look with minimal demolition, especially when paired with a refreshed focal wall featuring cabinet makeovers.
Choose a Bold Color
How do you pick a color that replaces flowery busyness with confident personality? I walked the room, tested swatches in morning and artificial light, and settled on a deep teal that reads calm but lively.
It anchors vintage cabinetry, hides imperfections, and lets brass pop. Pick a shade that complements existing pieces, then commit—one bold wall transforms the whole kitchen.
Navy cabinets can also add depth to previously boring layouts and provide a dramatic backdrop for metallic accents and open shelving, creating a cohesive, modernized look with visual depth.
Add Contrasting Trim
Swap the floral wallpaper for a bold accent wall and then frame it with contrasting trim to give the room instant structure and character.
I painted deep teal and crisp cream trim to echo vintage moldings while keeping things fresh. The trim defines stations, hides imperfect edges, and elevates cabinetry.
It reads collected, not staged—small detail, big personality, and surprisingly easy to execute. Inspired by painted cabinet transformations, this approach updates a 90s kitchen without a full gut remodel.
Opening a Closed-Off Galley Into a Bright Open Plan

I tore down the narrow wall between the kitchen and dining room and suddenly the whole house breathed — light poured in, sightlines opened, and the cramped galley felt like a memory.
I kept vintage details—subway tile, warm wood—then introduced airy white cabinetry and a reclaimed island. Now gatherings flow, storage feels intentional, and the space reads timelessly modern with gentle nostalgia.
The remodel also embraced ranch-style principles like opening sightlines and bringing in more natural light with an open plan approach.
Replacing Brass Fixtures With Matte Black Finishes

I swapped the dated brass for matte black and immediately noticed the sharper visual contrast that made the whole space read cleaner and more intentional.
I chose matte black for its tougher finish and low-maintenance feel, so the kitchen will actually look newer longer.
I also matched the cabinet pulls and faucet so the hardware reads as a coordinated styling choice rather than a hodgepodge.
I hung pendant lights over the island to create instant drama and tie the look together with Pendant Lights Over Your Island.
Updated Visual Contrast
One bold change I made was replacing the kitchen’s shiny brass fixtures with matte black finishes to sharpen the room’s contrast and modernize its vintage bones.
That switch framed white subway tile, warm wood tones, and faded wallpaper, creating crisp negative space and deliberate accents.
It reads like curated patina: confident, restrained, and quietly graphic, pulling era and update into one cohesive glance.
Modern Durability Upgrade
Moving from the visual refresh to how the kitchen actually holds up, I swapped the fragile, high-shine brass for matte black fixtures that stand up to everyday use.
The new finishes resist fingerprints and scratches, feel substantial, and age gracefully.
They ground vintage elements without stealing the show, making routines smoother and giving this revamp a practical, timeless edge I rely on daily.
Coordinated Hardware Styling
Swap the gleam for a grounded matte black and you’ll see how hardware can quietly redefine the room.
I swapped tired brass for matte pulls, faucets, and hinges to anchor vintage cabinets without erasing their soul.
The result feels curated: contrast that reads intentional, modern lines that respect patina, and a cohesive silhouette that ties countertops, lighting, and trims into a calm, collected whole.
Introducing an Island Where There Was None

With the old peninsula cleared away, I decided to introduce a freestanding island that wouldn’t just fill the gap but change how we use the whole kitchen.
I picked a warm butcher-block top, painted its base a soft sage, and added seating for casual meals.
Benefits I love:
- extra prep surface
- hidden storage
- casual dining spot
- visual anchor that ties vintage and modern
Turning Carpeted Floors Into Durable Hardwood
After the island went in, the carpeted floors looked even more out of place, so I decided to replace them with hardwood that could stand up to kitchen life.
I chose wide-plank, wire-brushed oak with a warm patina—durable, forgiving, and just a touch worn-in.
It ties the vintage cabinets to modern appliances, cleans easily, and finally feels like a kitchen, not a living room.
Updating Formica Counters to Engineered Quartz
I ripped out the faded Formica and ordered engineered quartz as soon as the island was done—its seamless, low-maintenance surface felt like the practical upgrade this kitchen needed.
I chose a soft veining that nods to mid-century charm while staying fresh.
Benefits I noticed immediately:
- durable against scratches
- stain-resistant for busy mornings
- consistent color across slabs
- easy, modern cleanup that respects vintage bones
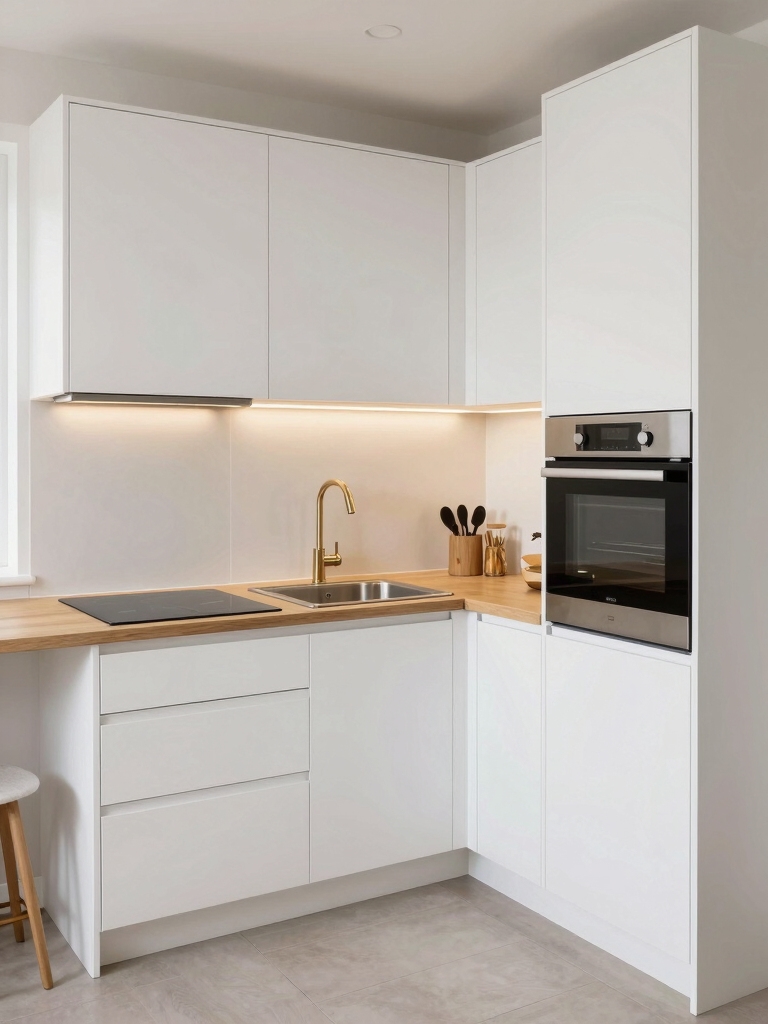
Adding Under-Cabinet Lighting for Task-Focused Glow
I’m excited to show how under-cabinet lighting can turn our retro-’90s kitchen into a functional, stylish space by exploring LED strips, puck lights, and low-profile fluorescents.
I’ll cover smart installation tips—placement, power access, and hiding wiring—so the glow looks intentional, not tacked on.
Then we’ll weigh control options like dimmers, motion sensors, and smart bulbs to get the right task-focused ambiance.
Types of Under-Cabinet Lighting
Usually I reach for under-cabinet lighting first when planning a 90s kitchen remodel because it transforms cluttered counters into a clear, usable workspace.
I pick fixtures by mood and function: LEDs for crisp task light, puck lights for focused spots, tape lights for seamless runs, and mini-fluorescents for soft vintage warmth.
- LEDs
- Puck lights
- Tape lights
- Mini-fluorescents
Installation Best Practices
After choosing the right fixtures—LEDs for crisp task light, pucks for focused spots, tape for seamless runs, or mini-fluorescents for vintage warmth—I’ll walk you through the practical steps that make under-cabinet lighting perform like it was always meant to: bright where you need it, discreet where you don’t.
I’ll plan spacing, hide wiring, mount securely, slope for glare prevention, and test before final trim.
Lighting Control Options
Let’s talk about how you’ll control that under‑cabinet glow so it works the way you cook — and lives — every day.
I added dimmers and smart switches to keep vintage charm but modern convenience. Think about scenes, timing, and simplicity.
- Dimmable LED strips
- Touch or rocker switches
- App or voice scenes
- Motion sensors for hands‑busy moments
Creating a Coffee Station From an Awkward Nook
I carved out an awkward corner of our 90s kitchen and turned it into a compact coffee station that feels both fresh and lived-in.
I installed a small counter, vintage mug hooks, and a narrow drawer for filters and spoons. A petite espresso maker, a scale, and jars of beans keep routine tidy. It’s cozy, efficient, and quietly charming.
Installing Shiplap and Open Shelving for Character
I added shiplap and open shelving to bring texture and display space to the room, and it immediately changed the kitchen’s mood from ordinary to intentional.
I kept lines clean, mixed worn wood with matte paint, and arranged pieces to feel collected not cluttered.
- layered textures
- curated ceramics
- accessible storage
- visual warmth
Transforming an Eat-In Kitchen Into a Breakfast Bar
I removed the cramped dining nook and opened the space to build a raised counter that now defines a cozy breakfast bar.
I picked stools that feel casual but tailored, and hung pendant lights to give the spot a warm, modern-vintage glow.
Let me show you how the seating, height, and lighting came together to make morning routines smoother and more stylish.
Removing the Dining Nook
Let’s open up the space: I stripped out the cramped eat-in nook and reimagined it as a streamlined breakfast bar that keeps the room social without hogging square footage.
I kept vintage charm with pared-back finishes and clever storage. Consider:
- Slim bench seating
- Open shelving for ceramics
- Pendant lighting for warmth
- Under-counter drawers for function
Installing a Raised Counter
After stripping out the eat-in nook, I wanted the new breakfast bar to feel airy yet grounded, so I raised the counter to create a deliberate separation between prep and social space.
I chose a warm walnut ledge atop a quartz apron, kept sightlines open, and added a subtle overhang for elbows. It reads modern-vintage: practical, inviting, and unexpectedly elegant.
Adding Casual Seating Lighting
To finish the breakfast-bar shift, I focused on lighting that feels casual but considered—think layers that invite lingering without shouting.
I added pendants with warm bulbs, under-counter strips for tasking, and a dimmer to shift mood.
The aim: approachable, vintage-tinged modernity that makes the counter a destination.
- Warm pendants
- Under-counter task light
- Dimmable control
- Accent wall wash
Bringing in Modern Appliances to Boost Efficiency
I swapped out the clunky white appliances for streamlined, energy-smart models and immediately felt the kitchen breathe easier; as someone who loves vintage charm, I wanted pieces that look at home in a 90s layout but work with today’s efficiency standards.
I chose matte finishes, quieter compressors, and smart ovens that blend into retro cabinetry, saving energy without sacrificing the room’s nostalgic soul.
Reconfiguring the Layout for Better Workflow
While keeping the kitchen’s 90s bones, I tore up the cramped flow and rebuilt zones that actually make sense for how I cook today.
I moved prep near the sink, created a clear cook-to-serve path, and carved a cozy breakfast nook.
Small shifts made a huge difference:
- Prep zone beside sink
- Dedicated baking drawer
- Clear cook-to-serve corridor
- Open landing spaces for plating
Incorporating Glass-Front Cabinets to Showcase Dishware
After opening up the flow and carving out purposeful work zones, I wanted the cabinets to say something about who uses the kitchen.
I added glass-front doors with thin muntins, vintage-inspired glass, and warm interiors to display heirloom plates and everyday ceramics.
It feels curated but lived-in, letting light and texture animate shelves while keeping storage tidy and intentional.
Replacing Bulky Hood Vents With Sleek Integrated Venting
We peeled away the bulky, dated hood and brought in a low-profile, integrated vent that keeps the room feeling open without sacrificing performance.
I love how it hides in cabinetry, amplifies vintage tiles, and improves airflow. Consider these benefits:
- streamlined silhouette
- quieter operation
- better ventilation
- cohesive aesthetic
It’s a small swap that modernizes while honoring the kitchen’s retro charm.
I’m honestly thrilled by how these 90s kitchens transformed — like a vinyl record getting remastered for a streaming playlist, they feel familiar yet utterly refreshed.
Seeing honey oak swapped for painted Shaker, floral paper traded for a bold wall, and brass replaced by matte black proves thoughtful updates can honor the past while embracing now.
If you’re tackling a remodel, start with layout and lighting — the rest will fall into place beautifully.