Here’s how I tackle 19 kitchen countertop organization musts to achieve a Pinterest-worthy space. I start by identifying daily zones, declutter with intent, and choose containers that fit my workflow. I maximize vertical storage, use clear labeled canisters for staples, and add a mini reveal shelf for decor. I design a smooth prep-to-cleanup flow and opt for budget-friendly upgrades with quick payoff. Stick with me for more tips you’ll love implementing next.
Identify Daily Zones for Countertop Use

To identify daily zones for countertop use, start by listing the tasks you perform most often in the kitchen and when you use them. I map these tasks to specific areas, placing essential tools nearby. I keep surfaces clear, label zones, and adjust as routines evolve. This practical approach helps you create an organized, inviting, stress-free workspace. Incorporating smart cabinet organization can further enhance your efficiency and maintain a clutter-free environment.
Declutter First: Decide What Truly Stays Out

I start by decluttering with intent, deciding what truly belongs on my countertop and what can live elsewhere.
I’ll separate daily essentials from rarely used items, so only the must-haves stay out.
Let’s keep it practical: clear the surface, then regroup daily items for easy reach and storage for the rest. Utilizing space saving ideas can also help maximize your countertop while keeping it organized and functional.
Declutter With Intent
Decluttering with intent starts with a clear yes or no for each item you consider, and the easiest way to do that’s to decide what truly stays out.
I guide you to categorize by use, frequency, and joy. Keep only essentials visible; tuck the rest away. Additionally, consider implementing clever small kitchen storage solutions to maximize the space you have while keeping surfaces tidy.
Choose purpose over impulse, then maintain with quick, daily wipes and checks.
Separate Daily vs. Rarely Used
Separating daily items from rarely used ones makes the decision immediate and clear: daily essentials stay out where I reach them, while infrequently used things get tucked away or reorganized. I assess what truly earns space, discard the rest, and label zones for quick access. This practical split keeps counters calm, functional, and inviting, reducing clutter and boosting efficiency daily. Additionally, organizing kitchen items by frequency helps streamline your workflow and enhances the overall aesthetic of your kitchen.
Choose Containers That Fit Your Workflow

I tailor containers to how you work, not the other way around.
I’ll help you pick right-sized options that keep what you use most close at hand.
Let’s start by matching your workflow to simple, efficient choices that cut clutter and boost speed. Additionally, utilizing smart cabinet organization can further enhance your kitchen’s functionality and aesthetics.
Match Your Workflow
To match your workflow, choose containers that fit how you actually work in the kitchen, not just what looks neat on a shelf.
I organize by task: daily staples within arm’s reach, fragile items near safe surfaces, and bulk ingredients grouped for quick access.
Practical labels and consistent sizes reduce clutter, save time, and keep your prep flow smooth. Additionally, utilizing kitchen organization techniques can further enhance your efficiency and space utilization.
Right-Sized Containers
Right-sized containers aren’t just about looks; they’re about your workflow.
I choose containers that fit how you use the space, not what’s trendy. Keep lids tight but accessible, labels clear, and sizes matched to common items.
Avoid overstock; group by frequency. When a container supports routine tasks, cleanup becomes quick, decision-free, and your counters stay calm and organized. Additionally, consider utilizing smart tips for organizing that can enhance your kitchen’s functionality and aesthetics.
Maximize Vertical Storage With Wall Solutions

Wall-mounted shelves and a pegboard setup instantly free up counter space while keeping frequently used items within easy reach. I show you practical wall solutions that streamline workflow, maximize vertical storage, and reduce clutter without sacrificing accessibility. Incorporating smart wall organization can further enhance your kitchen’s efficiency and aesthetic appeal.
Here are four ideas to begin:
- Install staggered shelves
- Add a pegboard with labeled hooks
- Use magnetic strips for metal tools
- Hang collapsible racks
Use Clear, Labeled Canisters for Staples

I like using clear, labeled canisters so I can see exactly what’s inside, no guessing needed.
When each canister is labeled and the style is consistent, you’ll notice how quickly staples stay organized and accessible.
Clear jars also show off the contents, reminding us of what we actually have and what we need to restock.
Clearly Labeled Canister Styles
If you want quick access to staples, start with clear, labeled canisters so you can see contents at a glance and know exactly what you’re grabbing.
I’ll share canister styles that stay tidy and readable.
- Square jars for space efficiency
- Wide-mouthed options for easy scooping
- Transparent acrylic with bold labels
- Chalkboard lids for quick updates
Visible Organization Benefits
Using clear, labeled canisters for staples makes visible organization effortless: when you can see exactly what you have, you grab the right item faster and avoid overbuying.
I notice everything at a glance, which reduces rummaging and hesitation. Your countertop stays tidy, inspiring, and easy to maintain.
With consistent labeling, upkeep becomes simple, predictable, and genuinely satisfying for daily use.
Group Appliances by Function and Frequency
Grouping appliances by function and how often you use them makes your countertop workflow smoother and your space feel calmer.
I group items by purpose, then by frequency, so I can grab what I need without sifting. Here’s how:
- Daily favorites within reach
- Weekly-use appliances nearby
- Seasonal or occasional tools tucked away
- Specialty gadgets grouped together nearby
Create a Coffee and Tea Station That Feels Intentional
I’ll show you how to craft a coffee and tea station that feels intentional by grouping essentials for quick, daily access.
Picture a focused setup—glass jars for loose tea, a single canister for coffee, and a small tray for sugar and spoons—so everything has a place.
Let’s discuss simple rules to keep it tidy, practical, and inviting for every cup you make.
Intentional Coffee Station
To create an intentional coffee station, I start by choosing a compact, dedicated spot on the counter where every item has a purpose and a place.
I keep essentials visible, minimize clutter, and group by function.
- Clear mug rack within reach
- Ground coffee, beans, and filters organized
- Compact grinder and kettle ready to go
- Small canister for sugar and spoons
Tea Time Organization
I carve out a small, dedicated spot on the counter where tea essentials have a clear home, everything within easy reach, and nothing left to guess about.
I group mugs, infusers, and sweeteners in labeled containers, keeping loose items tucked away.
I rotate everyday favorites, use a small tray for brewing tools, and maintain tidy lines for a calm, intentional tea routine.
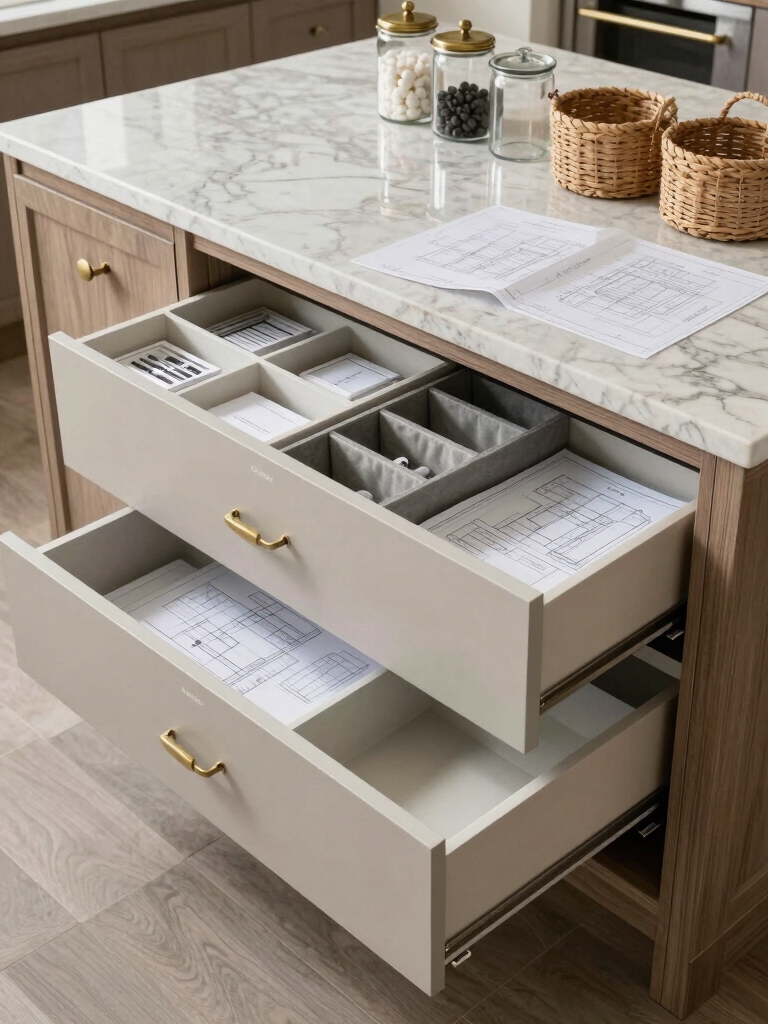
Designate a Home for Utensils, Knives, and Tools
Set up a dedicated drawer or tray for utensils, knives, and tools right where you prep or cook most often, so everything you reach for is easy to grab and easy to put away.
I organize with:
- clear placement
- magnetic strips
- labeled bins
- roll-up sleeves for prep mood
Create a Snack and Grab-and-Go Zone
If you’ve got utensils and tools neatly corralled, it’s natural to extend that order to snacks and grab-and-go items.
I keep a dedicated zone with clear, labeled containers and a small basket for quick options.
I rotate contents weekly, tuck away bulky wrappers, and place a reusable bag nearby.
The result: simple, inviting access without clutter.
Add Pull-Out Trays for Easy Access
I’m a big fan of slim pull-out trays for corner and under-sink spots, because they make every item easy to reach.
By installing them, you maximize accessibility and keep your countertops clear.
Let’s outline the best sizes and mounting options so you can start organizing with precision.
Install Slim Pull-Out Trays
Installing slim pull-out trays is one of the quickest ways to boost cabinet access, so you can see and reach every item without digging through clutter.
I walk you through setup, layout, and tips for smooth operation.
- Measure cabinet width and height precisely.
- Choose slim, sturdy rails with soft-close.
- Install base supports evenly.
- Label sections for quick picking.
Maximize Accessibility Benefits
Maximizing accessibility is simple with pull-out trays: they turn hard-to-reach items into front-and-center essentials you can grab in a flash.
I place daily-use tools at eye level, label sections, and keep zones distinct.
With smooth slides, I glide trays out, grab what I need, and reload efficiently.
This setup minimizes rummaging and enhances countertop calm, everyday.
Manage Cords and Appliances With Smart Styling
Keeping cords tamed and appliances in place is easier when you design a simple system you can stick with, so let’s start with three quick steps: group cords by outlet, use cord concealers or wraps to hide and shorten them, and assign a dedicated station for each appliance.
- Create a central hub for frequently used devices.
- Label cords at the outlet ends.
- Use vertical organizers for excess length.
- Store rarely used items out of sight.
Elevate Look With Cohesive Materials and Colors
When you unify materials and colors, your kitchen feels calm and intentional instead of busy or random.
I choose finishes and textures that complement each other—granite, quartz, wood, and matte metals—so countertops, backsplashes, and storage feel cohesive.
You’ll group similar tones, limit palettes, and avoid clutter.
This simple harmony boosts efficiency, confidence, and that Pinterest-worthy vibe, every single day.
Lighting That Highlights Your Organization
Planning your lighting around how you actually use the space keeps your organized countertops looking intentional.
I’ll guide you to shine efficiently without glare, so tasks stay clear and cabinets feel calm.
Here’s how:
- Use under-cabinet LEDs for task visibility
- Add dimmers to adapt brightness
- Favor cool white bulbs for crisp accuracy
- Keep key accents highlighted with spot lighting
Stylish Yet Practical Labels
Labels aren’t just for looks; they’re practical shortcuts that save time and keep you organized.
I choose labels that blend with my décor and add quick cues for the whole family. I favor legible fonts, clear wording, and consistent sizes.
Stocked with matte labels, chalkboard slips, or glass jars, they streamline routines without cluttering counters. Practical, stylish continuity shines.
Integrate a Small Cleaning Zone for Quick Tidying
I’ve found that a compact cleaning zone makes quick work of daily tidy-ups, and it fits right beside the labeled spots I already love.
I organize a small caddy with essentials, designate a wipe station, keep microfiber cloths handy, and store trash bags nearby.
1) Caddy
2) Wipes
3) Cloths
4) Bags
Include a Mini Reveal Shelf for Decor
A mini reveal shelf adds a simple, stylish focal point to your countertop while keeping small decor items within easy reach.
I tuck a few favorite pieces here—a vase, a candle, or a framed note—so they feel intentional, not cluttered.
This shelf whispers organization, guiding you to swap accents seasonally without crowding work zones.
Practical, calm, inviting.
Design a Motion-Friendly Prep-to-Cleanup Flow
We’ll carry that calm, intentional vibe from the mini reveal shelf into a motion-friendly prep-to-cleanup flow by mapping steps that keep your hands free and your space clear.
- Prep zones: designate action areas for washing, cutting, and stacking.
- Clear passages: move items directly to waste or compost without looping.
- Tools on cue: hang frequently used tools within arm’s reach.
- Cleanup loop: rinse, wipe, and return in one smooth motion.
Budget-Friendly Upgrades With Quick Payoff
If you’re on a budget, you don’t have to skip big wins: small upgrades can pay off fast and make a tangible difference in how your kitchen feels and functions.
I’ll share practical, low-cost tweaks: labeled storage, clear canisters, a magnetic knife strip, under-cabinet lighting, and adhesive shelf liners.
Quick payoff, organized setup, and fewer countertop clutter hotspots for daily ease.
Maintain Pinterest-Worthy Counters With a Monthly Routine
Maintaining Pinterest-worthy counters is easier than you think with a simple monthly routine that fits into real life.
I’ll guide you through a practical, friendly cadence that keeps surfaces clear and stylish.
- Do a 10-minute declutter first week each month
- Wipe and polish weekly for shine
- Tidy daily after prep and meals
- Review tools and labels monthly, discard duplicates
Conclusion
I’ve seen it again and again: a simple, organized countertop lowers stress and boosts creativity, not to mention speed in weekday mornings. Here’s a striking stat to picture: households with clearly labeled canisters waste 28% less food, because it’s easier to grab what you need and finish a task quickly. So start small—declutter, label, and verticalize. Your space will feel more inviting, practical, and Pinterest-worthy, without becoming a full-time project. You’ve got this—let’s blissfully tidy.