I’ve mapped out 20 outdoor kitchen layouts that prioritize smooth workflow, from compact single-wall setups to inviting U-shaped designs. I focus on clear work zones (prep, cook, serve), smart traffic patterns, and durable materials for outdoors. I’ll help you weigh space, sun, slope, and views, plus budget considerations and future-proofing. Each option centers on minimizing steps and maximizing social flow. Stick with me, and you’ll pick a layout that fits your site and lifestyle. You’ll get actionable nuances and clear next steps.
How to Pick the Right Outdoor Kitchen Workflow for Your Site

Choosing the right outdoor kitchen workflow starts with your site and how you cook.
I’ll help you map zones for prepping, cooking, and serving, then balance traffic flow and safety.
We’ll consider weather, shade, and grill placement, plus storage access.
Incorporating simple outdoor kitchen ideas can enhance both functionality and aesthetics, making your cooking experience more enjoyable.
I’ll keep pathways clear, tools handy, and cleanup simple, so your setup works smoothly from day one.
Single-Wall Layouts for Compact Spaces

Single-wall layouts are a fit-and-forget solution when space is tight. I design this setup to maximize efficiency, keeping essentials within reach and reducing steps.
You’ll minimize clutter with smart workflows and compact appliances. Let me share quick, practical pointers:
- Place grill, sink, and prep zone in a straight line
- Use vertical storage to save counter space
- Choose multipurpose tools to cut waste
- Plan easy-access trash and recycling nearby
Additionally, consider integrating compact appliances to further enhance your outdoor cooking experience without sacrificing space.
Galley Layouts for Tight Sites

Galley layouts are ideal when space is narrow but workflow still matters. I design compact kitchens with two parallel counters, so prep, cooking, and cleaning flow in a straight line.
I emphasize defined zones, drawer access, and uninterrupted traffic paths. I avoid wasted steps by aligning appliances, trash, and prep surfaces. Incorporating open-feeling designs can also enhance the overall kitchen experience.
If you’re tight on room, this keeps everything reachable and efficient.
L-Shaped Kitchens That Extend Dining Areas

I’ll show how an L-shaped layout can extend the dining area, creating a natural flow from prep to seating. We’ll prioritize space for seating and maintain a clear Functional Work Triangle to keep tasks smooth. Let’s discuss how these elements work together to extend dining flow without crowding the outdoor kitchen. Incorporating L-shaped kitchen designs can significantly enhance both functionality and aesthetic appeal in your outdoor space.
Extend Dining Flow
When you’re designing an L-shaped outdoor kitchen, extending the dining flow means the cooking area naturally leads to meals and conversations on the patio.
- Create a direct sightline from stove to table for quick interaction
- Align counter depth with dining seating to facilitate serving
- Place prep zones near dining to minimize steps
- Use consistent materials for cohesive outdoor appeal
- Consider incorporating stylish outdoor kitchens that enhance both functionality and aesthetics in your design.
Space for Seating
Space for seating in an L-shaped kitchen that extends the dining area should feel natural and inviting, not cramped.
I design with close, comfortable sightlines and flexible seating options. Choose counter-height stools or a casual banquette to keep conversations flowing.
Plan legroom and aisle widths so guests mingle without blocking prep zones. Keep the area visually cohesive with cohesive materials. Incorporating stunning outdoor kitchen designs can enhance the overall aesthetic and functionality of your space.
Functional Work Triangle
In an L-shaped layout that extends the dining area, the functional work triangle stays the backbone of efficiency: the sink, the stove, and the refrigerator should form a comfortably sized triangle that minimizes steps between zones.
- Place paths that connect all three stations without crossing
- Keep the refrigerator accessible from prep and serving zones
- Allow 36–48 inches of clearance around counters
- Prioritize short, direct routes over fancy layouts
Additionally, incorporating Big Green Egg outdoor kitchens can enhance your cooking experience while maintaining an efficient layout.
U-Shaped Plans for Multi-Zone Cooking

A U-shaped layout helps me keep the flow between zones—prep, cooking, and entertaining—within easy reach. I center the design on a versatile prep hub that serves as the spine of the setup, so everything you need is just steps away. Let’s explore how the surrounding counters and work zones support multi-zone cooking and smooth shifts for your space. Additionally, incorporating L-shaped layouts can further enhance the efficiency of your outdoor kitchen by maximizing corner space.
Flow Between Zones
Flow between zones in a U-shaped outdoor kitchen keeps cooking, prep, and cleanup moving smoothly.
I design the flow to minimize steps, reduce backtracking, and keep tools within reach. Think in zones, not chaos, and test pathways before final setup.
- Align prep, cooking, and cleaning areas with clear sightlines
- Place trash and recycling near, but not in, the main work line
- Make certain counter depth supports generous utensils and small appliances
- Create gentle traffic patterns to avoid cross-traffic during peak use
Central Prep Center
A central prep center in a U-shaped plan brings the work into a focused hub, where chopping, seasoning, and assembling meals stay efficient and close at hand.
I design it to minimize movement, with prep, tools, and trash within reach. Zones flow together, reducing steps.
I keep counters clear, storage handy, and a confident rhythm for smooth multi-zone cooking.
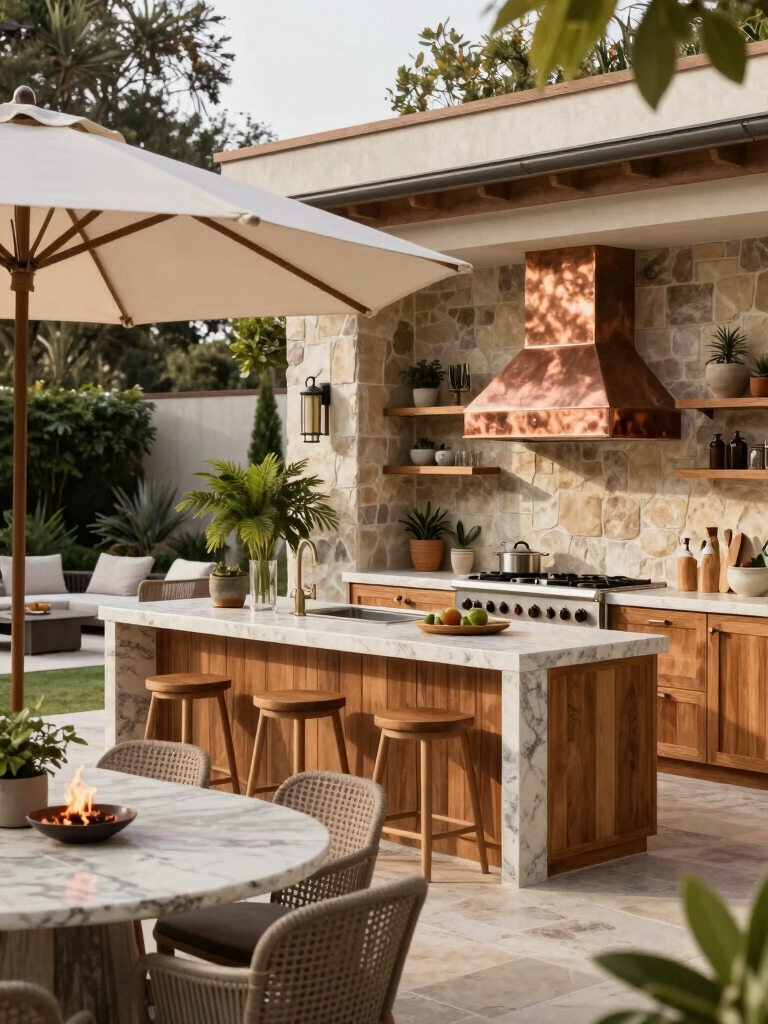
Island-Centered Designs That Invite Social Cooking
An island-centered kitchen instantly invites social cooking, because its layout brings guests into the action rather than keeping them on the periphery.
I design around interaction, accessibility, and flow, so chats happen as meals form, not after.
Here’s how to captivate guests without crowding prep:
- keep seating within easy reach of hot zones
- place prep surfaces for quick dialogue
- guarantee tool storage stays visible
- use lighting that invites lingering, not glare
Peninsula Setups for Partial Separation
Peninsula setups offer partial separation without closing off the space, and I’ll show you how to use that flow to your advantage.
I focus on Partial Shelter Flow to keep guests sheltered yet open to the cooking zone, while the Seamless Work Triangle stays intact for efficient prep, cooking, and cleanup.
Let’s talk about arranging counters and seating so the peninsula reads as a natural divider, not a barrier, keeping traffic smooth and the outdoor kitchen still social.
Partial Shelter Flow
When you’re designing a partial shelter flow with a peninsula setup, you’ll find that the peninsula acts as a natural divider while keeping everything within easy reach.
I’ll share practical tips you can use today to balance shelter, airflow, and work zones without overbuilding.
- Define clear prep and cooking zones under partial cover
- Use shading and rain protection strategically
- Align storage with primary prep spots
- Maintain open sightlines for safety and flow
Seamless Work Triangle
Seamless work flows come naturally when your peninsula acts as a smart hub rather than a barrier.
I design the space to keep the sink, prep area, and grill in a tight triangle, with the peninsula reducing distance and guiding traffic.
You’ll move smoothly, waste fewer steps, and maintain safety.
Plan angles and clear zones, then test, adjust, refine.
Zone-Based Layouts: Prep, Cook, and Serve Zones
Zone-based layouts divide outdoor kitchens into prep, cook, and serve areas to keep flow smooth and tasks clearly separated.
I design spaces by function, saving steps and reducing cross-traffic. You’ll gain efficiency with purpose-built zones, ergonomic work heights, and smart storage.
- Define distinct zones for prep, cooking, and serving
- Position sink, counter space, and trash near prep
- Place grill, burners, and tools near cook zone
- Establish a clear traffic pattern and seating access
Linear Vs Curved Island Options for Flow
Are you weighing a linear versus curved island to optimize flow? I’ll break down fit, function, and pace.
A linear setup streamlines prep and service, with clear work zones and easy traffic.
A curved island invites social interaction and multitasking, but may widen movement paths.
Choose based on space, traffic patterns, and how you cook, entertain, and clean.
Outdoor Kitchen With Built-In Dining Integration
Built-in dining gives your outdoor kitchen a true social hub, pairing prep zones with an integrated seating area so guests can stay in the conversation while you work.
I design it for flow, durability, and ease, so conversations stay lively without clutter.
- Maximized seating without crowding the prep line
- Built-in lighting for after-sunset meals
- Weather‑resistant materials that simplify care
- Flexible table legs to adapt to gatherings
From Prep to Grill: Planning Smooth Traffic Paths
When planning outdoor prep and grilling workflows, the key is a clear path from station to station that keeps traffic smooth and safe.
I map the sequence: prep to grill, tools within reach, work zones sized for one person, and clear sight lines.
I avoid backtracking, minimize steps, and mark zones with distinct edges to prevent collisions.
Storage-Focused Layouts: Cabinets, Fridges, and Waste
Storage-focused layouts keep the essentials within arm’s reach, so I design cabinets, fridges, and waste stations to work together as a streamlined unit.
I prioritize visibility, accessibility, and tidy spacing. This keeps prep moving and chores predictable.
- Cabinets near prep for quick reach
- Fridge placement beside prep for cold access
- Waste and recycling stations near cleanup
- Hidden wiring and outlets for clean surfaces
Appliances by Design: Grill, Smoker, and Chill Zones
Designing the outdoor kitchen around three zones—grill, smoker, and chill—keeps cooking smooth and enjoyable.
I arrange appliances by role: the grill for high-heat searing, the smoker for low-and-slow flavor, and a chill station for prep and cooling.
This layout minimizes walking, clarifies workflows, and keeps everything within reach, so setup, cook, and service stay efficient.
Weather-Ready Layouts: Shade, Wind, and Rain Considerations
Shade, wind, and rain heavily influence how I lay out an outdoor kitchen, so I design with protection in mind first and function second.
I’ll share practical, concise choices that keep flow intact.
- Cover zones for prep and seating
- Position grills and coolers away from prevailing winds
- Use shelter and windbreaks without crowding
- Plan drains and slope for rain runoff
Lighting and Power Planning for Night Entertaining
Tonight’s lighting plan matters, and I’ll walk you through the core layers you’ll want: ambient, task, and accent lighting that still looks cohesive with your outdoor kitchen.
I’ll also map out power basics, from outlets to a simple run of cable and a safe, weatherproof setup so you can run the gadgets you need without fuss.
Let’s start by nailing where you’ll place each layer and how to keep everything organized for easy, night-time entertaining.
Nighttime Lighting Layers
Nighttime lighting isn’t just about bright bulbs; it’s about layering purpose, safety, and mood so your outdoor kitchen shines from prep to plating.
I’ll share practical layers you can apply tonight.
- Task lighting over prep areas for accuracy
- Ambient glow along paths and seating for safety
- Accent lighting to highlight textures and features
- Dimmed zones to control mood and focus
Powering Outdoor Kitchens
Powering an outdoor kitchen blends lighting with power planning so night entertaining goes smoothly from prep to plating.
I map outlets where appliances sit, plan GFCI zones, and reserve some power for new gear.
Lighting guides visibility, safety, and mood, while weatherproofed fixtures survive.
I group tasks, keep cords tidy, and test circuits before guests arrive for a seamless flow.
Water and Plumbing Placements That Simplify Cleanup
Water and plumbing placements can make cleanup feel effortless, so I’ll outline practical layouts that minimize steps and mess.
- Place sink near grill and prep zone for quick rinses.
- Create one-way flow from dirty to clean areas to avoid backtracking.
- Install a dedicated drain/library hook for quick disposal.
- Include a compact utility cabinet for hoses and brushes.
Durable Materials for Outdoors and Aging Surfaces
Choosing durable materials for outdoor use and aging surfaces means thinking long term.
I prioritize weather resistance, slip safety, and low maintenance. Think concrete, stone, stainless, porcelain, and treated wood with proper sealants.
I’ll favor hidden fasteners and easy-clean finishes. Plan for UV fading and temperature swings, and pick surfaces that mix well with appliances.
Durability saves headaches and expands your outdoor kitchen’s life.
Budget-Aware Layouts: Maximizing Value
Budget-aware layouts maximize value without sacrificing function.
I design with you in mind, prioritizing practical steps over fancy extras, so you get a capable space without waste.
We’ll balance cost, durability, and flow, choosing versatile elements that serve multiple tasks.
Let’s keep it simple, effective, and easy to maintain.
- Prioritize multi-use components
- Choose durable, affordable materials
- Optimize work triangle on a budget
- Plan for scalable, modular updates
Site Constraints: Slope, Sun, and Views
I’ll start with how slope shapes access, then show how it guides where we place the kitchen and paths.
Sun exposure and views drive decisions about orientation and screening, so we’ll match heat, shade, and sightlines to your wants.
Together we’ll map a plan that respects each constraint while keeping the layout practical and inviting.
Slope Impacts Access
Slope can shape how you move and work in an outdoor kitchen, so I’ll start by noticing the terrain and how it affects access.
I’ll speak plainly about practical adjustments you can make now, without fluff, to keep flow steady and safe.
- Check grade and footing for wheelchairs or carts
- Place prep near stairs or ramps for easy reach
- Use level, non-slip surfaces in high-traffic zones
- Align work zones with existing paths to minimize turns
Sunlight and Views Plan
Sunlight and Views Plan: I’ll map how the sun moves across your site and where you’ll want the best sightlines for cooking, dining, and entertaining, all while keeping shade comfortable on hot days.
I assess slope, vantage points, and wind patterns, then place zones for cooking, prep, and seating to maximize efficiency, comfort, and visual access throughout the outdoor kitchen.
How to Choose Your Final Layout: a Decision Framework
So, how do you pick the final outdoor kitchen layout without getting overwhelmed?
I use a simple decision framework: define priorities, map tasks, test a flow, and finalize with flexibility.
Here are practical steps:
- Identify must-haves and nice-to-haves
- Sketch a functional work triangle
- Stage workflows before committing
- Allow room for future tweaks
Conclusion
If you’ve stuck with me this far, you’re close to a game-changing call. Picture your site, your crew, your favorite tools, all moving like clockwork. The right layout isn’t just space—it’s momentum. I’ll let you in on a secret: the best choice answers 3 questions you’ll actually use when you’re grilling, cleaning, and entertaining. Ready to decide? Trust the flow that fits your slope, sun, and views, and you’ll reveal smooth, effortless outdoor living.